flutter_quill 5.2.6  flutter_quill: ^5.2.6 copied to clipboard
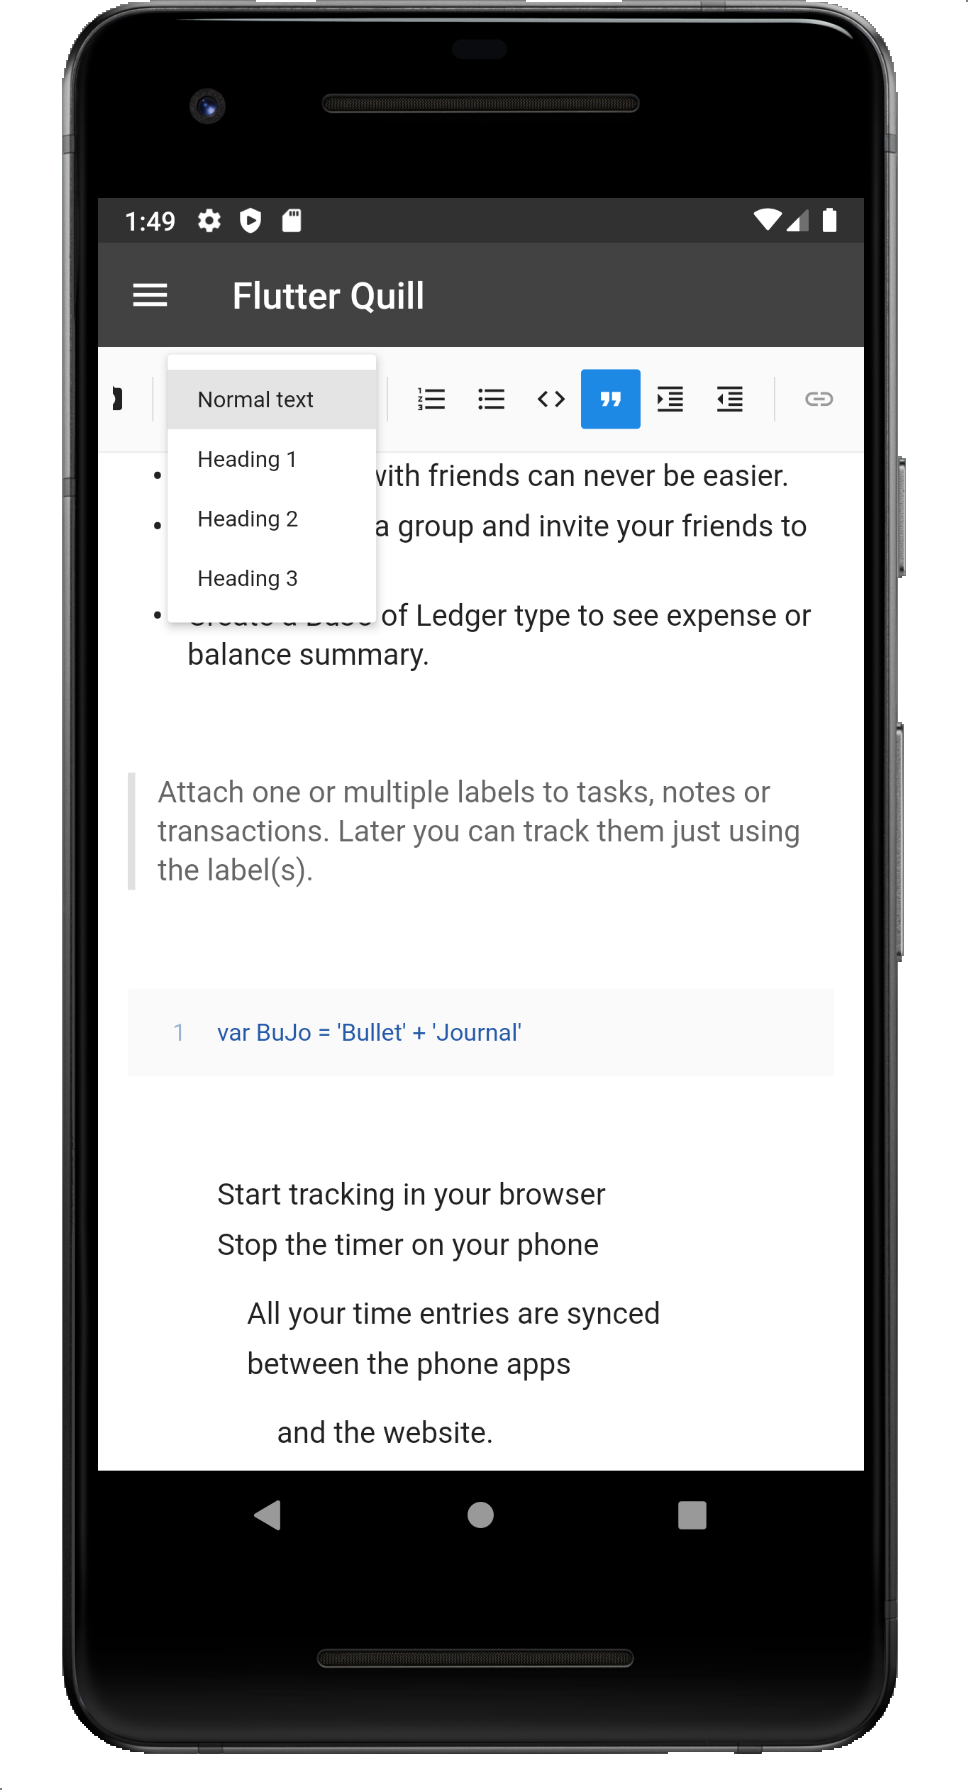
A rich text editor supporting mobile and web (Demo App @ bulletjournal.us)

A rich text editor for Flutter
![]()
![]()


FlutterQuill is a rich text editor and a Quill component for Flutter.
This library is a WYSIWYG editor built for the modern mobile platform, with web compatibility under development. Check out our Youtube Playlist or Code Introduction to take a detailed walkthrough of the code base. You can join our Slack Group for discussion.
Demo App: https://bulletjournal.us/home/index.html
Pub: https://pub.dev/packages/flutter_quill
Usage #
See the example directory for a minimal example of how to use FlutterQuill. You typically just need to instantiate a controller:
QuillController _controller = QuillController.basic();
and then embed the toolbar and the editor, within your app. For example:
Column(
  children: [
    QuillToolbar.basic(controller: _controller),
    Expanded(
      child: Container(
        child: QuillEditor.basic(
          controller: _controller,
          readOnly: false, // true for view only mode
        ),
      ),
    )
  ],
)
Check out Sample Page for advanced usage.
Input / Output #
This library uses Quill as an internal data format.
- Use
_controller.document.toDelta()to extract the deltas. - Use
_controller.document.toPlainText()to extract plain text.
FlutterQuill provides some JSON serialisation support, so that you can save and open documents. To save a document as JSON, do something like the following:
var json = jsonEncode(_controller.document.toDelta().toJson());
You can then write this to storage.
To open a FlutterQuill editor with an existing JSON representation that you've previously stored, you can do something like this:
var myJSON = jsonDecode(incomingJSONText);
_controller = QuillController(
          document: Document.fromJson(myJSON),
          selection: TextSelection.collapsed(offset: 0));
Web #
For web development, use flutter config --enable-web for flutter or use ReactQuill for React.
It is required to provide EmbedBuilder, e.g. defaultEmbedBuilderWeb.
Also it is required to provide webImagePickImpl, e.g. Sample Page.
Desktop #
It is required to provide filePickImpl for toolbar image button, e.g. Sample Page.
Configuration #
The QuillToolbar class lets you customise which formatting options are available.
Sample Page provides sample code for advanced usage and configuration.
Font Size #
Within the editor toolbar, a drop-down with font-sizing capabilities is available. This can be enabled or disabled with showFontSize.
When enabled, the default font-size values can be modified via optional fontSizeValues. fontSizeValues accepts a Map<String, String> consisting of a String title for the font size and a String value for the font size. Example:
fontSizeValues: const {'Small': '8', 'Medium': '24.5', 'Large': '46'}
Font size can be cleared with a value of 0, for example:
fontSizeValues: const {'Small': '8', 'Medium': '24.5', 'Large': '46', 'Clear': '0'}
Font Family #
To use your own fonts, update your assets folder and pass in fontFamilyValues. More details at this change, this article and this.
Custom Buttons #
You may add custom buttons to the end of the toolbar, via the customButtons option, which is a List of QuillCustomButton.
To add an Icon, we should use a new QuillCustomButton class
    QuillCustomButton(
        icon:Icons.ac_unit,
        onTap: () {
          debugPrint('snowflake');
        }
    ),
Each QuillCustomButton is used as part of the customButtons option as follows:
QuillToolbar.basic(
   (...),
    customButtons: [
        QuillCustomButton(
            icon:Icons.ac_unit,
            onTap: () {
              debugPrint('snowflake1');
            }
        ),

        QuillCustomButton(
            icon:Icons.ac_unit,
            onTap: () {
              debugPrint('snowflake2');
            }
        ),

        QuillCustomButton(
            icon:Icons.ac_unit,
            onTap: () {
              debugPrint('snowflake3');
            }
        ),
    ]
Custom Size Image for Mobile #
Define mobileWidth, mobileHeight, mobileMargin, mobileAlignment as follows:
{
      "insert": {
         "image": "https://user-images.githubusercontent.com/122956/72955931-ccc07900-3d52-11ea-89b1-d468a6e2aa2b.png"
      },
      "attributes":{
         "style":"mobileWidth: 50; mobileHeight: 50; mobileMargin: 10; mobileAlignment: topLeft"
      }
}
Custom Embed Blocks #
Sometimes you want to add some custom content inside your text, custom widgets inside of them. An example is adding notes to the text, or anything custom that you want to add in your text editor.
The only thing that you need is to add a CustomBlockEmbed and map it into the customElementsEmbedBuilder, to transform the data inside of the Custom Block into a widget!
Here is an example:
Starting with the CustomBlockEmbed, here we extend it and add the methods that are useful for the 'Note' widget, that will be the Document, used by the flutter_quill to render the rich text.
class NotesBlockEmbed extends CustomBlockEmbed {
  const NotesBlockEmbed(String value) : super(noteType, value);

  static const String noteType = 'notes';

  static NotesBlockEmbed fromDocument(Document document) =>
      NotesBlockEmbed(jsonEncode(document.toDelta().toJson()));

  Document get document => Document.fromJson(jsonDecode(data));
}
After that, we need to map this "notes" type into a widget. In that case, I used a ListTile with a text to show the plain text resume of the note, and the onTap function to edit the note.
Don't forget to add this method to the QuillEditor after that!
Widget customElementsEmbedBuilder(
  BuildContext context,
  QuillController controller,
  CustomBlockEmbed block,
  bool readOnly,
  void Function(GlobalKey videoContainerKey)? onVideoInit,
) {
  switch (block.type) {
    case 'notes':
      final notes = NotesBlockEmbed(block.data).document;

      return Material(
        color: Colors.transparent,
        child: ListTile(
          title: Text(
            notes.toPlainText().replaceAll('\n', ' '),
            maxLines: 3,
            overflow: TextOverflow.ellipsis,
          ),
          leading: const Icon(Icons.notes),
          onTap: () => _addEditNote(context, document: notes),
          shape: RoundedRectangleBorder(
            borderRadius: BorderRadius.circular(10),
            side: const BorderSide(color: Colors.grey),
          ),
        ),
      );
    default:
      return const SizedBox();
  }
}
And finally, we write the function to add/edit this note. The showDialog function shows the QuillEditor to edit the note, after the user ends the edition, we check if the document has something, and if it has, we add or edit the NotesBlockEmbed inside of a BlockEmbed.custom (this is a little detail that will not work if you don't pass the CustomBlockEmbed inside of a BlockEmbed.custom).
Future<void> _addEditNote(BuildContext context, {Document? document}) async {
  final isEditing = document != null;
  final quillEditorController = QuillController(
    document: document ?? Document(),
    selection: const TextSelection.collapsed(offset: 0),
  );

  await showDialog(
    context: context,
    builder: (context) => AlertDialog(
      titlePadding: const EdgeInsets.only(left: 16, top: 8),
      title: Row(
        mainAxisAlignment: MainAxisAlignment.spaceBetween,
        children: [
          Text('${isEditing ? 'Edit' : 'Add'} note'),
          IconButton(
            onPressed: () => Navigator.of(context).pop(),
            icon: const Icon(Icons.close),
          )
        ],
      ),
      content: QuillEditor.basic(
        controller: quillEditorController,
        readOnly: false,
      ),
    ),
  );

  if (quillEditorController.document.isEmpty()) return;

  final block = BlockEmbed.custom(
    NotesBlockEmbed.fromDocument(quillEditorController.document),
  );
  final controller = _controller!;
  final index = controller.selection.baseOffset;
  final length = controller.selection.extentOffset - index;

  if (isEditing) {
    final offset = getEmbedNode(controller, controller.selection.start).item1;
    controller.replaceText(
        offset, 1, block, TextSelection.collapsed(offset: offset));
  } else {
    controller.replaceText(index, length, block, null);
  }
}
And voila, we have a custom widget inside of the rich text editor!

For more info and a video example, see the PR of this feature
For more details, check out this YouTube video
Translation #
The package offers translations for the quill toolbar and editor, it will follow the system locale unless you set your own locale with:
QuillToolbar(locale: Locale('fr'), ...)
QuillEditor(locale: Locale('fr'), ...)
Currently, translations are available for these 22 locales:
Locale('en')Locale('ar')Locale('de')Locale('da')Locale('fr')Locale('zh', 'CN')Locale('zh', 'HK')Locale('ko')Locale('ru')Locale('es')Locale('tr')Locale('uk')Locale('ur')Locale('pt')Locale('pl')Locale('vi')Locale('id')Locale('nl')Locale('no')Locale('fa')Locale('hi')Locale('sr')
Contributing to translations
The translation file is located at toolbar.i18n.dart. Feel free to contribute your own translations, just copy the English translations map and replace the values with your translations. Then open a pull request so everyone can benefit from your translations!


Sponsors #

Metadata
Publisher
Metadata
A rich text editor supporting mobile and web (Demo App @ bulletjournal.us)
Homepage
Repository (GitHub)
View/report issues
License
![]() unknown (license)
unknown (license)
Dependencies
characters, collection, device_info_plus, diff_match_patch, flutter, flutter_colorpicker, flutter_keyboard_visibility, gallery_saver, i18n_extension, image_picker, pedantic, photo_view, platform, quiver, string_validator, tuple, url_launcher, video_player, youtube_player_flutter_quill