xl 0.9.1  xl: ^0.9.1 copied to clipboard
Implement accelerometer and pointer or touch fueled parallax animations with a bespoke XL layering paradigm. Gyroscope supported.
XL #
 |
 |
|---|---|
 |
 |
A package providing the XL stack widget to implement accelerometer- and
pointer-fueled parallax animations that smoothly transform
children according to a spatial, three-dimensional layer definition.
Touch and Gyroscope support included.
Design simple or elaborate XL-erometer driven interactions and interfaces.
Getting Started #
To get started with sensor data, use an XL with XLayers:
const Widget xl = XL(layers: [XLayer(. . .), ...]);
To distinguish between pointer data (mouse/touch) and sensors data,
employ PLayers and the relevant flags:
const Widget xl = XL(
 sharesPointer = false, // default is true
 sharesSensors = false, // default is false
 layers: [
   PLayer(. . .), // ignores sensors
   PLayer(. . .), // ignores sensors
   XLayer(. . .), // ignores pointer
   ...
 ],
);
Layers #
The XL.layers property takes a list of XLayers or PLayers.
These layers allow you to define the animatable properties
of their child widgets.
class Example extends StatelessWidget {
 @override
 Widget build(BuildContext context) {
   return MaterialApp(home: Scaffold(
     body: XL(
       layers: [
         XLayer(
           xRotation: 1.0,
           yRotation: 1.0,
           xOffset: 200,
           yOffset: 200,
           child: Center(
             child: Container(
               width: 250,
               height: 250,
               color: Colors.black,
         ))),
         XLayer(
           xRotation: 1.5,
           yRotation: 1.5,
           xOffset: 300,
           yOffset: 300,
           child: Center(
             child: Container(
               width: 200,
               height: 200,
               color: Colors.red,
         ))),
       ],
     ),
   ));
 }
}
Advanced Usage #
As stated, an XL may have both varieties of layer interspersed.
The default function of the stack is to apply pointer data to both
varieties of Layer, and to only apply sensors data to XLayers;
there are, however, flags available to toggle either functionality, as:
const layers = [
  XLayer(/* Blue X Layer; reactive */),
  PLayer(/* Red P Layer; more reactive */),
  XLayer(/* Black Layer; non-reactive control */),
];

final example = Column(children: [
  Expanded(
    child: Row(children: [
      const Expanded(
        child: XL(
          // X and P Layers behave the same way with these flags
          // (but still may differ slightly on parameters for Z axis rotation).
          sharesPointer: true,
          sharesSensors: true,
          layers: layers,
      )),
      const Expanded(
        child: XL(
          // All Layers react to pointers, but only XLayers
          // will recognize sensors. Default flags.
          sharesPointer: true, // default
          sharesSensors: false, // default
          layers: layers,
  ))])),
  Expanded(
    child: Row(children: [
      const Expanded(
        child: XL(
          // All Layers react to sensors,
          // but only PLayers will recognize pointer.
          sharesPointer: false,
          sharesSensors: true,
          layers: layers,
      )),
      const Expanded(
        child: XL(
          // Each Layer will deal only with its prescribed input data.
          sharesPointer: false,
          sharesSensors: false,
          layers: layers,
  ))])),
]);
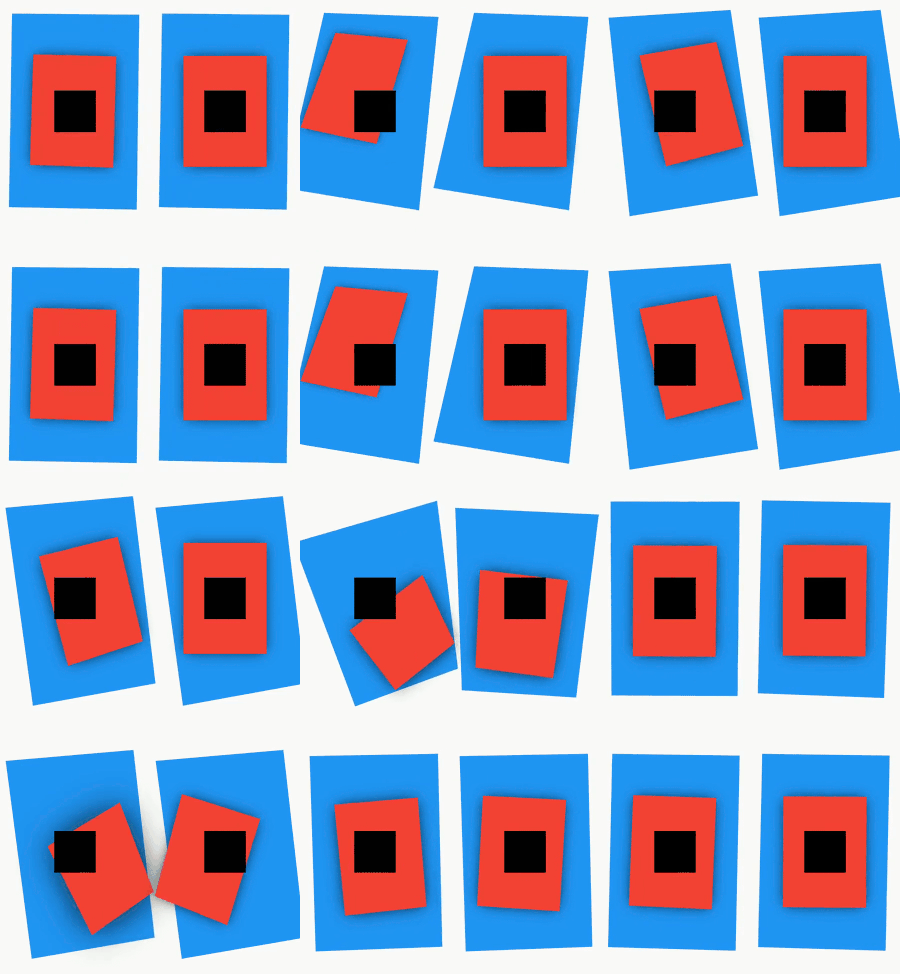
That same stack of
layerslaid out in a demonstration with the two flags in their four possible configurations:🟥 Red layers are
PLayers and react primarily to pointers data.
👈 The left two 🟥PLayers also consider sensors data🟦 Blue layers are
XLayers and react primarily to sensors data.
👆 The top two 🟦XLayers also consider pointer data⬛ Black layers are control
XLayers with no animation properties. They make no reaction to any input.
Reference #
🛣️ Roadmap #
- 🔳 Provide richer access to sensors data and ability to manipulate
Layers in new ways- Such as an
AccelSpecandGyroSpecthat would enable transformation of any axis based on input from any axis, determined by parameter.- Currently, for example,
yRotationis controlled by accelerometer X axis rotation.zRotationmay also be controlled by accelerometer X axis rotation with parameterzRotationByX. However,zRotationByGyromay interpret Z axis gyroscope rotations. It is the only axis with two such inputs. - Imagine declaring an axis to rotate or offset, then also determining
which axis/sensor contributes to it. What deep options that could provide!
Such as offsetting a
Widgetvertically and rotating it over Y axis based on only one input from accelerometer.
- Currently, for example,
- Such as an
- 🔳 Along with #1 above, provide more Gyroscope functionality
than only one axis of influence.
- Gyro is a little tricker, as the sensor mostly reads flat near-
0values unless the device is moving. - This still provides cool options for developers to make neat interactions, and so should be expanded upon.
- Gyro is a little tricker, as the sensor mostly reads flat near-
- ✅
Offer an automaticXLstack that simply accepts aList<Widget>(not necessarilyXLayers) and dynamically generates progressively greater translation and rotation values for each layer.- Check out
AutoXLwhich makes a parallax stack even easier to implement.
Simply provide any old widgets aslayersand optionally tinker with thedepthFactoror max layerdepth. - Pre-configured:
AutoXL.pane,AutoXL.wiggler,AutoXL.deep
- Check out
🐞 Bugs #
- Discrepancy with normalization delay and normalization duration.
📜 History #
For posterity and developer preference, there are three extension "wrappers" available.
- Instead of the short, all-caps
XL, consider aParallaxStack - Instead of the double-cap
XLayer, consider anAcceleraxLayer - Instead of the double-cap
PLayer, consider aParallaxLayer
final xl = ParallaxStack( // XL
  sharesSensors: true, // same parameters and functionality
  layers: [
    AcceleraxLayer(. . .), // XLayer
    ParallaxLayer(. . .), // PLayer
  ],
);
WORK IN PROGRESS
- Furthermore, the 🌊 original website demo works well with accelerometer data.

