passkeys 1.0.3  passkeys: ^1.0.3 copied to clipboard
Flutter plugin enabling simple passkey authentication. Can be either used with a ready-to-use relying party server (Corbado) or with your custom relying party.
passkeys #
A Flutter package to enable authentication through passkeys (based on WebAuthn / FIDO2).
| Android | iOS | Linux | macOS | Web | Windows | |
|---|---|---|---|---|---|---|
| Support | yes | yes | no | no | no | no |
Features #
- sign up and login users with passkeys
- connect your own relying party server or use pre-implemented ones
Getting started #
The best way to learn how you can set up passkeys in your Flutter app is to read the brief introduction below and then take a look at the example of this package.
Introduction #
When it comes to understanding passkeys, there are three parties:
- the user of your Flutter app
- your Flutter app (installed on a device with e.g. Face ID or Touch ID)
- a relying party server (a backend where users' public keys will be stored)
More information on how these three parties interact with each other to make passkeys work.
Like with traditional password-based authentication flows, a user has to sign up first, i.e. set up a passkey. The flow is shown in the image below.
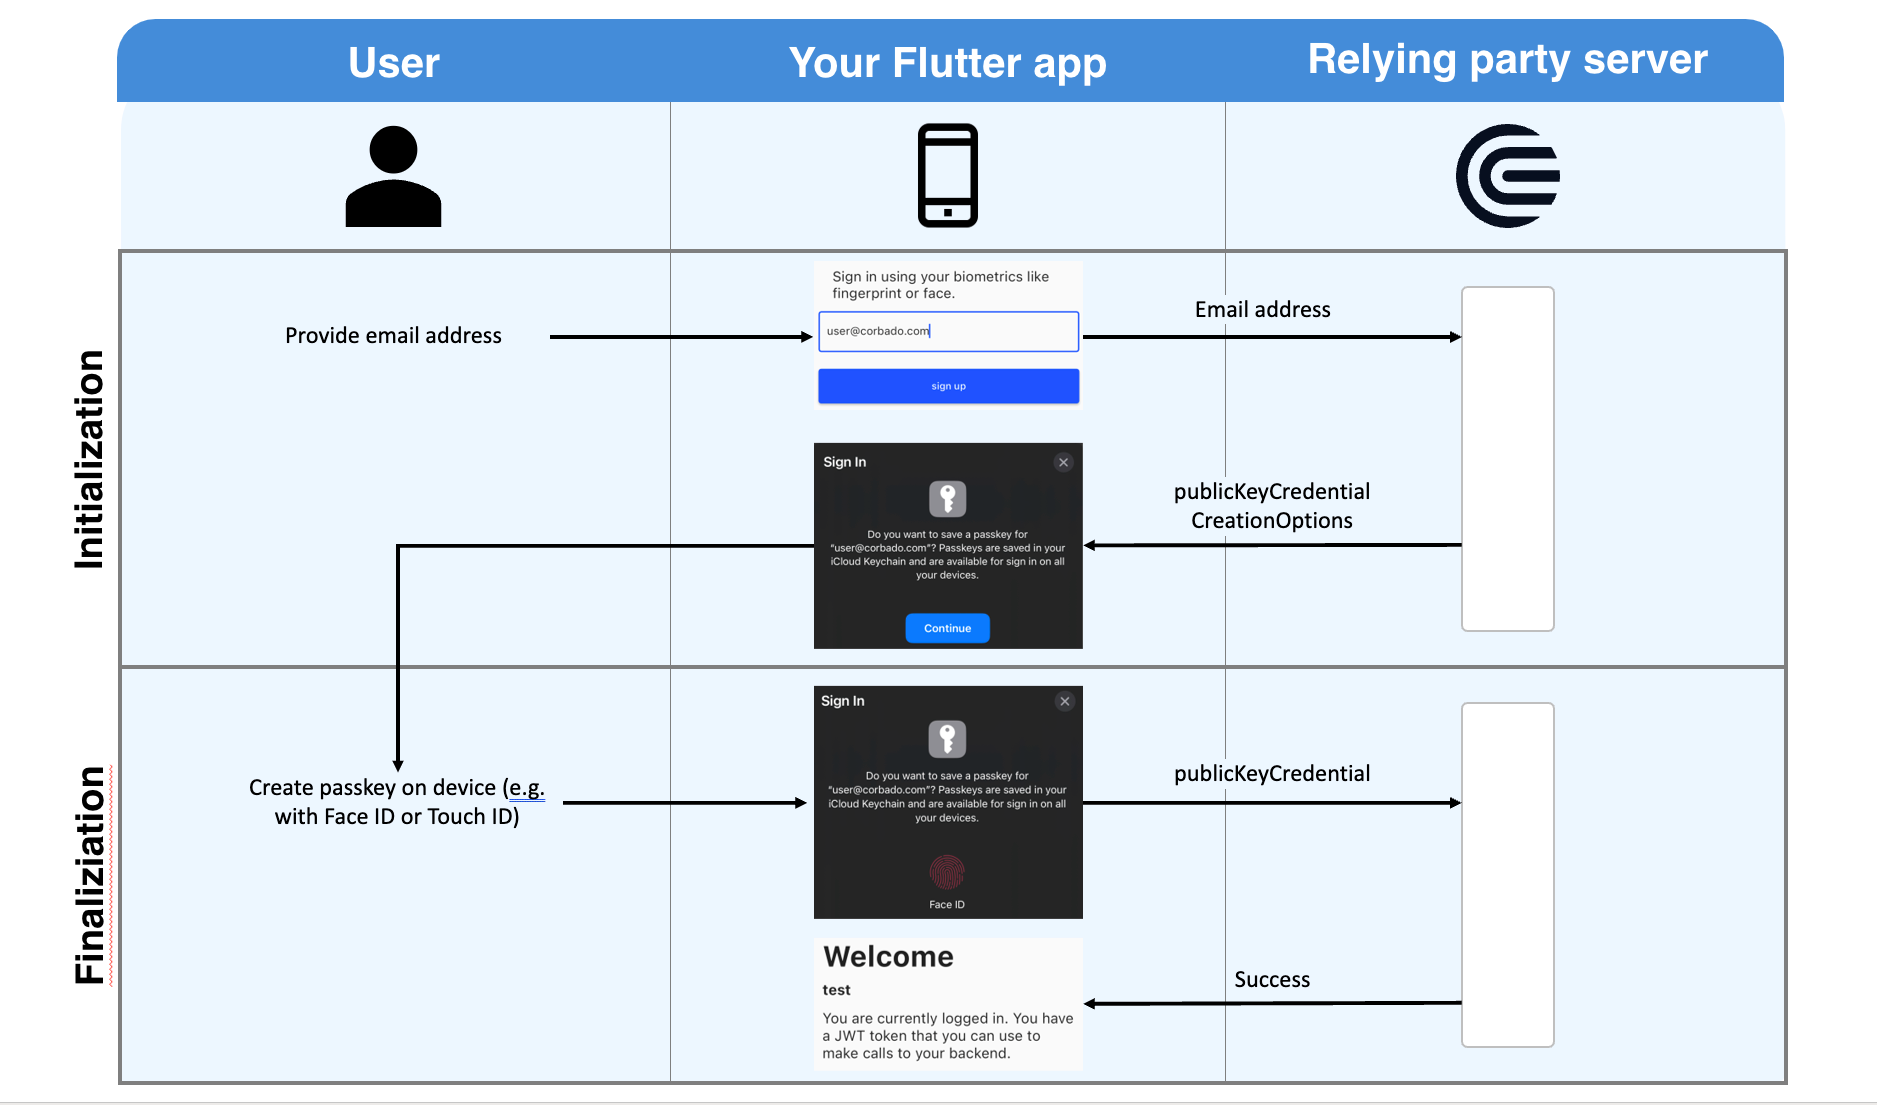
At first, the user will provide his email address to your app. This email address will be sent to the relying party server. You can implement that server yourself, or you can rely on prebuilt ones (e.g. provided by Corbado). The relying party server's response will contain publicKeyCredentialCreationOptions. It contains all information required by the user's device to set up a passkey.
Your app will now interact with your native device's OS (no worries, the actual work is abstracted by this Flutter package) to ask the user to set up a passkey. All he has to do is to provide his biometrics once (e.g. via Face ID or Touch ID). After this setup, a private key and a public key are created. The private key is stored securely on the user's device. The public key is sent to the relying party server. For this to work, the app has to be associated with the relying party server. This involves a bit of configuration in your app and on the relying party server (find more details below where we explain how to set up the example). The relying party server will validate and store the public key. Afterwards, it will respond with a success message (e.g. a JWT token).
From now on, the user can log into your app using this biometric information. On each login, your app will ask the relying party server for a challenge. The relying party server generates a challenge that must be signed with the private key. To access that private key the app asks once again the user for his biometrics (another call to your native device's OS). After the user has provided his biometrics (e.g. by putting his finger on the fingerprint reader), the challenge is signed and the signed challenge is sent to the relying party server. Using the public key, it will validate the signed challenge and the server will answer with a success message (e.g. a JWT token).
Example #
To run the example follow these steps:
- Clone the GitHub repo
git clone git@github.com:corbado/flutter-passkeys.git - Go to the example directory
cd packages/passkeys/passkeys/exampleand run the example appflutter run lib/main.dart - Sign up a new user by providing an email address and clicking sign up.
- After logging out, you can login by providing the exact same email address again or sign up another user by providing a new one.
Find more explanations to this example and troubleshooting in the example's readme.
Usage #
To get an idea on how to use this package to sign up and login users take a look at the code below. It has been extracted from the example of this package. To see this code in connection with a UI, take a look at the example and run it on your machine.
import 'package:passkeys/passkey_auth.dart';
import 'package:passkeys_example/relying_party_server.dart';

_register() async {
  final auth = PasskeyAuth(SharedRelyingPartyServer());
  final registerResponse = await auth.registerWithEmail(const RpRequest(email: 'user@example.com'));
  print('Registration successful: ${registerResponse != null}');
}
import 'package:passkeys/passkey_auth.dart';
import 'package:passkeys_example/relying_party_server.dart';

_signIn() async {
  final auth = PasskeyAuth(SharedRelyingPartyServer());
  final signInResponse = await auth.authenticateWithEmail(const RpRequest(email: 'user@example.com'));
  print('Sign in successful: ${signInResponse != null}');
}
We now want to quickly go through the most common use cases for Flutter developers when using passkeys. We will try to show how this package can help with each use case. While use case 1 is a very basic one (exploration only) 2 and 3 show cases in which real apps are built. Use case 4 and 5 are more advanced solutions that try to help you with building more complicated apps.
1. Use case: You just want to prototype with passkeys
You just want to see passkeys in action in a Flutter app? Then the example of this package is the right point for you to start. There is no configuration required and you can go through sign up and login flows on your emulator.
Note:
- ⚠️ You share a relying party server with other Flutter developers. Its user table is flushed every day. We have built the example this way to make it very simple to set up. For an example, this works totally fine, but if you want to build your own app you need your own relying party server.
- ⚠️ You cannot run the example on physical iOS devices but only on a simulator (for Android, physical devices + emulators work)
2. Use case: You want to use passkeys for your app and you already have built your relying party server
If you already have a relying party server, you just need to tell this package how to interact with it. This is done by implementing the RelyingPartyServer interface. Use that implementation to initialize the PasskeyAuth object.
import 'package:passkeys/passkey_auth.dart';

_signUp() async {
  final auth = PasskeyAuth(YourOwnRelyingPartyServer());
  final registerResponse = await auth.registerWithEmail(const RpRequest(email: 'user@example.com'));
  print('Registration successful: ${registerResponse != null}');
}

_signIn() async {
  final auth = PasskeyAuth(YourOwnRelyingPartyServer());
  final signInResponse = await auth.authenticateWithEmail(const RpRequest(email: 'user@example.com'));
  print('Sign in successful: ${signInResponse != null}');
}
How to implement the *RelyingPartyServer* interface?
The code below gives an idea on how you can connect your own relying party server by implementing RelyingPartyServer.
import 'package:passkeys/relying_party_server/relying_party_server.dart';
import 'package:passkeys/relying_party_server/types/authentication.dart';
import 'package:passkeys/relying_party_server/types/registration.dart';

class YourOwnRelyingPartyServer implements RelyingPartyServer<Request, Response> {
  // an instance of a HTTP client that can perform the required 4 types of requests against your relying party server
  // - initRegister
  // - completeRegister
  // - initAuthenticate
  // - completeAuthenticate
  final YourApiClient _client;

  @override
  Future<Response> completeAuthenticate(AuthenticationCompleteRequest request) {
    // build the request that your backend (and thus your client) expects
    const request = YouApiClientAuthenticateRequest.from(request);

    // make the completeAuthenticate call to your relying party server
    const response = _client.completeAuthenticate(request);

    // map the backend response to the Response class
    return Response(idToken: response.idToken);
  }

  @override
  Future<Response> completeRegister(RegistrationCompleteRequest request) {
    // similar in its structure to completeAuthenticate
    throw UnimplementedError();
  }

  @override
  Future<AuthenticationInitResponse> initAuthenticate(Request request) {
    // similar in its structure to completeAuthenticate
    throw UnimplementedError();
  }

  @override
  Future<RegistrationInitResponse> initRegister(Request request) {
    // similar in its structure to completeAuthenticate
    throw UnimplementedError();
  }
}

// Define all fields in this class that your relying party server expects during the initial sign up and login call
// At most, this must contain some kind of user identifier (e.g. an email address).
class Request {
  const Request({required this.email});

  final String email;
}

// Define all data in this class that can be returned by your relying party server on a successful authentication.
// Usually this is some kind of token (e.g. a JWT token that encodes user data).
class Response {
  const Response({required this.idToken});

  final String idToken;
}
3. Use case: You want to use passkeys for your app but you don't want to build your own relying party server
To use passkeys in your own app, you need a relying party server. If you don't want to build one, you can use already existing solutions. To allow this package to integrate with a relying party server, the RelyingPartyServer interface must be implemented for that particular server.
Corbado lets you set up a relying party server. This package also comes with a ready to use implementation for the RelyingPartyServer interface that connects to your relying party server. To save time and effort, you can use Corbado as a relying party server. Find an example how to do this including a step by step guide here.
You can use every other SaaS provider that allows you to set up a relying party server though. All you need to do is implement the RelyingPartyServer interface.
4. Use case: You want to build an app that supports more advanced use cases with passkeys
While this package allows you to use passkeys for authentication, a few challenges remain unsolved, e.g.:
- App users don't want to login every time they open an app, so how can we keep them logged in?
- Not every device supports passkeys yet, how can we provide an alternative login for these users?
- A user might have used your app on another device and now tries to login on a new device. His passkey is still on that old device, so how can we log him in on the new device?
Solving these challenges goes beyond the scope of this package.
As a solution you can create your own authentication SDK that builds on top of the passkeys package. This can make sense if you want to build your own authentication backend.
Alternatively, you can save time and use our solution for that problem: corbado_auth. This is a separate flutter package that builds on top of the passkeys package to provide solutions for the above challenges. For more information, check out its documentation and examples.
5. Use case: You want to use Firebase together with passkeys
Firebase is a great technology that helps you with building your app. We are currently working on a solution that enables this package to be used together with Firebase Auth.
Metadata
Publisher
Metadata
Flutter plugin enabling simple passkey authentication. Can be either used with a ready-to-use relying party server (Corbado) or with your custom relying party.
Homepage
Repository (GitHub)
View/report issues
License
![]() unknown (LICENSE)
unknown (LICENSE)
Dependencies
convert, corbado_frontend_api_client, flutter, http, json_annotation, openapi_generator_annotations, passkeys_android, passkeys_ios, passkeys_platform_interface