passkeys 2.17.4  passkeys: ^2.17.4 copied to clipboard
Flutter plugin enabling simple passkey authentication. Can be either used with a ready-to-use relying party server (Corbado) or with your custom relying party.

passkeys #
A Flutter package to enable authentication through passkeys (based on WebAuthn / FIDO2).
Take a look at https://passkeys.flutter.corbado.io for a live demo (this is a Flutter web deployment of the example on Vercel).
| Android | iOS | Linux | macOS | Web | Windows | |
|---|---|---|---|---|---|---|
| Support | ✅ | ✅ | ❌ | ✅ | ✅ | ✅ |
Features #
- sign up and login users with passkeys on iOS, Android and Web
- login users with conditional UI
Getting started #
The best way to learn how you can set up passkeys in your Flutter app is to read the brief introduction below and then take a look at the example of this package.
Introduction #
When it comes to understanding passkeys, there are three parties:
- the user of your Flutter app
- your Flutter app (installed on a device with e.g. Face ID or Touch ID)
- a relying party server (a backend where users' public keys will be stored)
More information on how these three parties interact with each other to make passkeys work.
Like with traditional password-based authentication flows, a user has to sign up first, i.e. set up a passkey. The flow is shown in the image below.
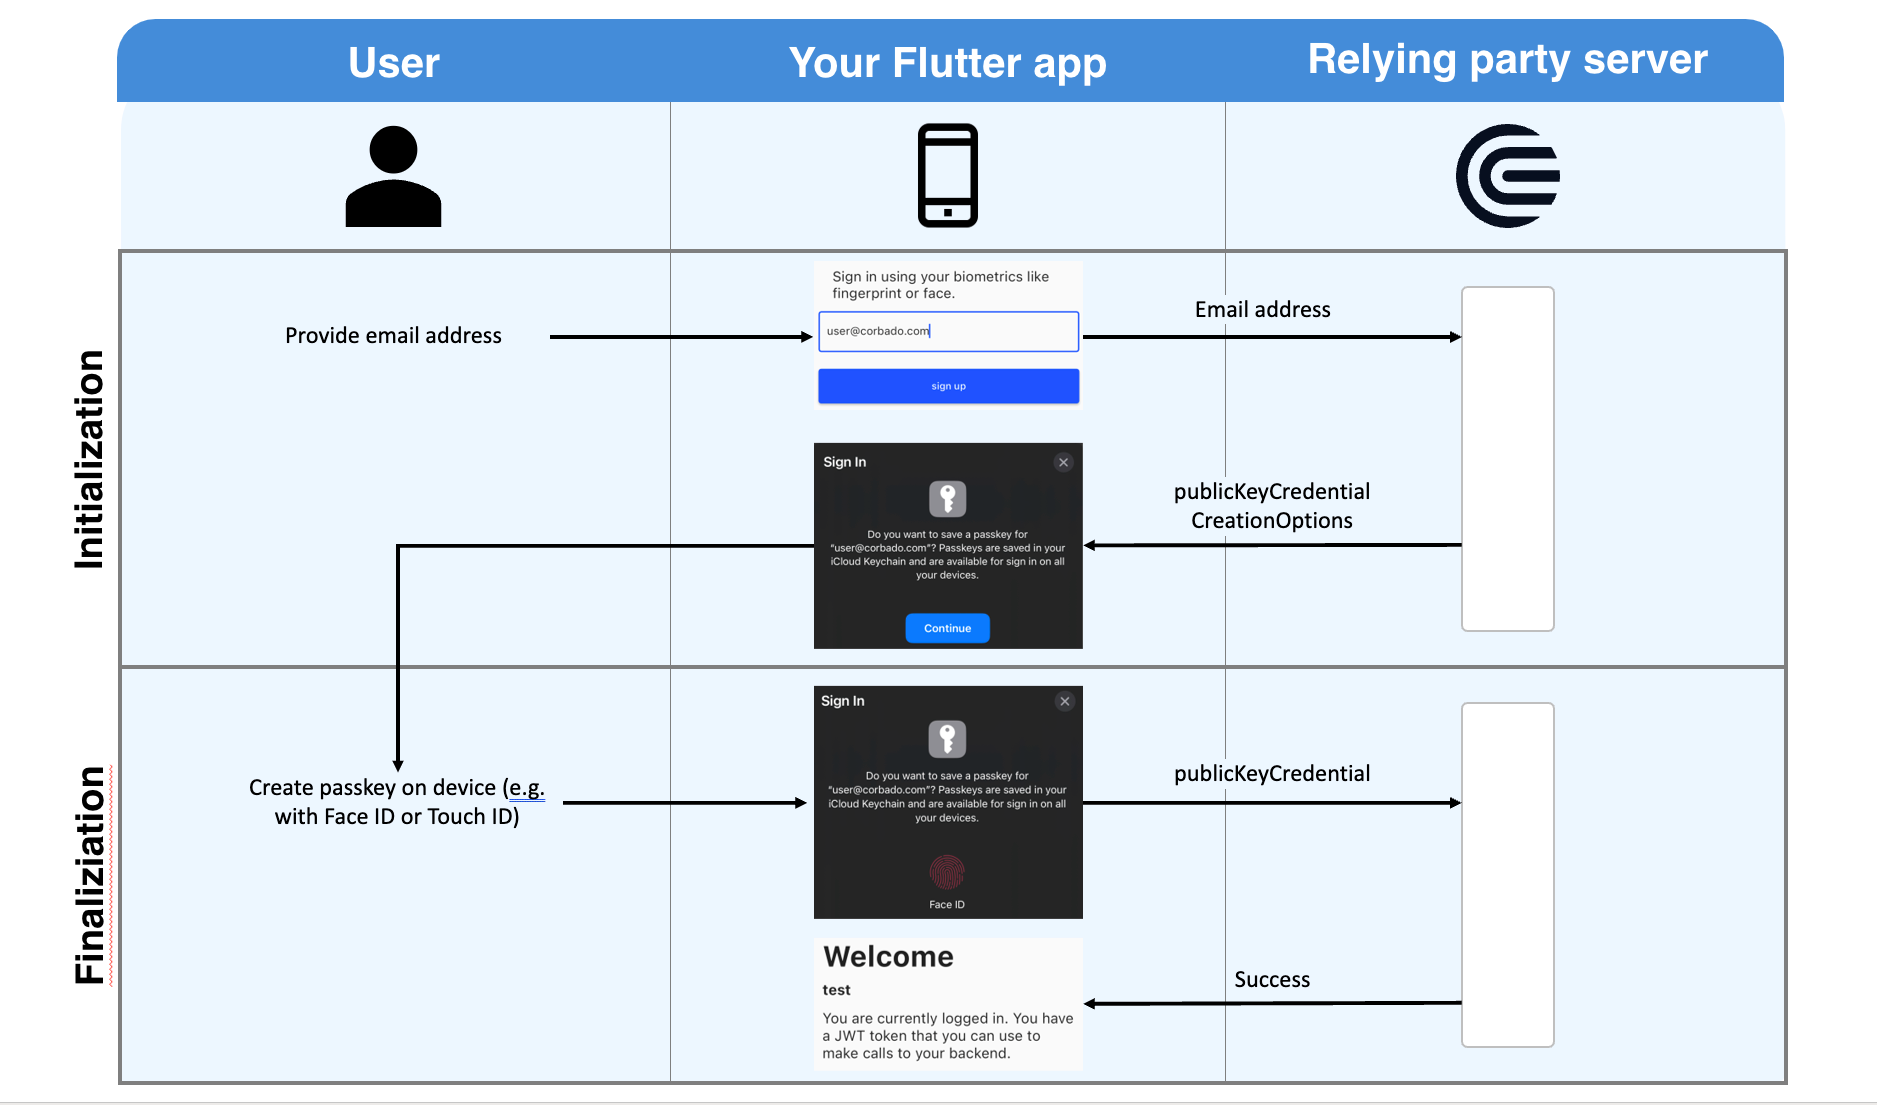
At first, the user will provide his email address or a username to your app. This email address will be sent to the relying party server. You can implement that server yourself, or you can rely on prebuilt ones (e.g. provided by Corbado). The relying party server's response will contain publicKeyCredentialCreationOptions. It contains all information required by the user's device to set up a passkey.
Your app will now interact with your native device's OS (no worries, the actual work is abstracted by this Flutter package) to ask the user to set up a passkey. All he has to do is to provide his biometrics once (e.g. via Face ID or Touch ID). After this setup, a private key and a public key are created. The private key is stored securely on the user's device. The public key is sent to the relying party server. For this to work, the app has to be associated with the relying party server. This involves a bit of configuration in your app and on the relying party server (find more details below where we explain how to set up the example). The relying party server will validate and store the public key. Afterwards, it will respond with a success message (e.g. a JWT token).
From now on, the user can log into your app using this biometric information. On each login, your app will ask the relying party server for a challenge. The relying party server generates a challenge that must be signed with the private key. To access that private key the app asks once again the user for his biometrics (another call to your native device's OS). After the user has provided his biometrics (e.g. by putting his finger on the fingerprint reader), the challenge is signed and the signed challenge is sent to the relying party server. Using the public key, it will validate the signed challenge and the server will answer with a success message (e.g. a JWT token).
Example #
To run the example follow these steps:
- Clone the GitHub repo
git clone git@github.com:corbado/flutter-passkeys.git - If you want to run the example on an iOS Simulator or an Android emulator, start one now (skip this step if you want to start the example in a browser).
- Run
melos run example-passkeys-nativeto start the example on iOS/Android. - Sign up a new user by providing an email address and clicking sign up.
- After logging out, you can login by providing the exact same email address again or sign up another user by providing a new one.
Find more explanations to this example and troubleshooting in the example's README.
Usage #
To get an idea on how to use this package to sign up and login users take a look at the code below. It has been extracted from corbado_auth. There we use it to build a passkey centered authentication SDK. To see this code in connection with a UI, take a look at the example and run it on your machine. Tip: You can also debug through it to get a better understanding of how it works.
_register() async {
  final passkeyAuthenticator = PasskeyAuthenticator();
  final relyingPartyServer = RelyingPartyServer(); // this is not part of this package

  // initiate sign up by calling the relying party server
  final webAuthnChallenge = await relyingPartyServer.startSignUpWithPasskey(
      'user@example.com', 'Username');
  // call the platform authenticator to register a new passkey on the device
  final platformRes = await passkeyAuthenticator.register(webAuthnChallenge);
  // finish sign up by calling the relying party server again
  final relyingPartyServerRes = await relyingPartyServer.finishSignUpWithPasskey(platformRes);
}
_signIn() async {
  final passkeyAuthenticator = PasskeyAuthenticator();
  final relyingPartyServer = RelyingPartyServer(); // this is not part of this package

  // initiate sign in by calling the relying party server
  final webAuthnChallenge = await relyingPartyServer.startLoginWithPasskey('user@example.com');
  // call the platform authenticator to ask the user to sign the challenge with his passkey
  final platformRes = await passkeyAuthenticator.authenticate(webAuthnChallenge);
  // finish sign in by calling the relying party server again
  final relyingPartyServerRes = await relyingPartyServer.finishLoginWithPasskey(platformRes);
}
We now want to quickly go through the most common use cases for Flutter developers when using passkeys. We will try to show how this package can help with each use case. While use case 1 is a very basic one (exploration only), 2, 3 and 4 show cases in which real apps are built.
1. Use case: You just want to prototype with passkeys
You just want to see passkeys in action in a Flutter app? Then the example of this package is the right point for you to start. There is no configuration required and you can go through sign up and login flows on your emulator.
Note:
- ⚠️ You share a relying party server with other Flutter developers. Its user table is flushed every day. We have built the example this way to make it very simple to set up. For an example, this works totally fine, but if you want to build your own app you need your own relying party server.
- ⚠️ You cannot run the example on physical iOS devices but only on a simulator (for Android, physical devices + emulators work).
2. Use case: You want to use passkeys for your app and you already have built your relying party server
If you already have a relying party server that implements the WebAuthn standard, you can use this package to abstract away the platform specific code that is required to use passkeys. Take a look at the code above in the Usage section to get a rough idea on how to wire your relying party server with this package.
3. Use case: You want to use passkeys for your app but you don't want to build your own relying party server
To use passkeys in your own app, you need a relying party server. If you don't want to build one, you can use already existing solutions. To save time and effort, you can use Corbado as a relying party server. If you want to try it out, use corbado_auth. Find an example how to do this including a step by step guide here.
FYI: You can use this approach in two variations:
- You are building a new app and don't have an existing user base: In this case you can use CorbadoAuth from corbado_auth and let it manage both passkeys and users for you.
- You want to introduce passkeys to an already existing app that has an existing user base: In this case you can use CustomCorbadoAuth from corbado_auth and let it manage passkeys for you. You will continue to manage users and sessions yourself though.
4. Use case: You want to use Firebase together with passkeys
Firebase is a great technology that helps you with building your app. To use passkeys together with Firebase you can use corbado_auth_firebase.
5. Use case: You want to handle when the passkeys are not supported
if (kIsWeb) {
  authService.authenticator.getAvailability().web().then((value) {
    if (!value.hasPasskeySupport) {
      // Disable passkey sign-up for Web
      disablePasskeySignUp();
    }
  });
} else if (Platform.isAndroid) {
  authService.authenticator.getAvailability().android().then((value) {
    if (!value.hasPasskeySupport) {
      // Disable passkey sign-up for Android
      disablePasskeySignUp();
    }
  });
} else if (Platform.isIOS) {
  authService.authenticator.getAvailability().ios().then((value) {
    if (!value.hasPasskeySupport) {
      // Disable passkey sign-up for iOS
      disablePasskeySignUp();
    }
  });
}
Troubleshooting #
As a first step, you can rely on our integrated doctor tool to help you debug and configure your app. To enable it, simply pass debugMode: true when initializing PasskeysAuthenticator:
import 'package:passkeys/passkeys.dart';

void main() {
  final authenticator = PasskeyAuthenticator(debugMode: true);
}
The doctor will automatically perform checks and provide feedback through the Passkeys package's error handling system.
Android #
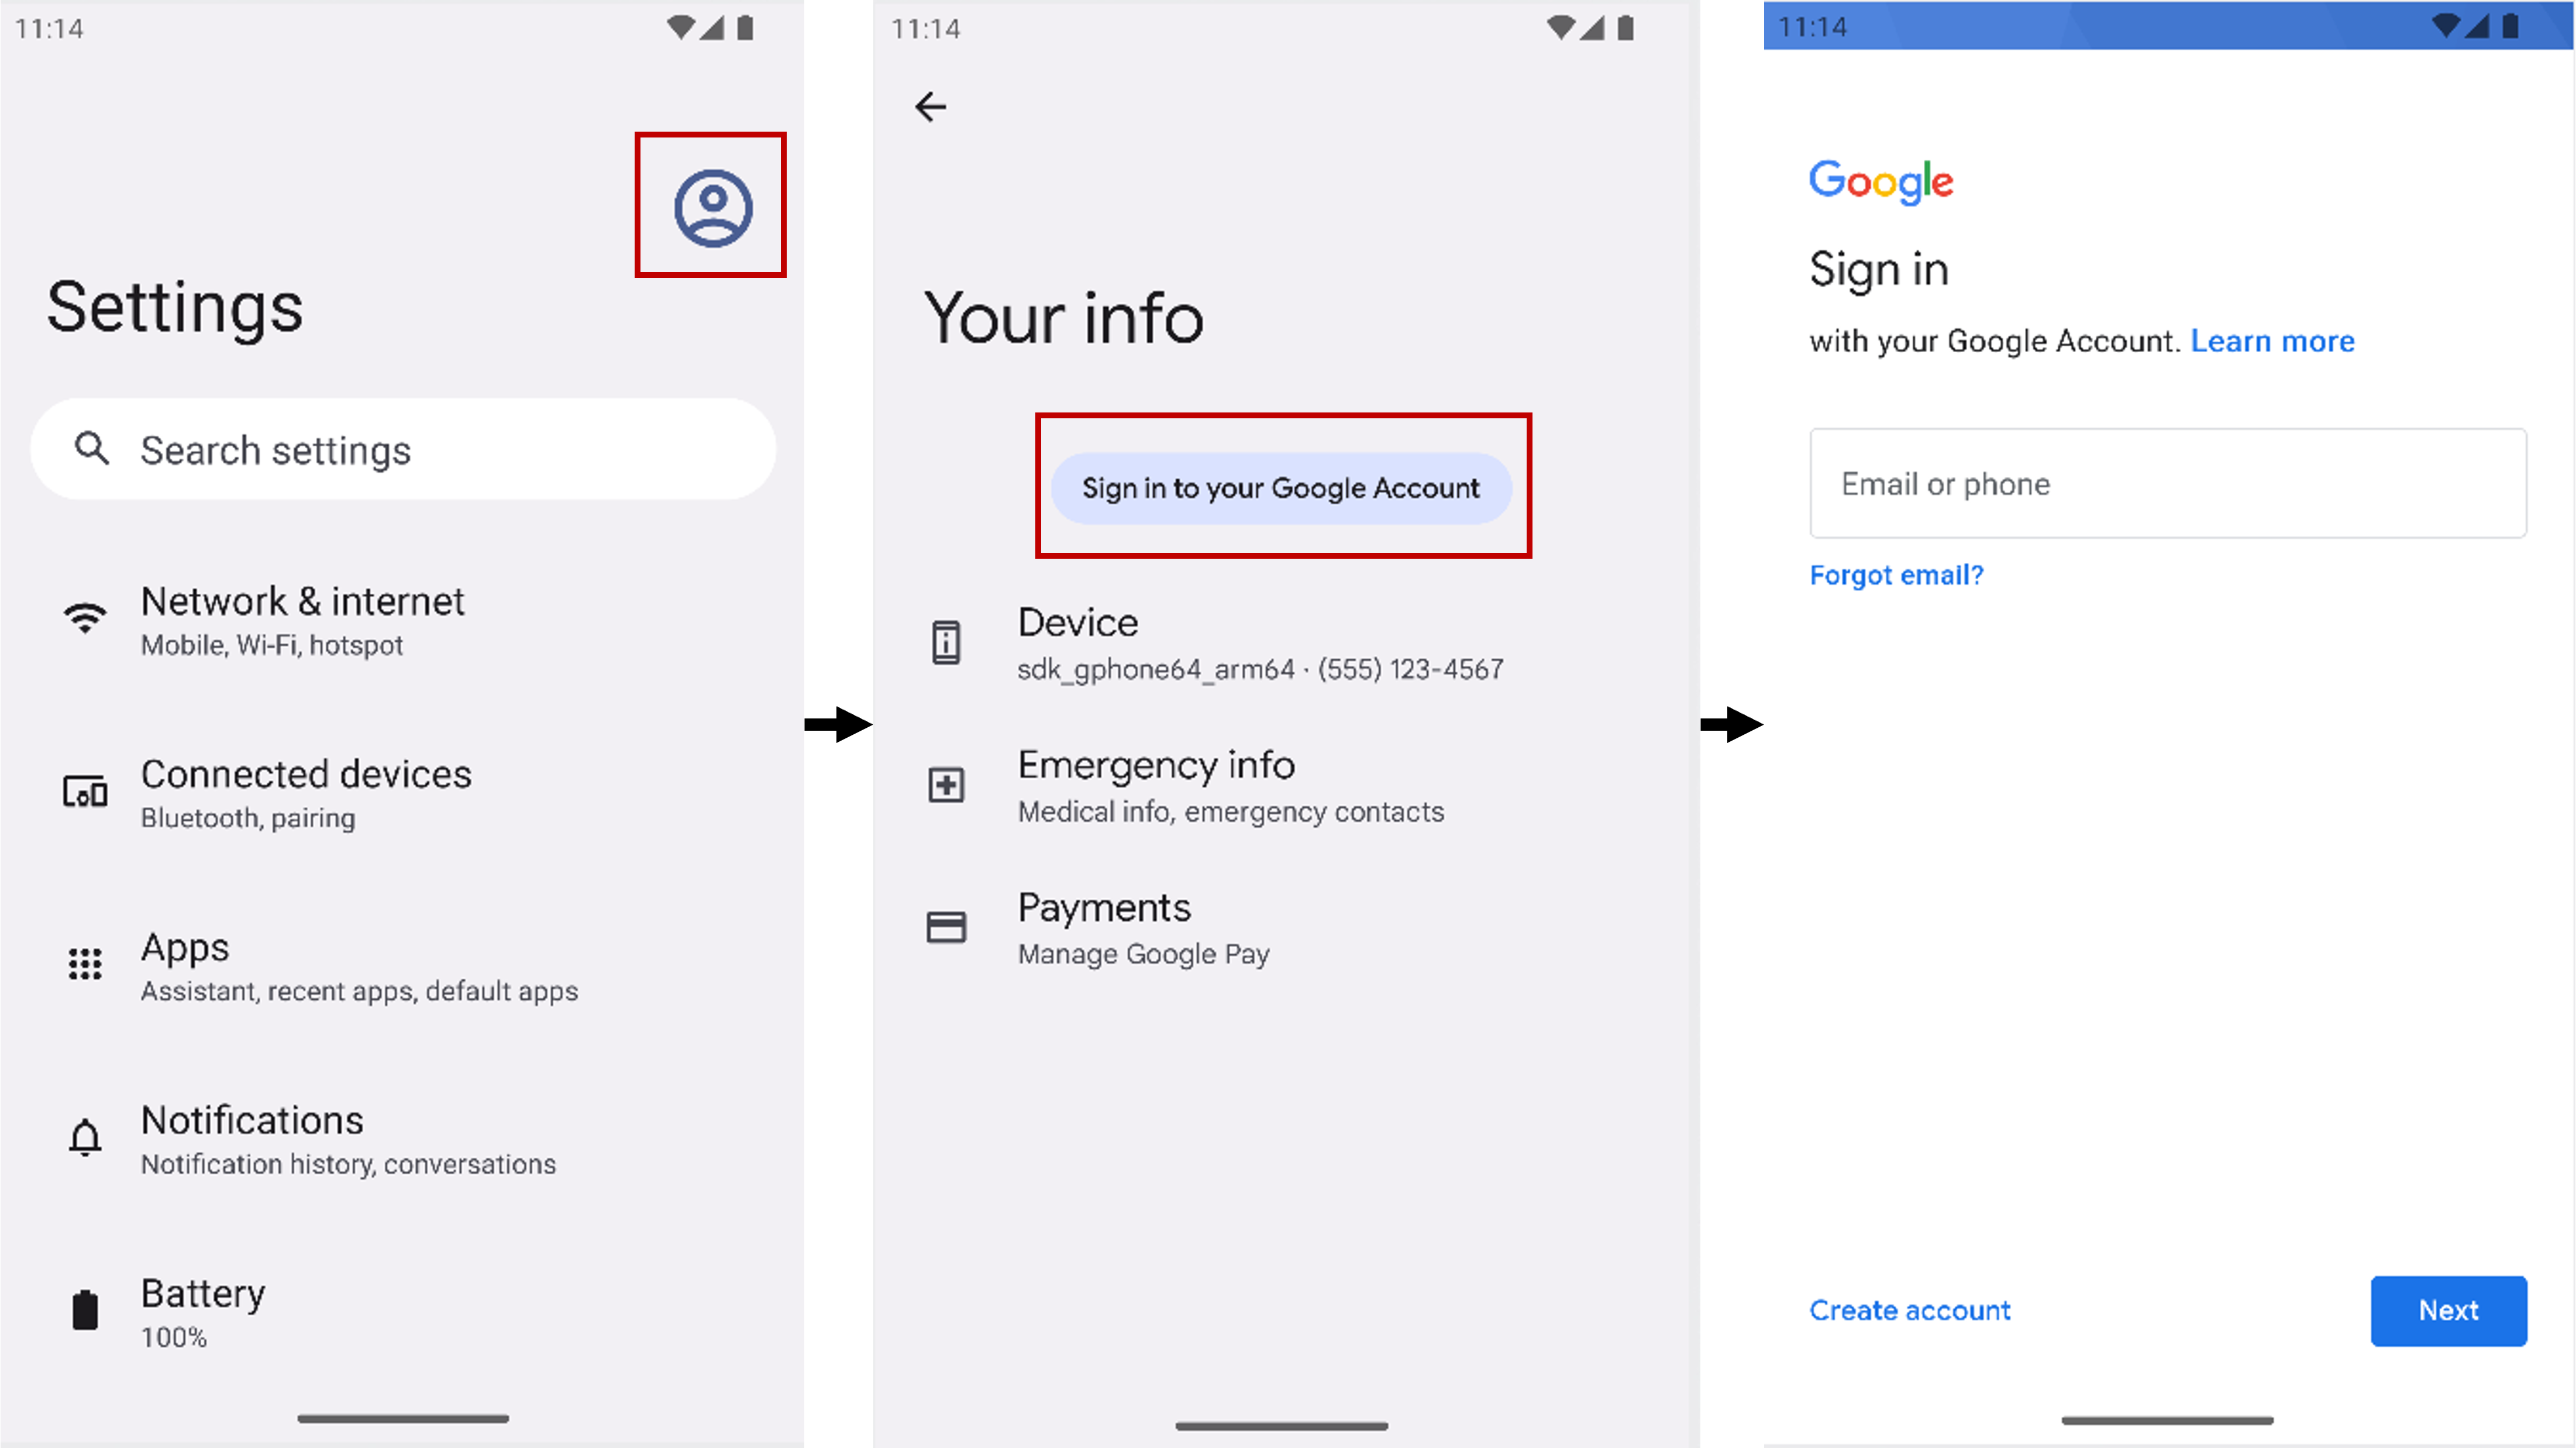
1. Make sure that you have logged into a Google account.
Google backs up all your passkeys so you need to be logged into a Google account to use passkeys.
If you are not logged in, you will see the following message: "Sign in to your Google Account to
create passkeys." and this package will throw a SyncAccountNotAvailableException.
You can log into your Google account by opening settings, clicking on the icon in the top right and then on "Sign in to your Google Account".
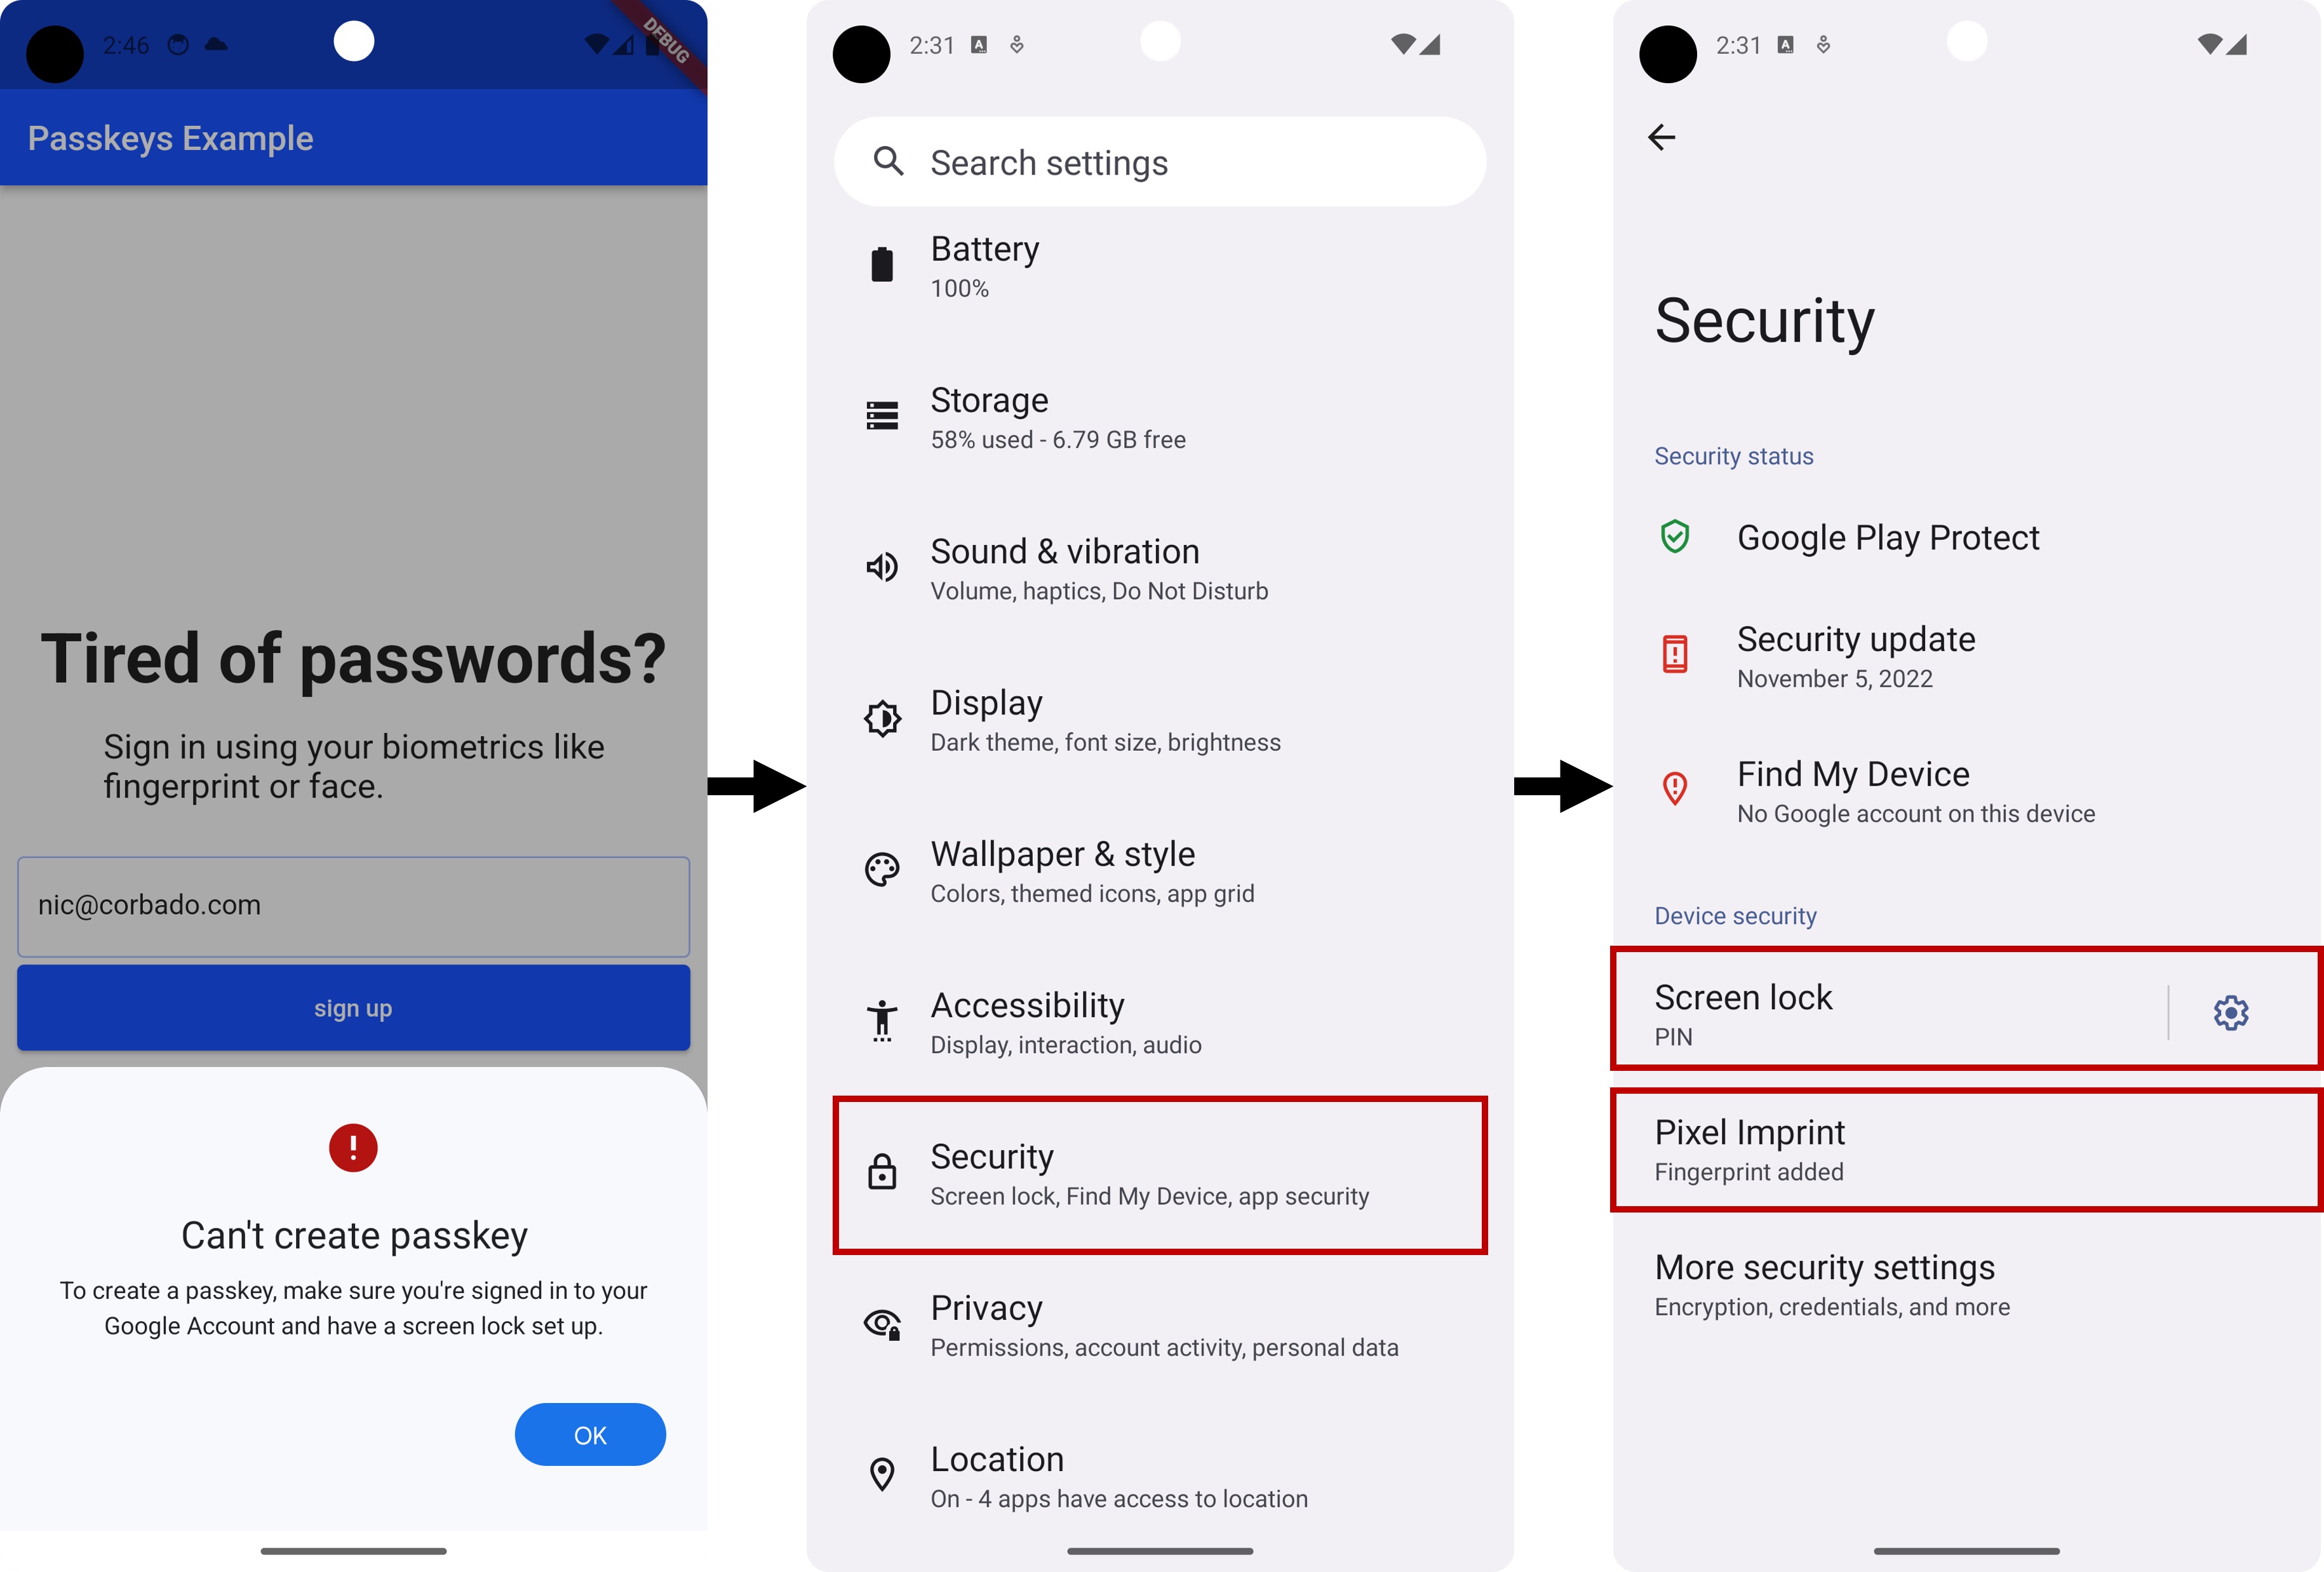
2. Make sure that you have set up a screen lock or biometrics on your device.
If you run the application in an emulator and it says that you can't create a passkey, you have to log into your Google account and properly set up a screen lock or biometrics on the device.
To set up the screen lock, open the settings, search for security settings and add a PIN as well as a fingerprint as shown below (PIN is required for fingerprint):
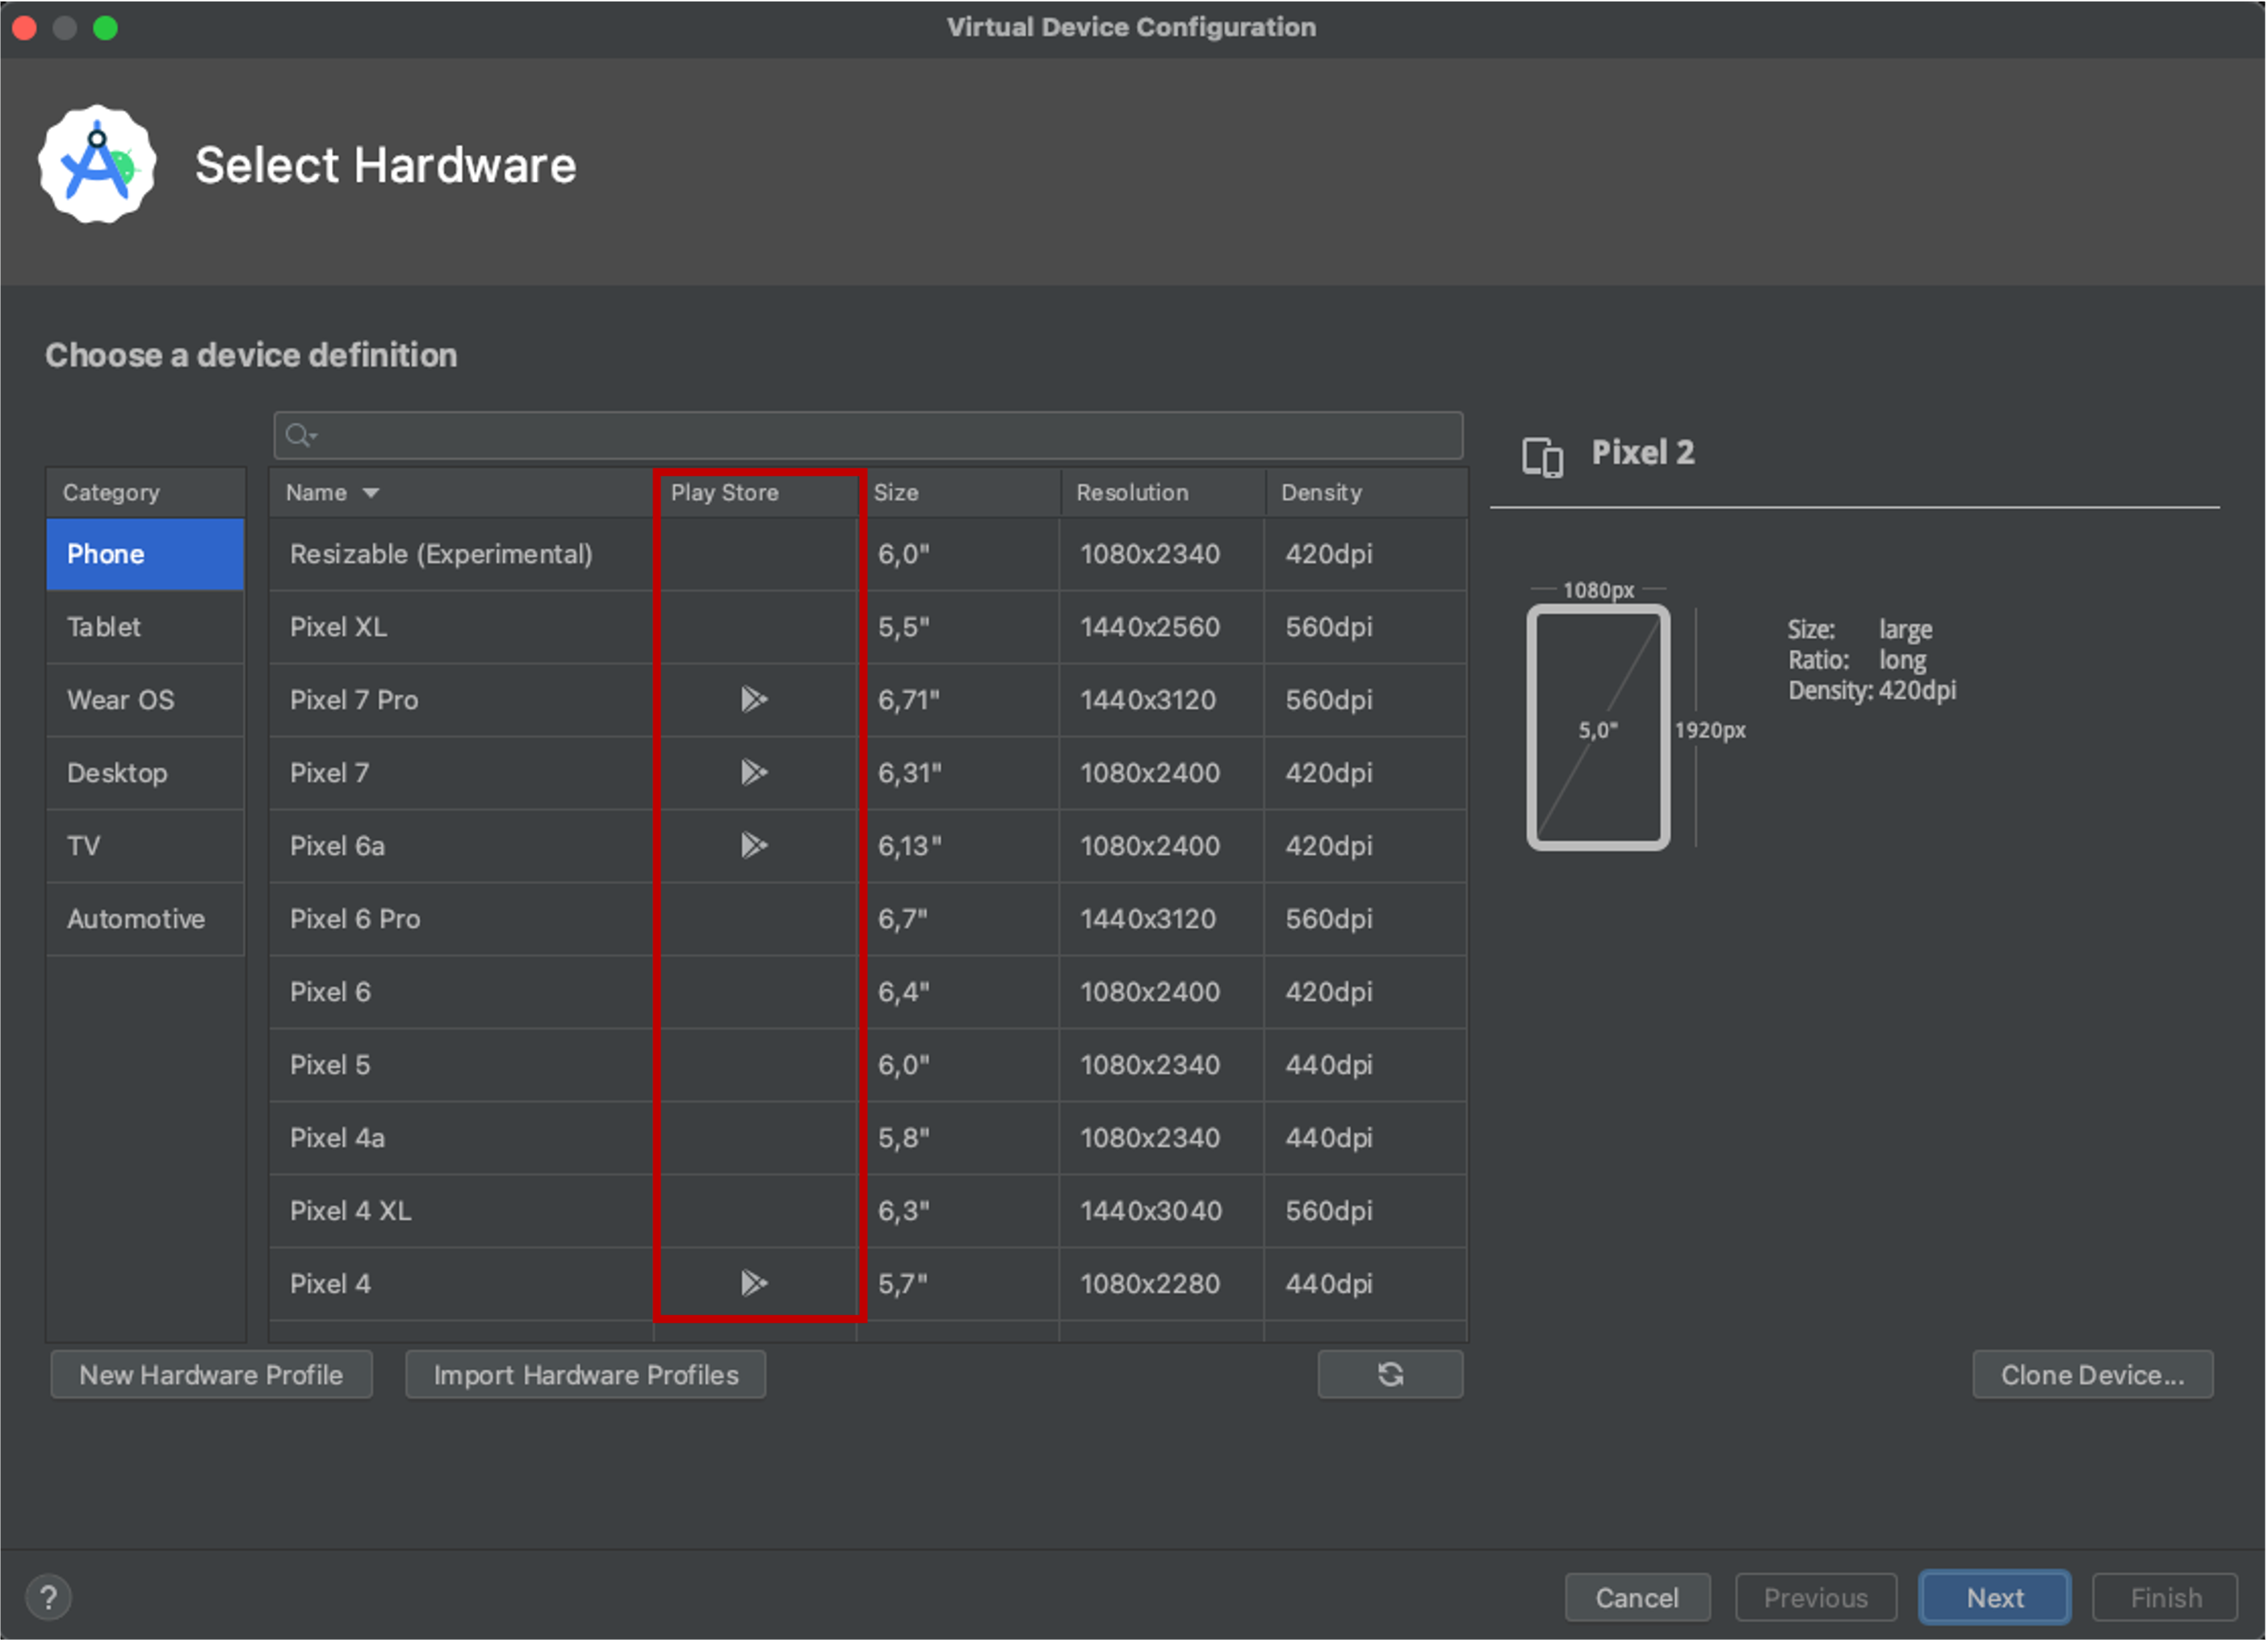
3. In case of using an emulator, make sure that is has Play Store support.
During our implementation and testing, we detected some bugs when using specific API versions / devices of Android emulator (physical devices worked at any time though). To avoid these issues, make sure that you are using an emulator with the following traits:
- API version 33 or 34
- Play Store Support (indicated by the Google Play icon when you create a new emulator device):
We tested this example successfully on:
- Pixel 7 Pro
- Pixel 7
- Pixel 6a
- Pixel 4
We continuously update the package to make things work on more emulators, once there are patches by Google.
Our recommendation if you run the example on an Android emulator is to follow these steps:
- Start your Android emulator (one of the emulators we mentioned above).
- Open the emulator's settings and sign into your Google account.
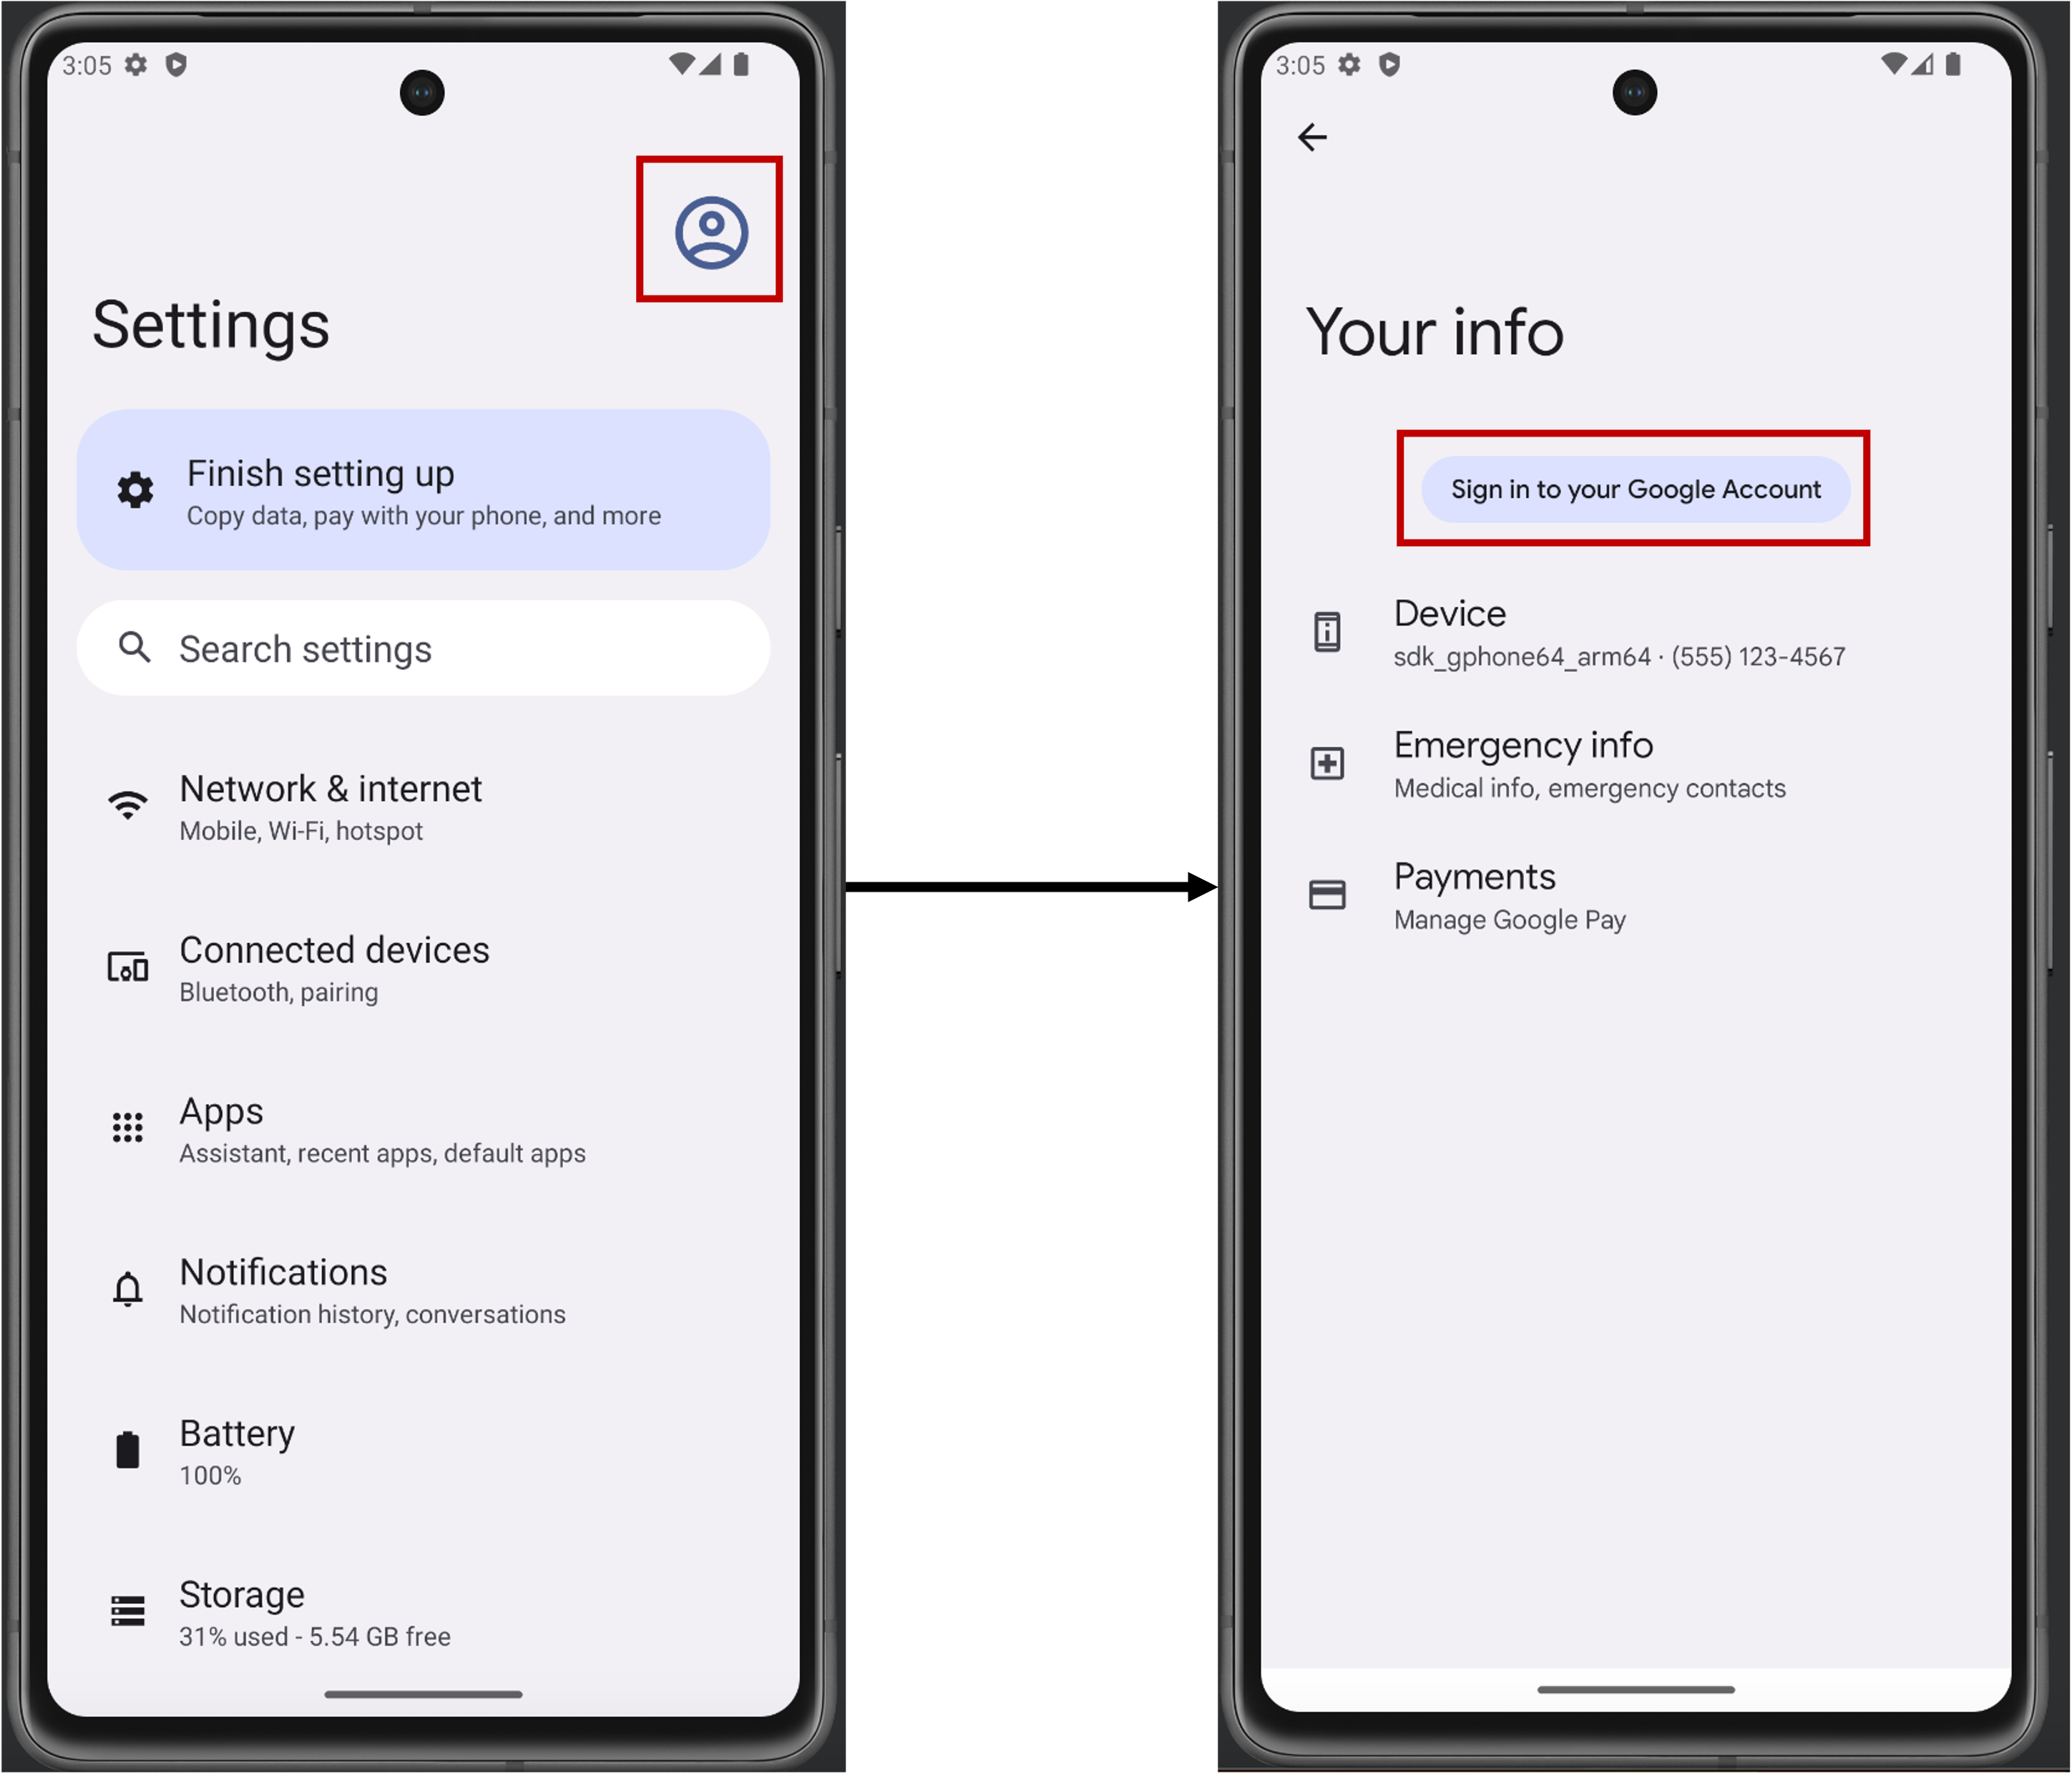
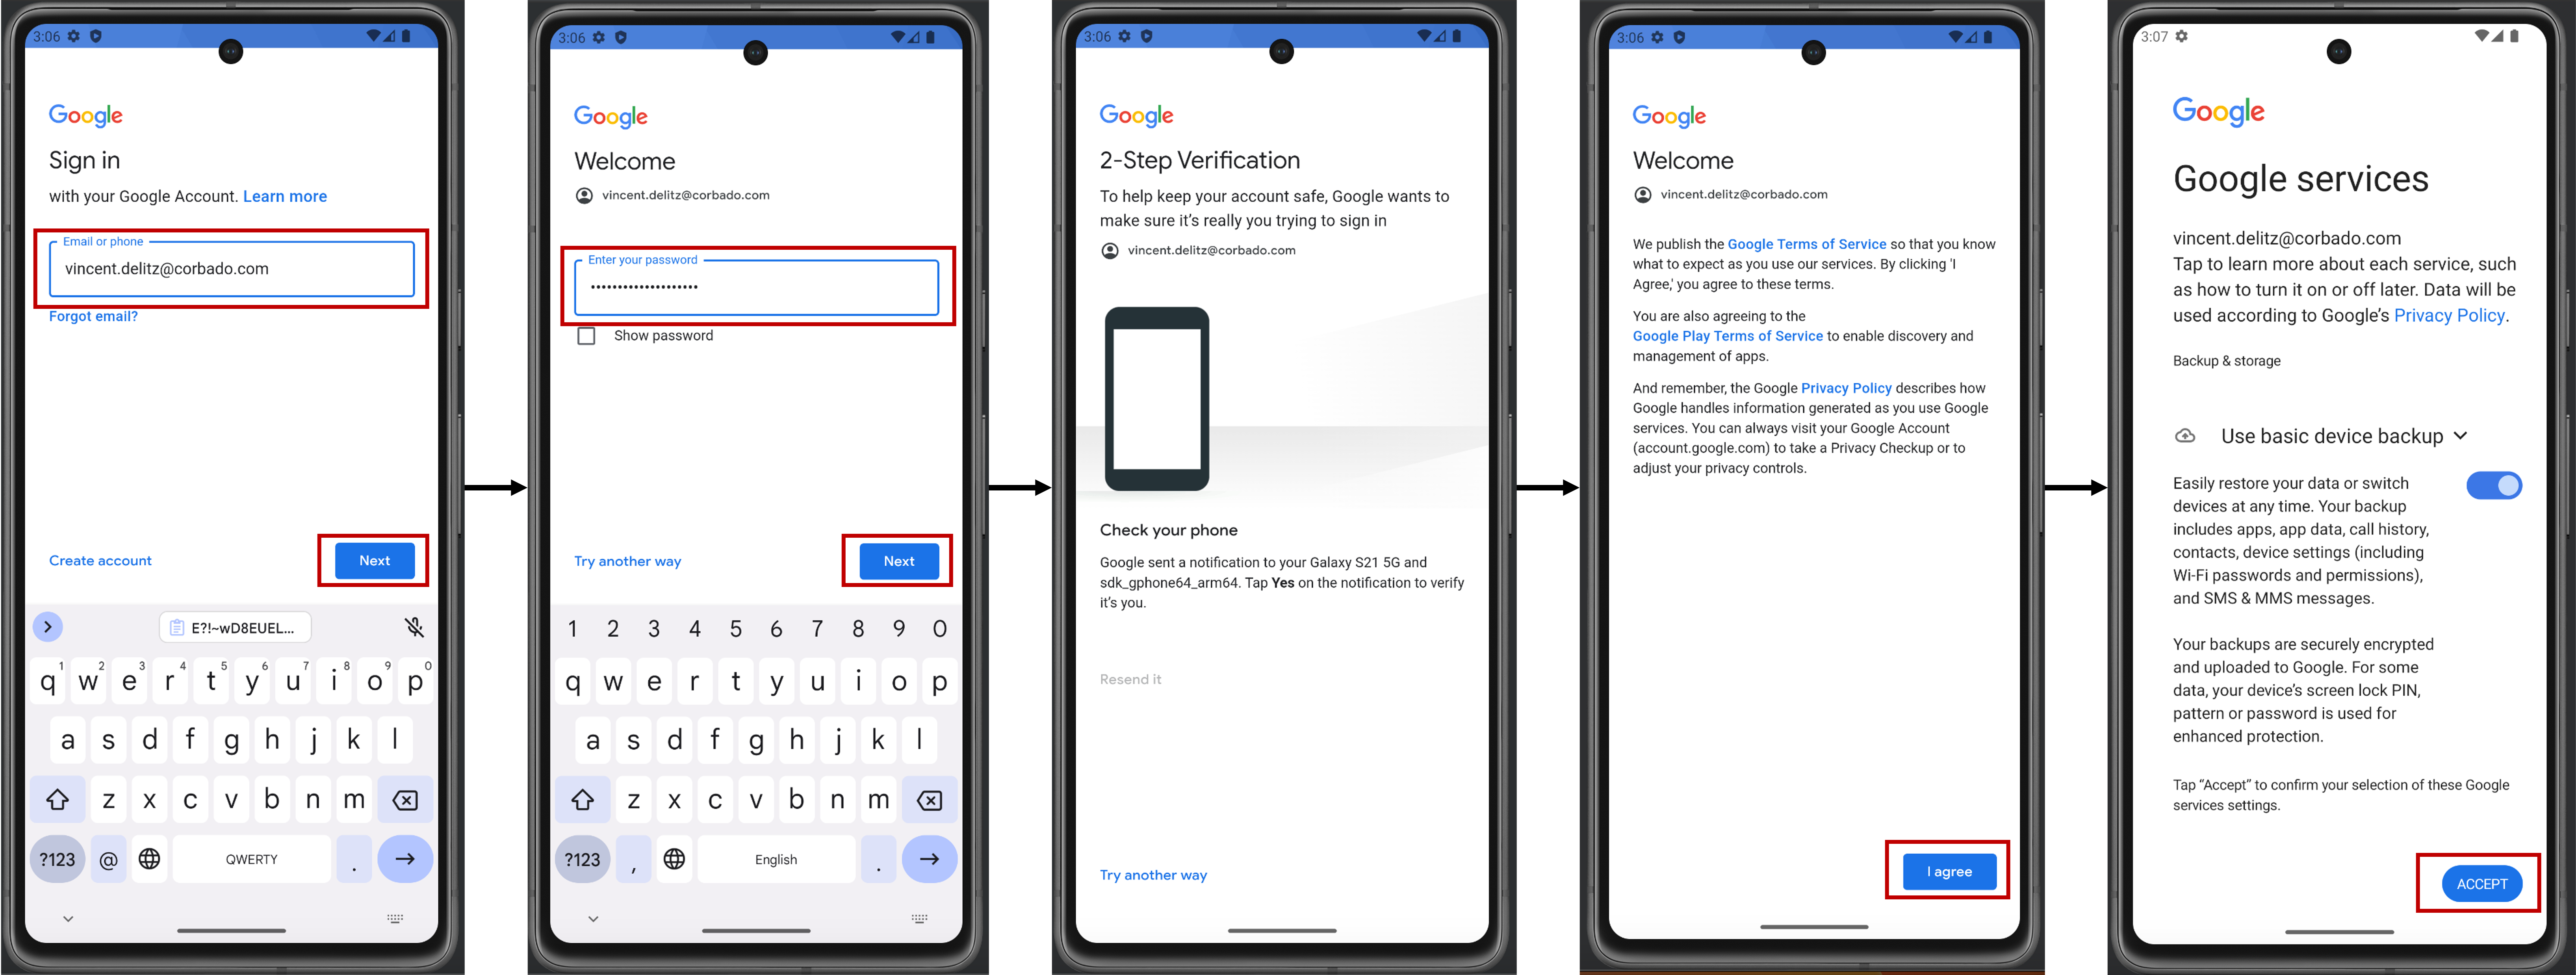
- Stay in the settings and add a screen lock (and optionally a fingerprint).
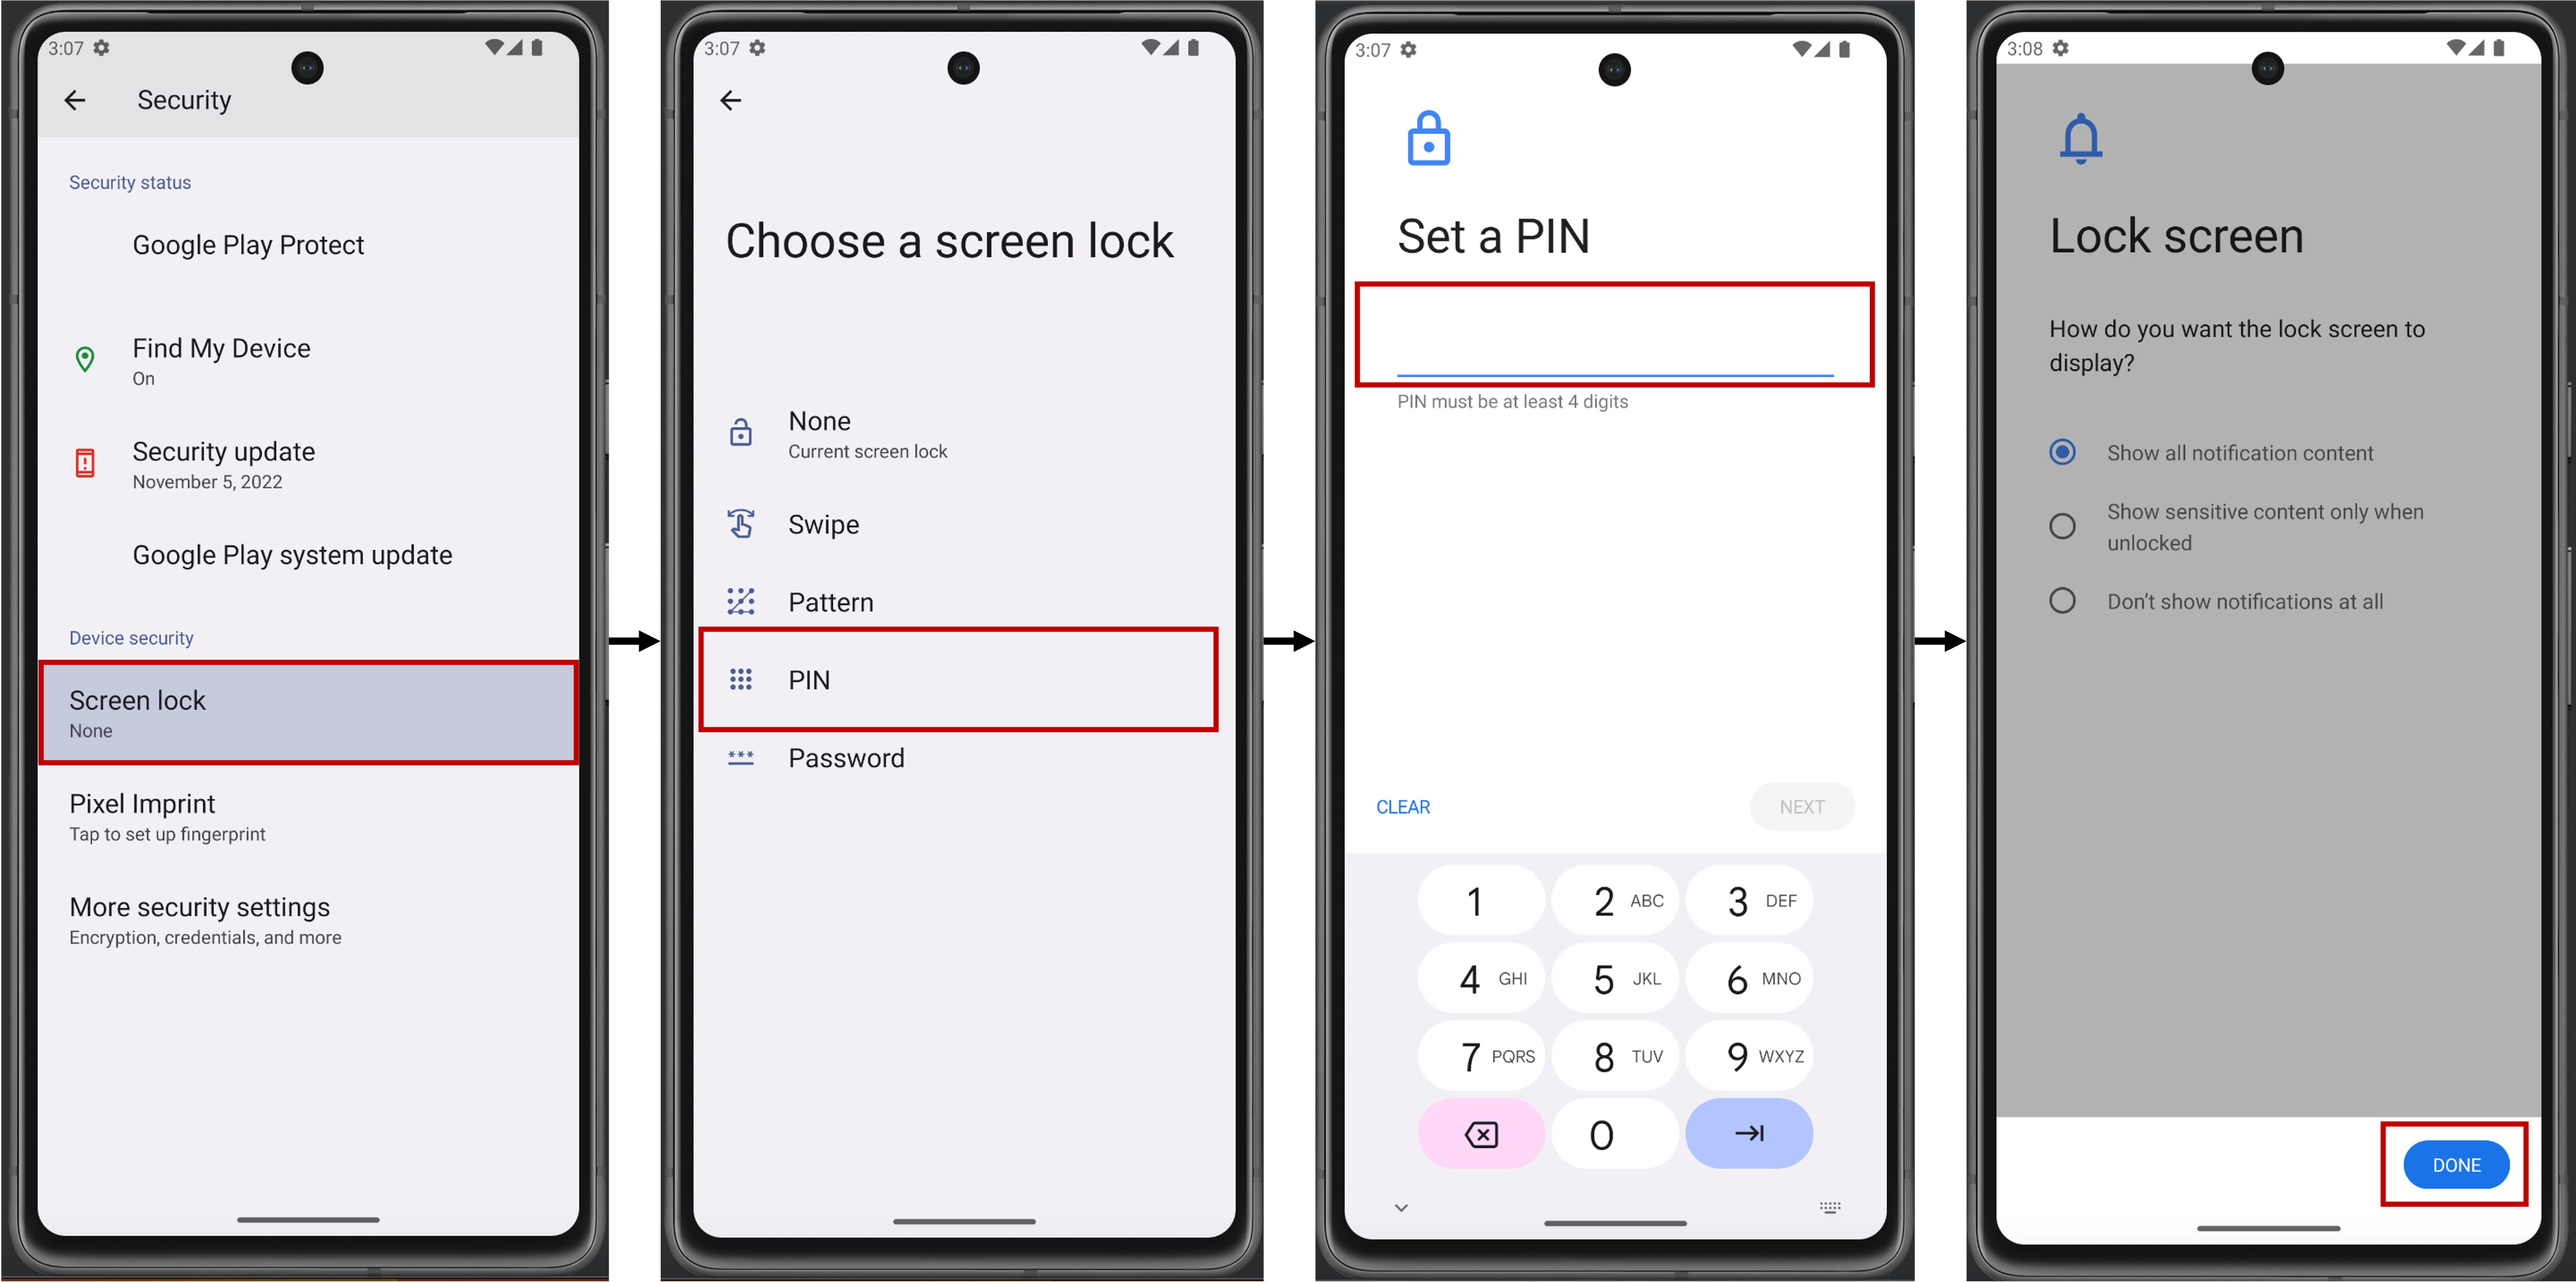
- Update Google Play (Extended Controls => Google Play => Update).
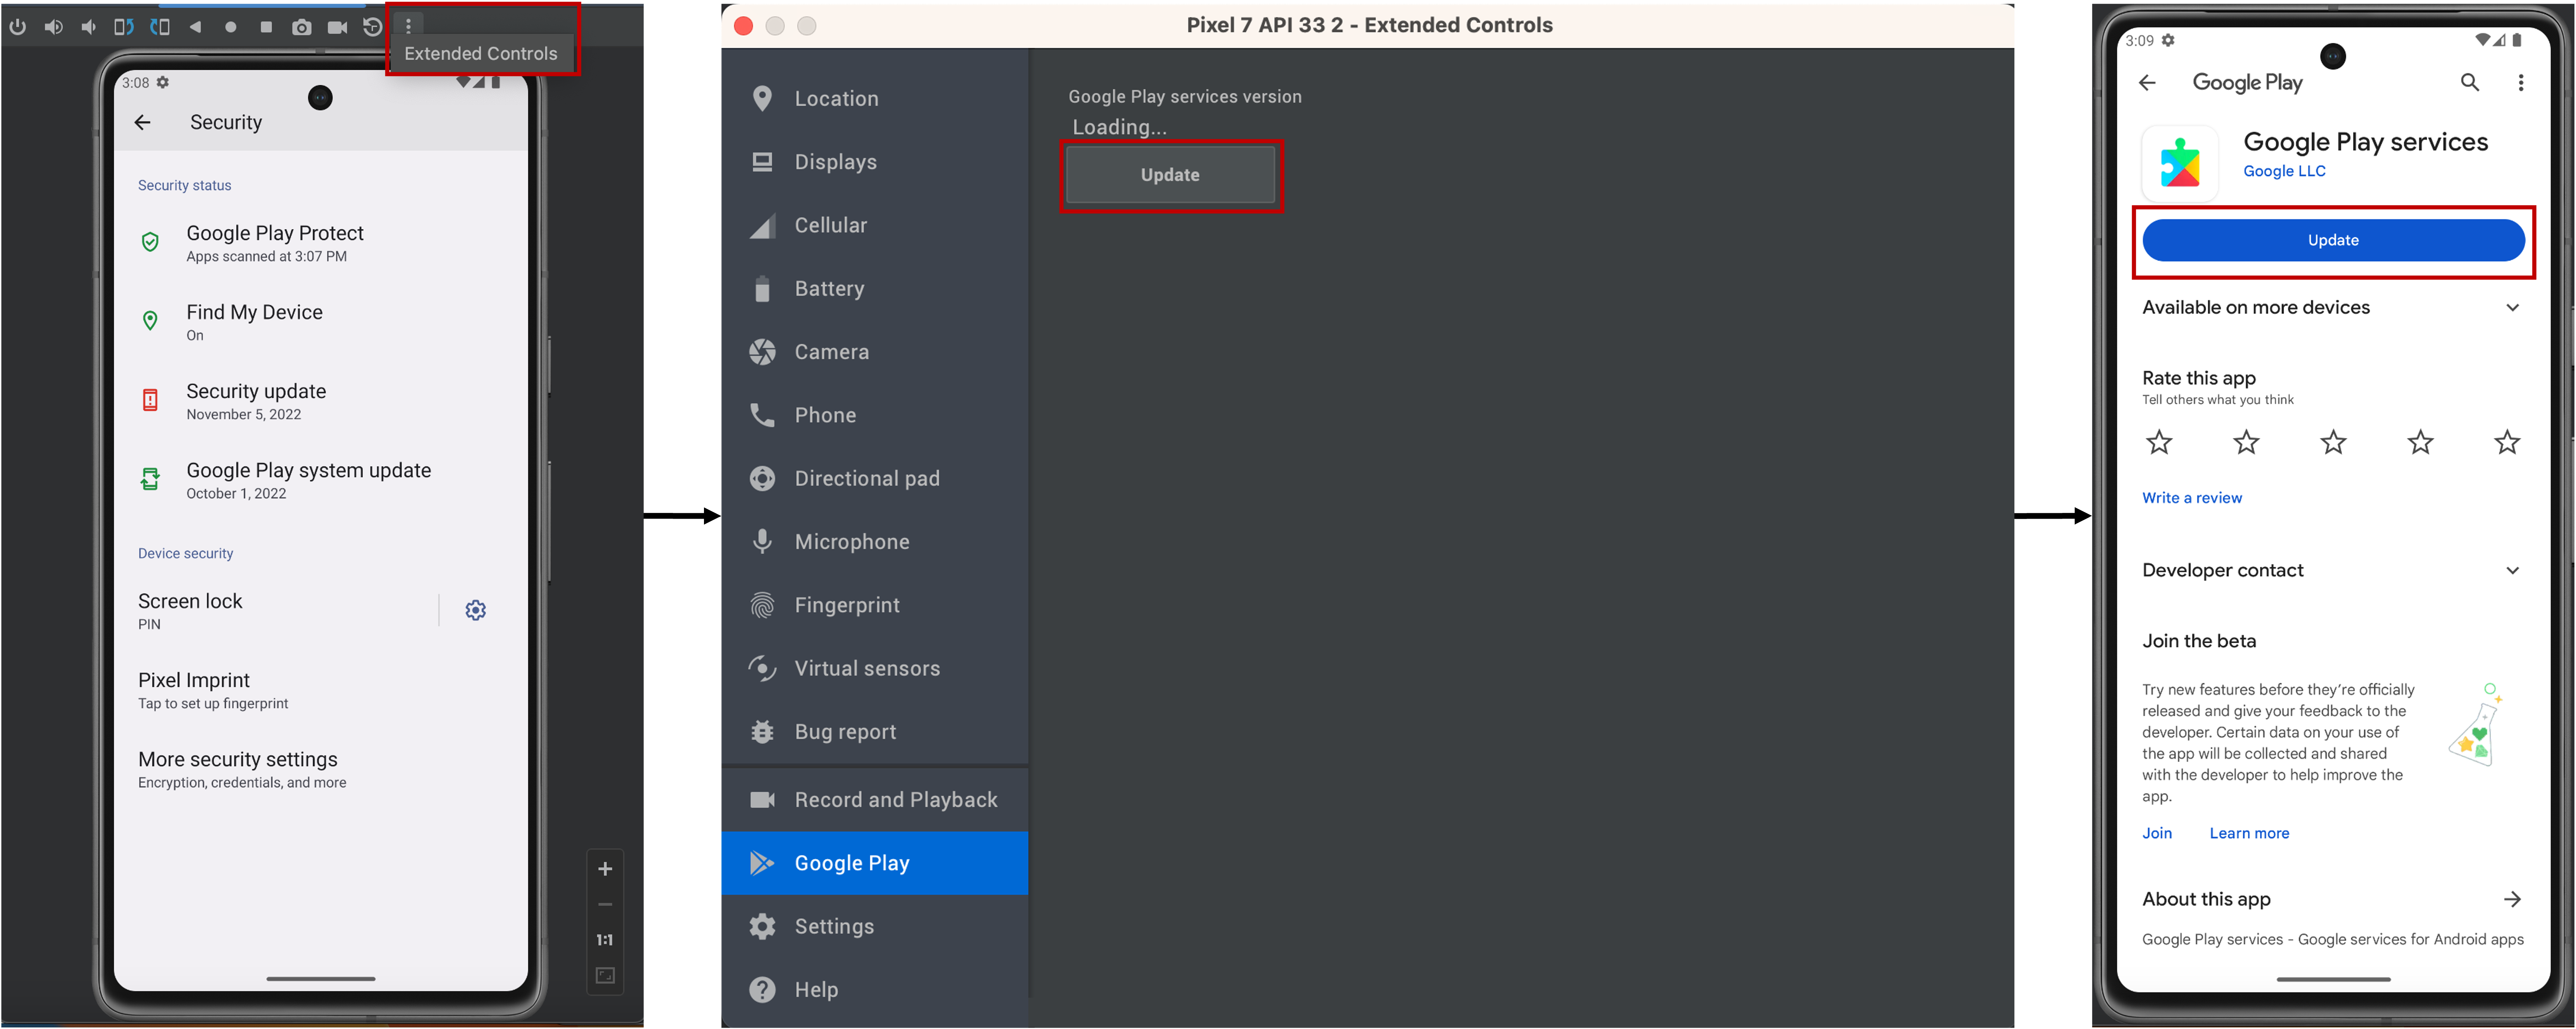
- Restart the emulator (cold boot).
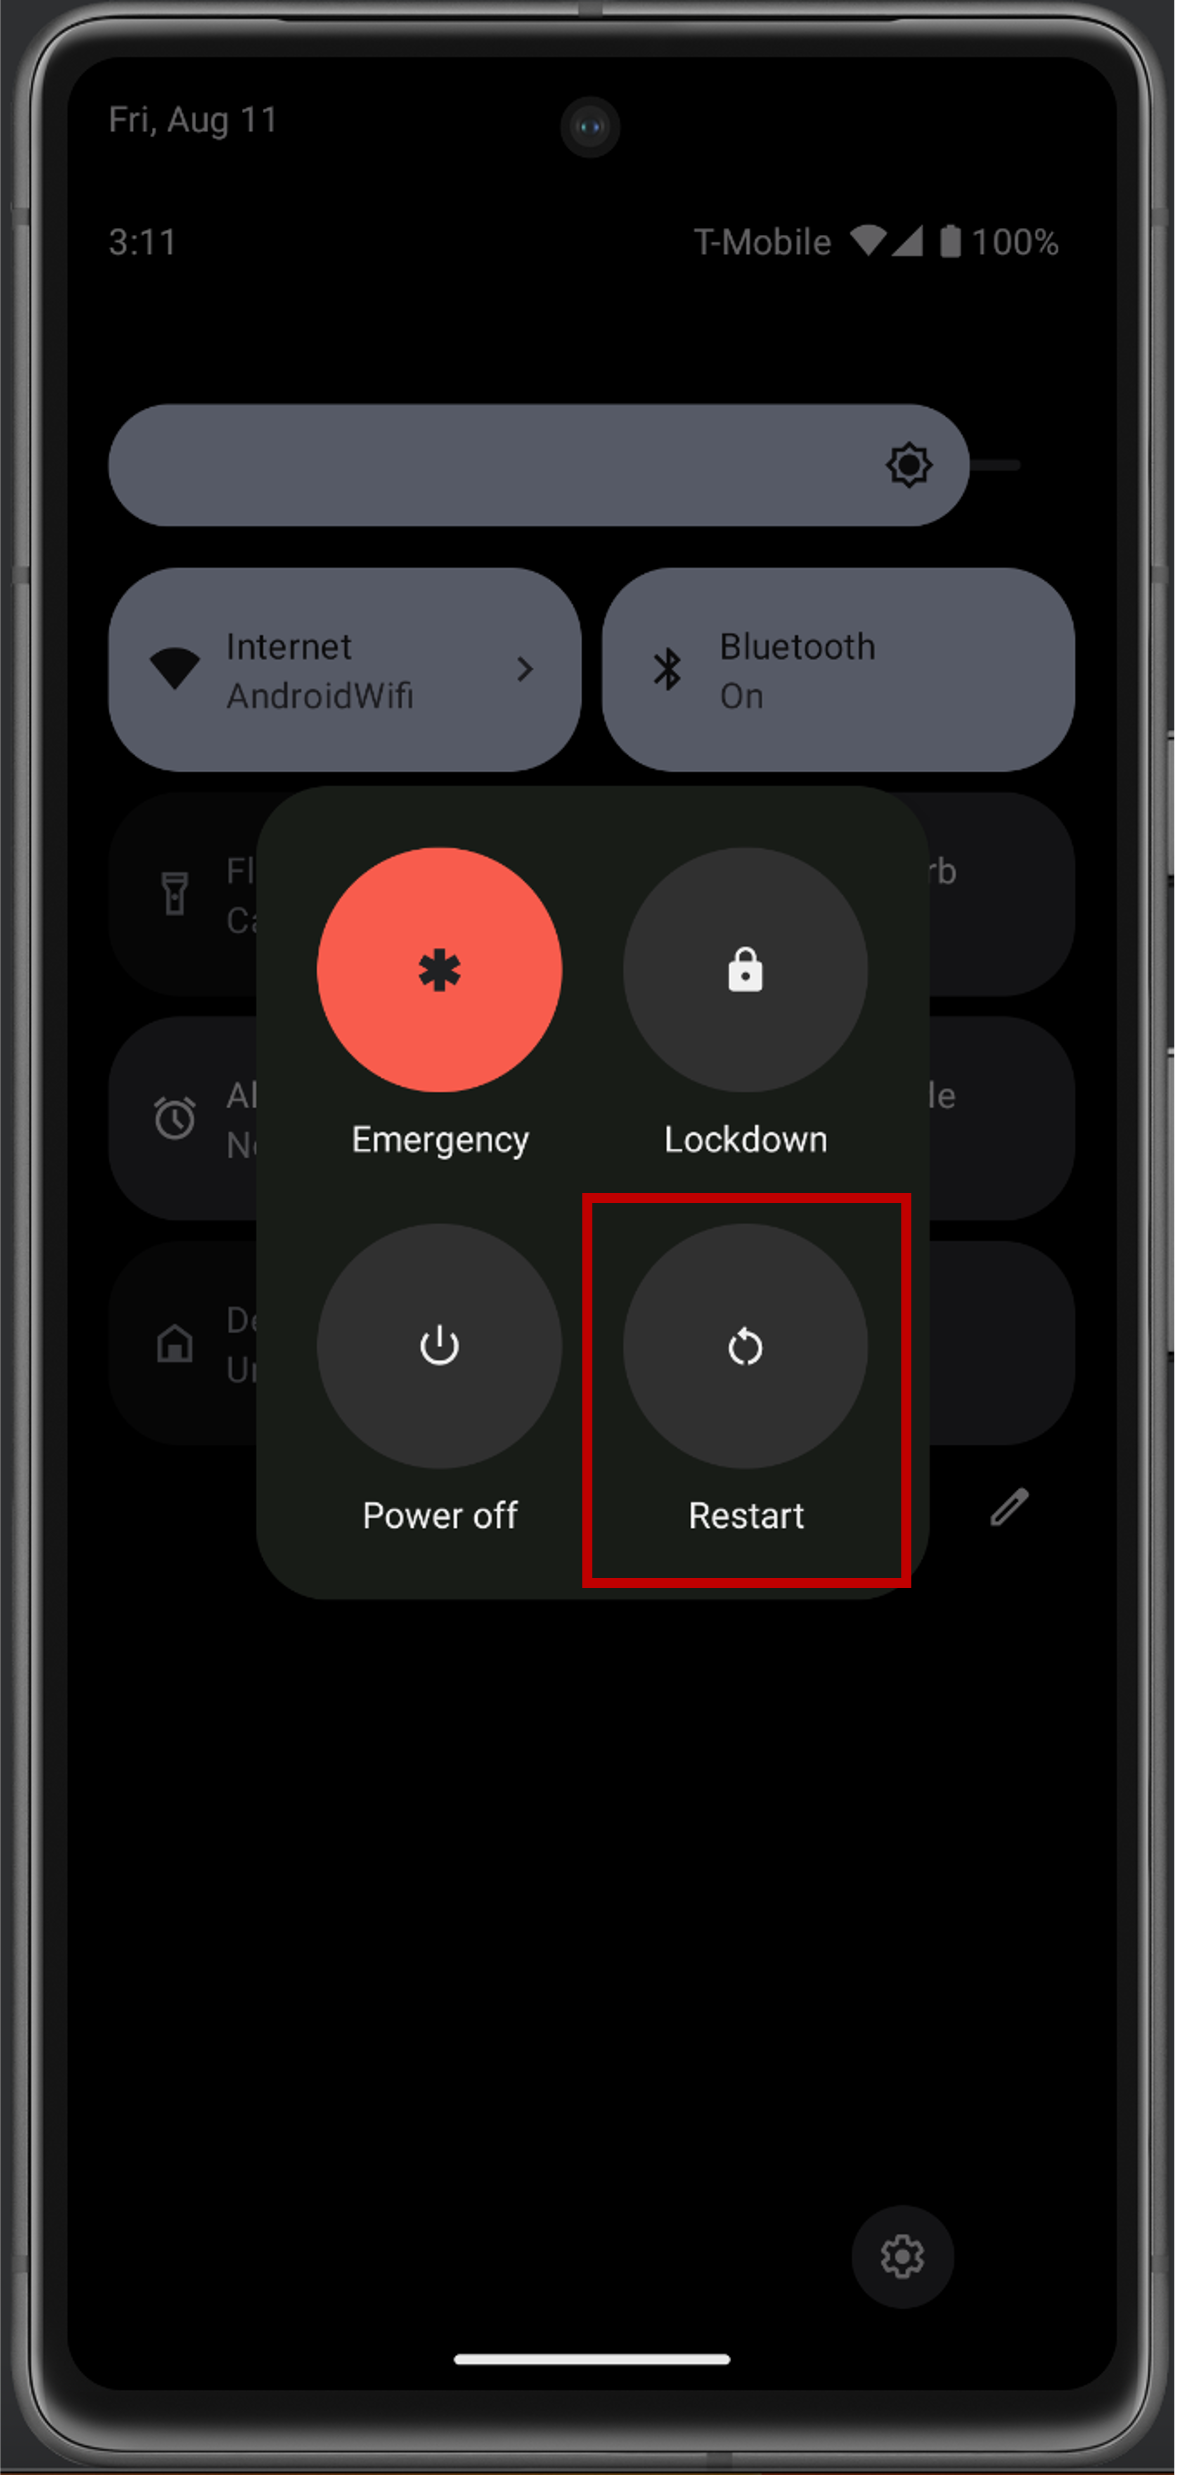
- You can now run the example app on your Android emulator.
iOS #
1. Make sure to enable biometrics to use passkeys
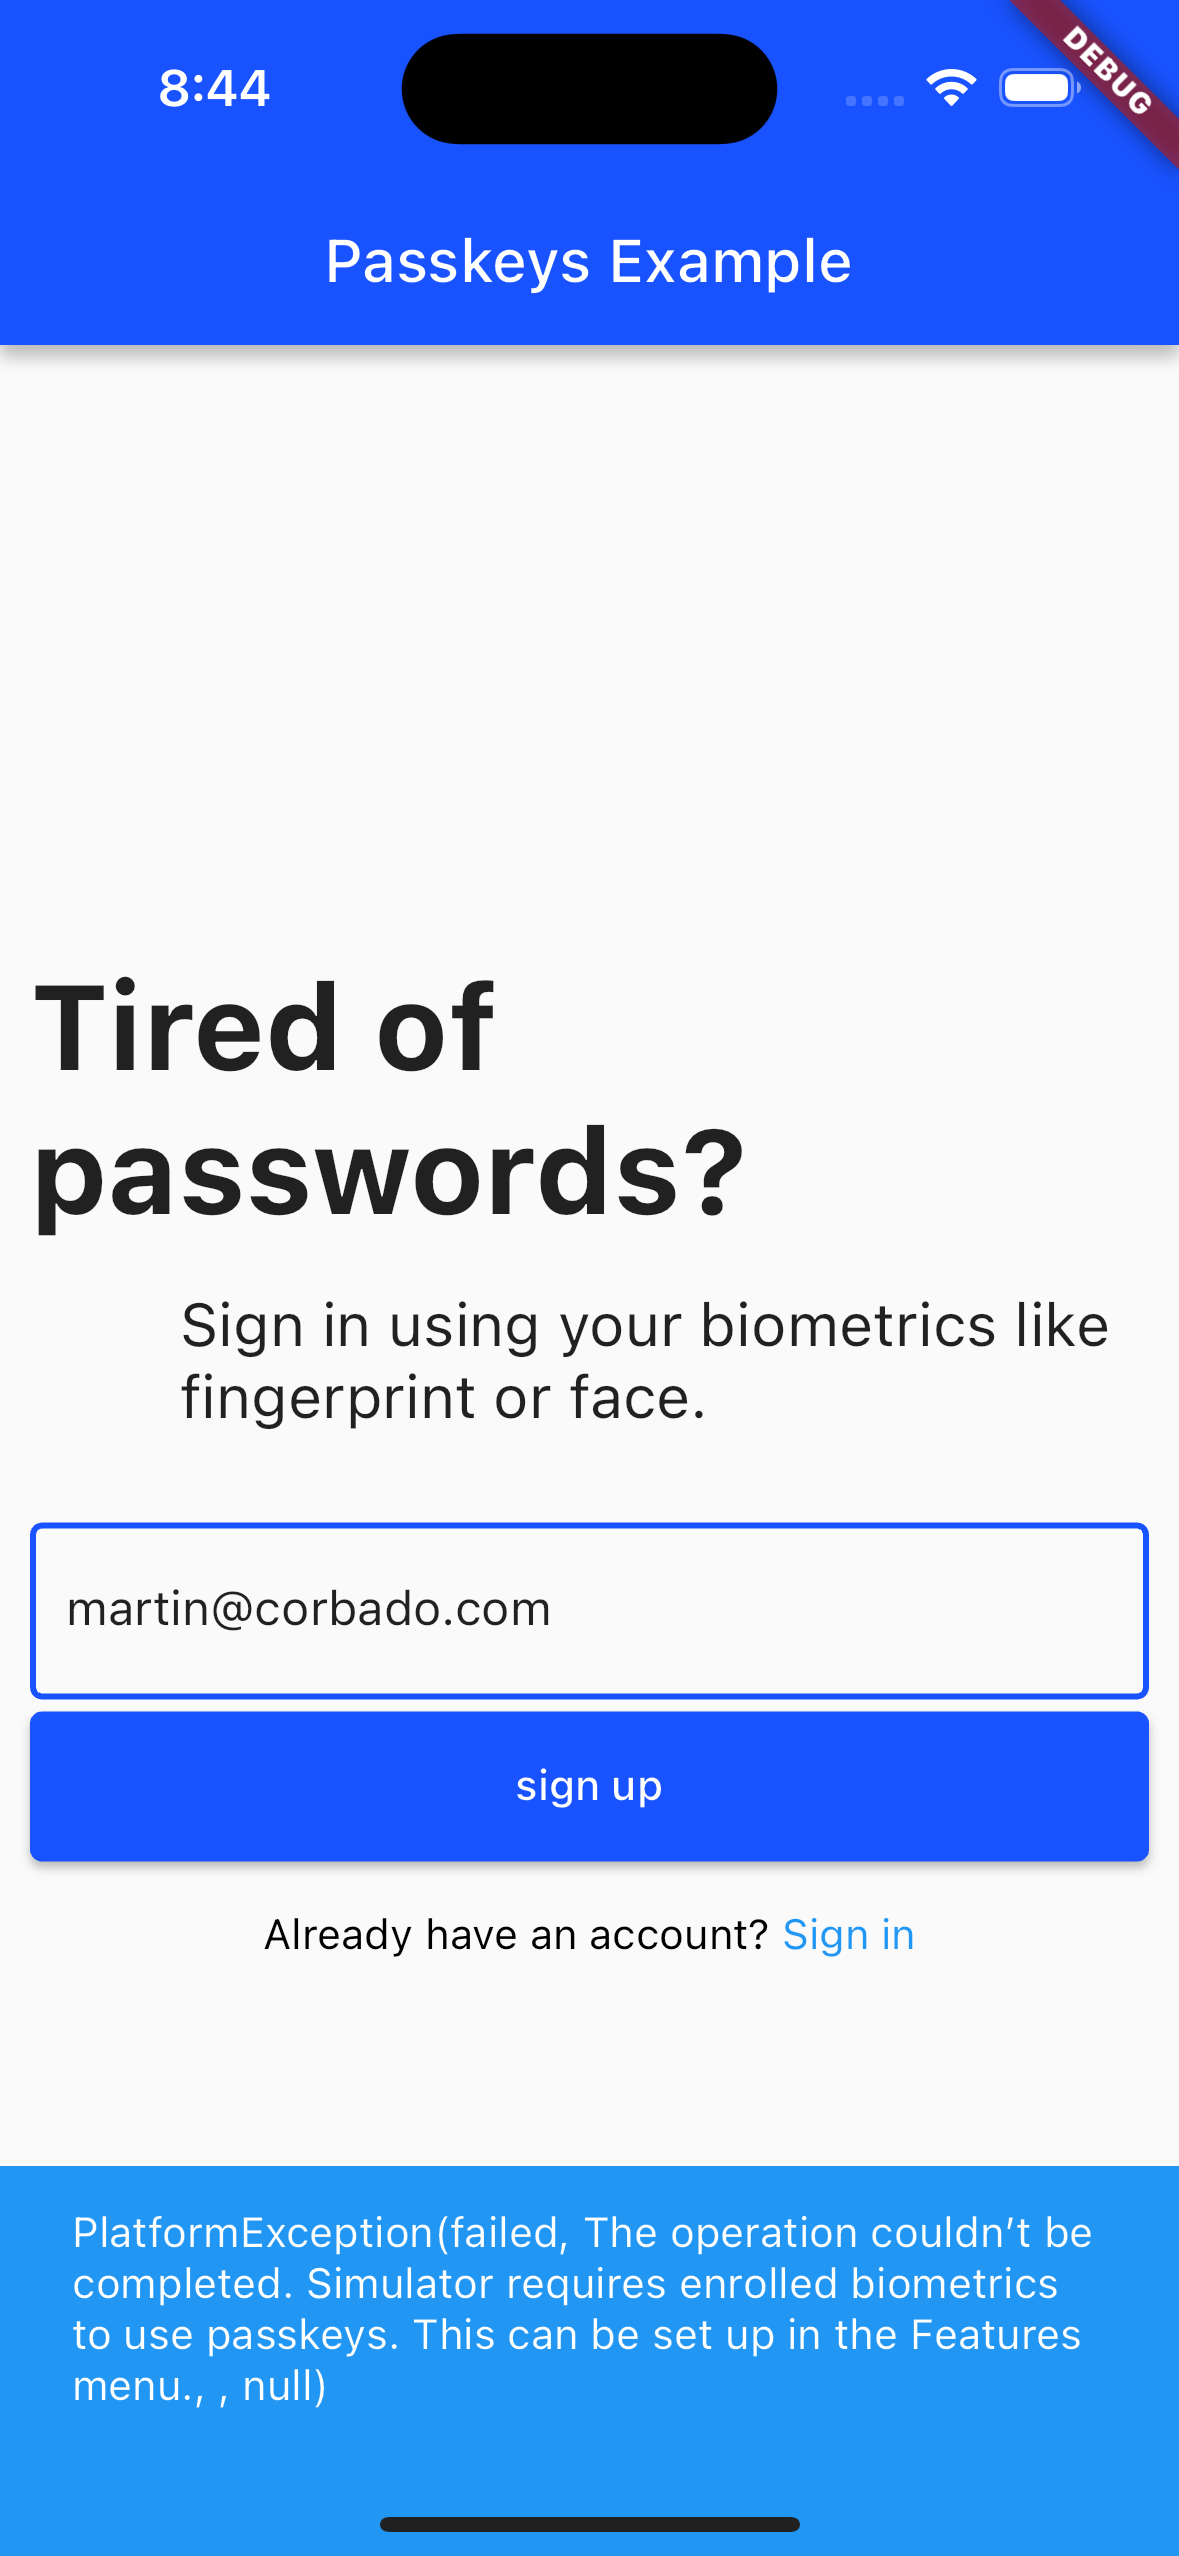
If you get an error like "Simulator requires enrolled biometrics to use passkeys" during sign up or login, activate Face ID for your device. On a simulator, this can be done under Features => Face ID by clicking on "Enrolled".
macOS #
1. Configure Apple App Site Association (AASA) and Associated Domains
- Make sure your relying server serves a valid Apple App Site Association (AASA) file at
https://<your-domain>/.well-known/apple-app-site-association. - The AASA must include your app's
appIDentries, which are composed of your Apple Team ID and the macOS bundle identifier (<TeamID>.<BundleID>). Example reference file:https://flutter.corbado.io/.well-known/apple-app-site-association. - Add the Associated Domains entitlement to your macOS target and include your relying server domain using the
webcredentials:prefix (e.g.,webcredentials:your-domain), so the system can match your app to the relying party. - Ensure the AASA is hosted without redirects and with the correct content type.
Web #
1. Update your index.html to include our JavaScript library
Our passkeys_web package relies on JavaScript for integrating with the browser's WebAuthn API. To make this work, you have to include our JavaScript library in your web/index.html file. If not correctly integrated the PasskeyAuthenticator would not correctly initialize and the application would crash and an exception asking to add the code blow will show in your console.<script
src="https://github.com/corbado/flutter-passkeys/releases/download/2.4.0/bundle.js"
type="application/javascript"
></script>
You can also take a look at this package's example to see how it is done there.
Requirements
- This package requires Flutter 3.19.0 or later.
Additional Details
- To support WebAssembly (Wasm) as outlined
in Flutter's documentation, we had to utilize
dart:js_interop, which requires Dart 3.3.0 and Flutter 3.19.0. Therefore, Flutter 3.19.0 is the minimal requirement for this feature. - Starting with Flutter 3.22.0 and later, when inserting the application script into the HTML, use:
<script src="flutter_bootstrap.js" type="application/javascript"></script>
Instead of:
<script src="main.dart.js" type="application/javascript"></script>
- To enable running or building using Wasm, simply add the
--wasmflag to theflutter runorflutter buildcommands.
Passkeys Doctor #
A diagnostic tool for Flutter Passkeys implementation that helps identify and resolve common configuration issues with WebAuthn/Passkeys.
Overview #
Passkeys Doctor is a diagnostic tool that helps developers identify and fix common issues with their Passkeys implementation. It performs various checks to ensure your app is properly configured for Passkeys authentication across different platforms (iOS, Android, and Web).
Features #
- RPID Validation: Verifies that your Relying Party ID (RPID) is correctly configured
- Platform-Specific Checks:
- iOS: Validates Apple App Site Association (AASA) file configuration
- Android: Verifies Digital Asset Links configuration
- Web: Ensures RPID matches the current hostname
- Real-time Diagnostics: Provides immediate feedback on configuration issues
- Detailed Error Reporting: Offers specific guidance on how to fix identified issues
Usage #
The Passkeys Doctor is already integrated into the main Passkeys package. To enable it, simply pass debugMode: true when initializing PasskeysAuthenticator:
import 'package:passkeys/passkeys.dart';

void main() {
  final authenticator = PasskeyAuthenticator(debugMode: true);
}
The doctor will automatically perform checks and provide feedback through the Passkeys package's error handling system.
Diagnostic Checks #
RPID Validation
- Ensures RPID is properly formatted
- Verifies RPID matches your domain
iOS-specific Checks
- Validates Apple App Site Association (AASA) file contains the app bundle
Android-specific Checks
- Validates Digital Asset Links is correctly configured
Web-specific Checks
- Ensures RPID matches current hostname
- Validates existence of passkeys JS script
Error Handling #
The doctor provides detailed error messages and suggestions for fixing common issues. Each checkpoint includes:
- Name of the check
- Detailed description of the issue
- Type of issue (error, warning, or success)
- Suggested fixes when applicable
Best Practices #
- Enable the doctor during development to catch configuration issues early
- Use the detailed error messages to guide your configuration fixes