nearby_service 0.2.1  nearby_service: ^0.2.1 copied to clipboard
Nearby Service Flutter Plugin is used to create connections in a P2P network. Supports sending text messages and files.

Nearby Service #
Connecting phones in a P2P network
Nearby Service Flutter Plugin is used to create connections in a P2P network. The plugin supports sending text messages and files. With it, you can easily create any kind of information sharing application without Internet connection.
The package does not support communication between Android and IOS/macOS (Darwin) devices, the connection is available for Android-Android and Darwin-Darwin relations.
Your feedback and suggestions would be greatly appreciated! You can leave your opinion here
Video #
Watch a quick demonstration in MP4 format:
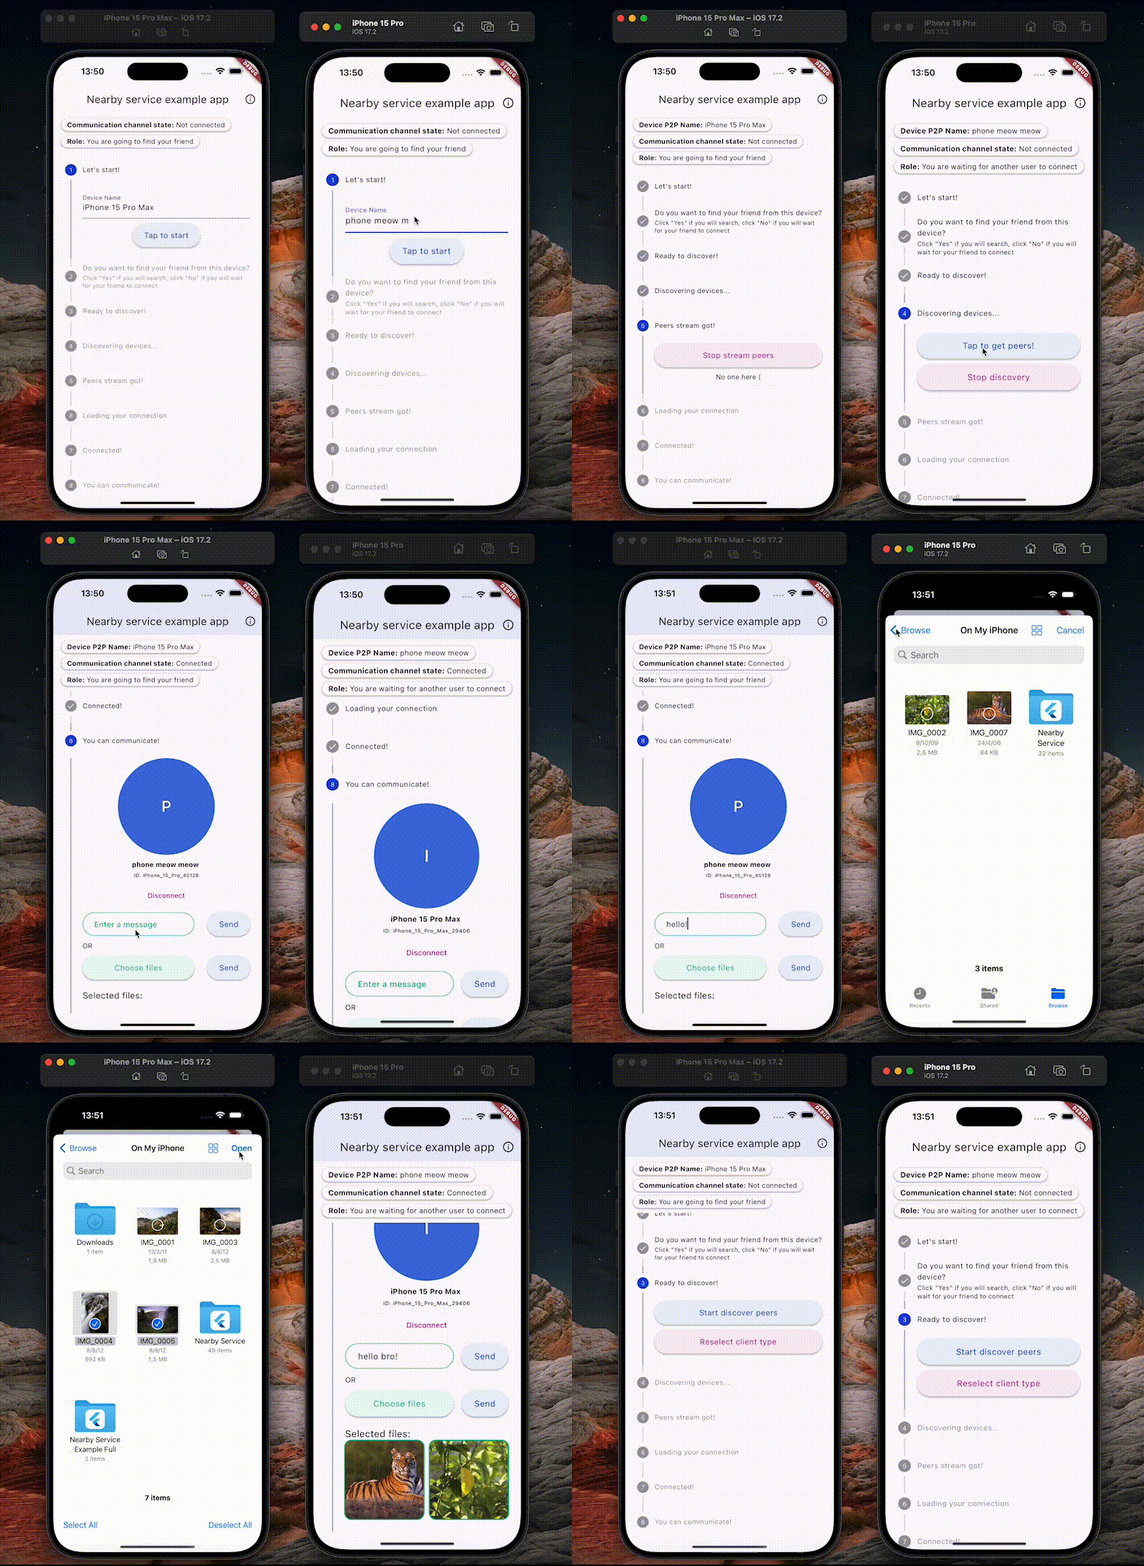
Or find the GIF demo at the end of the README:
Table of Contents #
About #
A peer-to-peer (P2P) network is a decentralized network architecture in which each participant, called a peer, can act as both a client and a server. This means that peer-to-peer networks can exchange resources such as files, data or services directly with each other without needing a central authority or server.
About Android Plugin #
For Android, Wi-fi Direct is used as a P2P network.
It is implemented through the android.net.wifi.p2p module.
It requires permissions for ACCESS_FINE_LOCATION and NEARBY_WIFI_DEVICES (for Android 13+).
It is also important that you need Wi-fi enabled on your device to use it.
To check permissions and Wi-fi status, the
nearby_service plugin includes a set of methods:
checkWifiService()(Android only): returns true if Wi-fi is enabledrequestPermissions()(Android only): requests permissions for location and nearby devices and returns true if grantedopenServicesSettings(): opens Wi-fi settings for Android and general settings for iOS and macOS
Testing the plugin is not possible on Android emulators, as they usually do not contain the Wi-fi Direct function in general! Use physical devices for that.
About IOS and macOS Plugin #
For IOS and macOS, the P2P connection is implemented through the Multipeer Connectivity framework.
This framework automatically selects the best network technology depending on the situation—using Wi-Fi if both devices are on the same network, or using peer-to-peer Wi-Fi or Bluetooth otherwise.
The module will work even with Wi-fi turned off (via Bluetooth), but you can still use openServicesSettings() from
the nearby_service plugin to open the settings and prompt the user to turn Wi-fi on.
Features #
-
Device Preparation
- Requesting permissions to use Wi-Fi Direct (Android only)
- Checking Wi-Fi status (Android only)
- Opening settings to enable Wi-Fi (Android and IOS/macOS)
- Role selection - Browser or Advertiser (IOS and macOS only)
-
Connecting to the Device from a P2P Network
- Listening for discovered devices (peers)
- Creating connections over the P2P network
- Monitoring the status of the connected device
-
The Data Transmission Channel
- Establishing the channel for data exchange
- Monitoring the status of the channel
-
Typed Data Exchange
- Transmitting text data over the P2P network
- Receiving confirmation of successful text message delivery
- Transmitting files over the P2P network
- The option to confirm or deny receiving of files over the network
Setup #
Android setup #
All necessary Android permissions are already in the AndroidManifest.xml of the plugin, so you don't need to add anything to work with p2p network.
IOS and macOS setup #
For IOS and macOS, you need to add the following values to Info.plist:
<key>NSBonjourServices</key>
  <array>
    <string>_mp-connection._tcp</string>
  </array>
<key>UIRequiresPersistentWiFi</key>
<true/>
<key>NSLocalNetworkUsageDescription</key>
<string>[Your description here]</string>
For macOS, you must have the following in Release.entitlements and DebugProfile.entitlements:
...
<key>com.apple.security.network.server</key>
<true/>
<key>com.apple.security.network.client</key>
<true/>
...
-
NSBonjourServicesFor the
nearby_serviceplugin, you should add the value<string>_mp-connection._tcp</string>. This key is required for Multipeer Connectivity. It defines the Bonjour services that your application will look for. Bonjour is Apple's implementation of zero-configuration networking, which allows devices on a LAN to discover each other and establish connections without requiring manual configuration. -
UIRequiresPersistentWiFiThis key is not strictly required for Multipeer Connectivity to work. This key is used to indicate that your application requires a persistent Wi-Fi connection even when the screen is off. This can be useful for maintaining a network connection for continuous data transfer.
-
NSLocalNetworkUsageDescriptionThis key is needed to inform users why your application will use the local network. You must provide a string value that explains why your application needs LAN access.
Note that if you want to use the plugin to send files, you also need to follow the instructions about permissions of the filesystem management package you are using.
Usage #
The full example demonstrating the functionality can be viewed at the link.
Important note: for functionality that is only available for one of the platforms, you should use the corresponding API element from
NearbyService.For Android:
final _nearbyService = NearbyService.getInstance();
_nearbyService.android..
For IOS and macOS:
final _nearbyService = NearbyService.getInstance();
_nearbyService.darwin..
- Import the package:
import 'package:nearby_service/nearby_service.dart';
- Create an instance of NearbyService:
// getInstance() returns an instance for the current platform.
final _nearbyService = NearbyService.getInstance();
- Initialize the plugin:
// You can change the device name on a P2P network only for iOS.
// Optionally pass the [darwinDeviceName].
await _nearbyService.initialize(
        data: NearbyInitializeData(darwinDeviceName: darwinDeviceName),
      );
Extra step for Android: ask for permissions and make sure Wi-fi is enabled:
final granted = await _nearbyService.android?.requestPermissions();
if (granted ?? false) {
  // go to the checking Wi-fi step
}
final isWifiEnabled = await _nearbyService.android?.checkWifiService();
if (isWifiEnabled ?? false) {
  // go to the starting discovery step
}
Extra step for IOS and macOS: ask the user to choose whether they are a Browser or Advertiser:
In IOS and macOS Multipeer Connectivity, there are 2 roles for the discovery process and connection between devices: browser and advertiser.
Browser: This component discovers nearby devices that report their availability. It is responsible for finding peers that advertise themselves and inviting them to join the shared session.
Advertiser: This component advertises the availability of the device to nearby peers. It is used to let know the browser that the device is available for inviting and connecting.
The code for selecting a role:
_nearbyService.darwin?.setIsBrowser(value: isBrowser);
// go to the starting discovery step
- Start to discover the P2P network.
final result = await _nearbyService.discover();
if (result) {
   // go to the listening peers step
}
- Start listening to peers:
_nearbyService.getPeersStream().listen((event) => peers = event);
- Each of the peers is a
NearbyDeviceand you can connect to it:
Remember that when used on the Android platform, you can only pass
NearbyAndroidDeviceto theconnect()method. Similarly for iOS and macOS,NearbyDarwinDevice. Devices automatically come from the discovery state in the correct type, so you just need to use the received data.
final result = await _nearbyService.connect(device);
if (result) {
  // go the the listening the device step
}
- Once you are connected via P2P network, you can start listening to the connected device. If
nullcomes from the stream, it means the devices lost connection.
_connectedDeviceSubscription = _nearbyService.getConnectedDeviceStream(device).listen(
  (event) async {
    final wasConnected = connectedDevice?.status.isConnected ?? false;
    final nowConnected = event?.status.isConnected ?? false;
    if (wasConnected && !nowConnected) {
      // return to the discovery state
    }
    connectedDevice = event;
  },
);
- Once you have connected over a P2P network, you still need to create a communication channel to transfer data.
For Android, this is a socket embedded in
NearbyService, for iOS and macOS it's a setup to listen to messages and resources from the desired device. There is a methodstartCommunicationChannel()for this purpose. You should pass to it listeners for messages and resources received from the connected device. There can only be one communication channel, if you create a new one, the previous one will be cancelled.
final messagesListener = NearbyServiceMessagesListener(
  onData: (message) {
    // handle the message from NearbyServiceMessagesListener
  },
);
final filesListener = NearbyServiceFilesListener(
  onData: (pack) async {
    // handle the files pack from NearbyServiceFilesListener
  },
);

await _nearbyService.startCommunicationChannel(
  NearbyCommunicationChannelData(
    connectedDevice.info.id,
    messagesListener: messagesListener,
    filesListener: filesListener,
  ),
);
- I think you've already guessed that since there are listeners of messages from another device, we can send them
ourselves too :) There is a method
send()for that:
_nearbyService.send(
  OutgoingNearbyMessage(
    content: NearbyMessageTextRequest.create(value: message),
    receiver: connectedDevice.info,
  ),
);
Data sharing #
This is a very important topic for the nearby_service plugin because it provides unique functionality for sharing
typed data.
First, it's essential to say that when you send a message, you are required to pass the OutgoingNearbyMessage model.
This contains the receiver - the recipient to whom the message is addressed. The receiver is someone with whom you
already have an established communication channel. Also OutgoingNearbyMessage contains a content field, it can be
one of 4 types:
NearbyMessageTextRequestNearbyMessageTextResponseNearbyMessageFilesRequestNearbyMessageFilesResponse
We will talk more about them later.
Second, there is another type of message, ReceivedNearbyMessage. This is what comes to you from
the NearbyServiceMessagesListener. It contains a sender field so that you can identify who the message came from and
use that information.
Text messages #
Description of the operating logic:
- One of the devices sends a message using the
send()method:
// DEVICE A
_nearbyService.send(
  OutgoingNearbyMessage(
    content: NearbyMessageTextRequest.create(value: message),
    receiver: connectedDevice.info,
  ),
);
- Another device receives the
ReceivedNearbyMessagewith content cast asNearbyMessageTextRequestfrom theNearbyServiceMessagesListener.
// DEVICE B
final messagesListener = NearbyServiceMessagesListener(
  onData: (message) {
    // message is ReceivedNearbyMessage with content cast as NearbyMessageTextRequest here
  },
);
- If you want the sender to make sure the message has been received, you can send them
NearbyMessageTextResponse. You need to add theidfrom the receivedNearbyMessageTextRequestto it:
// DEVICE B
_nearbyService.send(
  OutgoingNearbyMessage(
    receiver: connectedDevice.info,
    content: NearbyMessageTextResponse(id: requestId),
  ),
);
- If everything is fine, the sender will receive your
NearbyMessageTextResponsefrom theirNearbyServiceMessagesListener:
// DEVICE A
final messagesListener = NearbyServiceMessagesListener(
  onData: (message) {
    // message is ReceivedNearbyMessage with content cast as NearbyMessageTextResponse here
  },
);
Throughout the process, you can use the
ids of the messages to identify them.
Resource messages #
Description of the operating logic:
- One of the devices sends a message with
NearbyMessageFilesRequestusing thesend()method:
// DEVICE A
_nearbyService.send(
  OutgoingNearbyMessage(
    // files here is List<NearbyFileInfo>, it can be easily created from the file path: NearbyFileInfo(path: file.path)
    content: NearbyMessageFilesRequest.create(files: files),
    receiver: connectedDevice.info,
  ),
);
- Another device receives the
ReceivedNearbyMessagewith content cast asNearbyMessageFilesRequestfrom theNearbyServiceMessagesListener.
The file request comes from the
NearbyServiceMessagesListenerbecause it doesn't contain the transferred files, only the request to send them! For files, confirmation by the other party before starting the data transfer is required!
// DEVICE B
final messagesListener = NearbyServiceMessagesListener(
  onData: (message) {
    // message is ReceivedNearbyMessage with content cast as NearbyMessageFilesRequest here
  },
);
- In order to receive the files, the other party must confirm that it wants to do so and send a message
with
NearbyMessageFilesResponsecontent. TheNearbyMessageFilesResponsecontains theisAcceptedfield, which will determine whether the file sending will start or not.
If you don't want to use confirmation logic to send files, just send the automatic positive responses to
NearbyMessageFilesRequestinNearbyServiceMessagesListener.
// DEVICE B
_nearbyService.send(
  OutgoingNearbyMessage(
    receiver: connectedDevice!.info,
    content: NearbyMessageFilesResponse(
      id: request.id,
      isAccepted: isAccepted,
    ),
  ),
);
- The sender will receive
NearbyMessageFilesResponsein theirNearbyServiceMessagesListenerand can notify the user.
// DEVICE A
final messagesListener = NearbyServiceMessagesListener(
  onData: (message) {
    // message is ReceivedNearbyMessage with content cast as NearbyMessageFilesResponse here
  },
);
At this time under the hood, the sending of files will begin and the recipient will receive ReceivedNearbyFilesPack in
the NearbyServiceFilesListener when sending is complete. ReceivedNearbyFilesPack holds the paths of the received
files already stored on the device's temporary directory. You can overwrite them to the desired location, delete them,
or do anything else you like.
// DEVICE B
final filesListener = NearbyServiceFilesListener(
  onData: (pack) async {
  // pack is ReceivedNearbyFilesPack here
  },
);
Exceptions #
NearbyService includes custom errors that you can catch in your implementation.
Common exceptions See here:
NearbyServiceUnsupportedPlatformException: Usage of the plugin on an unsupported platformNearbyServiceUnsupportedDecodingException: Error decoding messages from native platform to Dart (open an issue if this happens)NearbyServiceInvalidMessageException: An attempt to send an invalid message on the sender's side. Add content validation to your messages
Exceptions that can be caught from the discover(), stopDiscovery(), connect(), and disconnect() methods for
the Android platform
See here:
NearbyServiceBusyException: The Wi-Fi P2P framework is currently busy. Usually this means that you have sent a request to some device and now one of the peers is CONNECTINGNearbyServiceP2PPUnsupportedException: Wi-Fi P2P is not supported on this deviceNearbyServiceNoServiceRequestsException: No service discovery requests have been made. Ensure that you have initiated a service discovery request before attempting to connectNearbyServiceGenericErrorException: A generic error occurred. This could be due to various reasons such as hardware issues, Wi-Fi being turned off, or temporary issues with the Wi-Fi P2P frameworkNearbyServiceUnknownException: An unknown error occurred. Please check the device's Wi-Fi P2P settings and ensure the device supports Wi-Fi P2P
Additional options #
-
Each
NearbyDevicecontainsNearbyDeviceInfothat presents different meanings depending on the platform. For Androididis the MAC address of the device, and for iOS it is the unique identifier of its MCPeerID. In general, id identifies the device in its platform. -
Use the getter
communicationChannelStateofNearbyServiceto know the state of the communication channel. It may be:enum CommunicationChannelState { notConnected, loading, connected; bool get isNotConnected => this == CommunicationChannelState.notConnected; bool get isLoading => this == CommunicationChannelState.loading; bool get isConnected => this == CommunicationChannelState.connected; }The getter is
ValueListenableso you can listen to its state. -
There are methods
getPlatformVersion()andgetPlatformModel()ofNearbyServiceto determine the version and model of the device respectively. You can use them to specify a name for the IOS. -
Use
getCurrentDeviceInfo()ofNearbyServiceto get information about the current device on the P2P network. Note that the ID obtained fromgetCurrentDeviceInfo()for Android will always be 02:00:00:00:00:00 for privacy issues. -
For Android, it is possible to listen to the current state of the connection using method
getConnectionInfoStreamofNearbyAndroidService. -
When you are creating a service with
getInstance(), you can define the logging level in the plugin using fieldlogLevel. Possible logging levels:enum NearbyServiceLogLevel { debug, info, error, disabled, }
Demo #
Android #

IOS #

Migration Guide #
Migrating from v0.1.0 to v0.2.0 #
Version 0.2.0 adds support for macOS but introduces breaking changes to accommodate the unified Darwin platform (iOS and macOS).
API Changes
-
Property Renaming
.iosproperty has been renamed to.darwin
// Before (v0.1.0) _nearbyService.ios?.setIsBrowser(value: isBrowser); // After (v0.2.0) _nearbyService.darwin?.setIsBrowser(value: isBrowser); -
Class Renaming
NearbyIOSDevicehas been renamed toNearbyDarwinDeviceNearbyIOSServicehas been renamed toNearbyDarwinServiceNearbyServiceIOSExceptionMapperhas been renamed toNearbyServiceDarwinExceptionMapper
-
Parameter Renaming in NearbyInitializeData
iosDeviceNamehas been renamed todarwinDeviceName
// Before (v0.1.0)
await _nearbyService.initialize(
  data: NearbyInitializeData(iosDeviceName: deviceName),
);

// After (v0.2.0)
await _nearbyService.initialize(
  data: NearbyInitializeData(darwinDeviceName: deviceName),
);
Assert Statements
If you have assertions in your code that check for specific types, make sure to update them:
// Before (v0.1.0)
assert(
  device is NearbyIOSDevice,
  'The Nearby IOS Service can only work with the NearbyIOSDevice'
);

// After (v0.2.0)
assert(
  device is NearbyDarwinDevice,
  'The Nearby Darwin Service can only work with the NearbyDarwinDevice'
);
Flutter Configuration
If you're developing a plugin based on nearby_service, note that the pubspec.yaml now uses sharedDarwinSource: true to share code between iOS and macOS platforms.


