love 0.1.0-beta.5  love: ^0.1.0-beta.5 copied to clipboard
A state management library that is functional, elegant and predictable.
love #
A state management library that is functional, elegant and predictable.
Why #
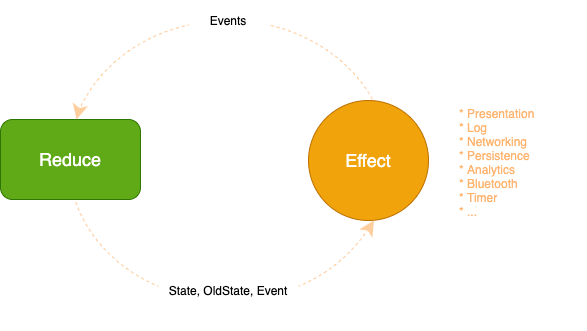
love has DNA of ReactiveX, Redux and RxFeedback. so it is:
- Unified - one is all, all is one (System<State, Event>)
- Declarative - system are first declared, effects begin after run is called
- Predictable - unidirectional data flow
- Flexible - scale well with complex app
- Elegant - code is clean for human to read and write
- Testable - system can be test straightforward
Libraries #
- love - dart only state management library. if we are developing pure dart app, we can install love
- flutter_love - provide flutter widgets handle common use case with love. if we are developing flutter app, we can install flutter_love
Counter Example #
// typedef CounterState = int;

abstract class CounterEvent {}
class CounterEventIncrease implements CounterEvent {}
class CounterEventDecrease implements CounterEvent {}

void main() async {

  final counterSystem = System<int, CounterEvent>
    .create(initialState: 0)
    .add(reduce: (state, event) {
      if (event is CounterEventIncrease) {
        return state + 1;
      }
      return state;
    })
    .add(reduce: (state, event) {
      if (event is CounterEventDecrease) {
        return state - 1;
      }
      return state;
    })
    .add(effect: (state, oldState, event, dispatch) {
      // effect - log update
      print('\nEvent: $event');
      print('State: $state');
      print('OldState: $oldState');
    })
    .add(effect: (state, oldState, event, dispatch) {
      // effect - inject mock events
      if (event == null) { // event is null on system run
        dispatch(CounterEventIncrease());
      }
    });

  final dispose = counterSystem.run();

  await Future.delayed(Duration(seconds: 3));

  dispose();
}
Output:
Event: null
State: 0
OldState: null

Event: Instance of 'CounterEventIncrease'
State: 1
OldState: 0
We hope the code is self explained. If you can guess what this code works for. That's very nice!
This example first declare a counter system, state is the counts, events are increase and decrease. Then we run the system to log output, after 3 seconds we stop this system.
The code is not very elegant for now, we have better way to approach same thing. We'll refactor code step by step when we get new skill. We keep it this way, because it's a good start point to demonstrates how it works.
How it works? #
State #
State is data snapshot of a moment.
For Example, the Counter State is counts:
// typedef CounterState = int;
Event #
Event is description of what happened.
For Example, the Counter Event is increase and decrease which describe what happened:
abstract class CounterEvent {}
class CounterEventIncrease implements CounterEvent {}
class CounterEventDecrease implements CounterEvent {}
Reduce #
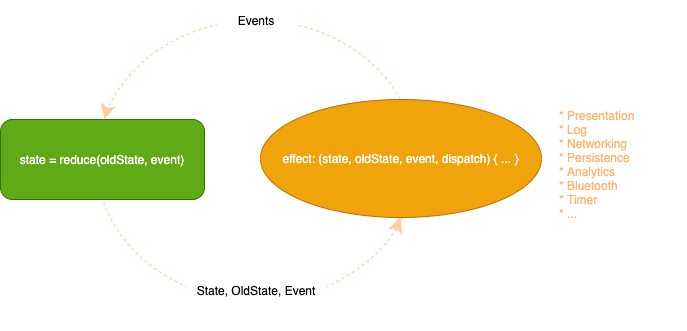
Reduce is a function describe how state update when event happen.
typedef Reduce<State, Event> = State Function(State state, Event event);
Counter Example:
    ...
    .add(reduce: (state, event) {
      if (event is CounterEventIncrease) {
        return state + 1;
      }
      return state;
    })
    .add(reduce: (state, event) {
      if (event is CounterEventDecrease) {
        return state - 1;
      }
      return state;
    })
    ...
If increase event happen we increase the counts, if decrease event happen we decrease the counts.
We can make it cleaner:
    ...
-   .add(reduce: (state, event) {
-     if (event is CounterEventIncrease) {
-       return state + 1;
-     }
-     return state;
-   })
-   .add(reduce: (state, event) {
-     if (event is CounterEventDecrease) {
-       return state - 1;
-     }
-     return state;
-   })
+   .on<CounterEventIncrease>(
+     reduce: (state, event) => state + 1,
+   )
+   .on<CounterEventDecrease>(
+     reduce: (state, event) => state - 1,
+   )
    ...
It's more elegant for us to read and write.
Note: Reduce is pure function that only purpose is to compute a new state with current state and event. There is no side effect in this function.
Then, how to approach side effect?
Effect #
Effect is a function that cause observable effect outside.
typedef Effect<State, Event> = void Function(State state, State? oldState, Event? event, Dispatch<Event> dispatch);
Side Effects:
- Presentation
- Log
- Networking
- Persistence
- Analytics
- Bluetooth
- Timer
- ...
Bellow are log effect and mock effect:
    ...
    .add(effect: (state, oldState, event, dispatch) {
      // effect - log update
      print('\nEvent: $event');
      print('State: $state');
      print('OldState: $oldState');
    })
    .add(effect: (state, oldState, event, dispatch) {
      // effect - inject mock events
      if (event == null) { // event is null on system run
        dispatch(CounterEventIncrease());
      }
    });
Then, what about async stuff like networking effect or timer effect:
    ...
    .add(effect: (state, oldState, event, dispatch) {
      // effect - log update
      ...
    })
+   .add(effect: (state, oldState, event, dispatch) async {
+     // effect - auto decrease via async event
+     if (event is CounterEventIncrease) {
+       await Future.delayed(Duration(seconds: 3));
+       dispatch(CounterEventDecrease());
+     }
+   })
    ...
We've add a timer effect, when an increase event happen, we'll dispatch a decrease event after 3 seconds to restore the counts.
We can also add persistence effect:
    ...
    .add(effect: (state, oldState, event, dispatch) async {
      // effect - auto decrease via async event
      ...
    })
+   .add(effect: (state, oldState, event, dispatch) {
+     // effect - persistence
+     if (event != null  // exclude initial state
+       && oldState != state // trigger only when state changed
+     ) {
+       print('Simulate persistence save call with state: $state');
+     }
+   },)
    ...
This persistence save function will be called when state changed, but initial state is skipped since most of time initial state is restored from persistence layer, there is no need to save it back again.
Effect Trigger #
We've added timer effect and persistence effect. For now, Instead of thinking what effect is it, let's focus on what triggers these effects:
    ...
    .add(effect: (state, oldState, event, dispatch) async {
      // effect - auto decrease via async event
      if (event is CounterEventIncrease) {
        await Future.delayed(Duration(seconds: 3));
        dispatch(CounterEventDecrease());
      }
    })
    .add(effect: (state, oldState, event, dispatch) {
      // effect - persistence
      if (event != null  // exclude initial state
        && oldState != state // trigger only when state changed
      ) {
        print('Simulate persistence save call with state: $state');
      }
    },)
    ...
It's not hard to find the first timer effect is triggered on increase event happen,
the second persistence effect is triggered by react state changes.
Here, We have two kind of Effect Trigger:
- Event Based Trigger
- State Based Trigger
Event Based Trigger #
Event Based Trigger will trigger effect when event meet some condition.
We have a series of operators (methods) that has prefix on to approach this better:
    ...
-   .add(effect: (state, oldState, event, dispatch) async {
-     // effect - auto decrease via async event
-     if (event is CounterEventIncrease) {
-       await Future.delayed(Duration(seconds: 3));
-       dispatch(CounterEventDecrease());
-     }
-   })
+   .on<CounterEventIncrease>(
+     effect: (state, event, dispatch) async {
+       // effect - auto decrease via async event
+       await Future.delayed(Duration(seconds: 3));
+       dispatch(CounterEventDecrease());
+     },
+   )
    ...
We can even move effect around reduce when they share same condition:
    ...
    .on<CounterEventIncrease>(
      reduce: (state, event) => state + 1,
+     effect: (state, event, dispatch) async {
+       // effect - auto decrease via async event
+       await Future.delayed(Duration(seconds: 3));
+       dispatch(CounterEventDecrease());
+     },
    )
    .on<CounterEventDecrease>(
      reduce: (state, event) => state - 1,
    )
    ...
-   .on<CounterEventIncrease>(
-     effect: (state, event, dispatch) async {
-       // effect - auto decrease via async event
-       await Future.delayed(Duration(seconds: 3));
-       dispatch(CounterEventDecrease());
-     },
-   )
    ...
There are special cases. for example, we want to dispatch events on system run:
    ...
    .add(effect: (state, oldState, event, dispatch) {
      // mock events
      if (event == null) { // event is null on system run
        dispatch(CounterEventIncrease());
      }
    },);
We can use onRun operator instead:
    ...
-   .add(effect: (state, oldState, event, dispatch) {
-     // mock events
-     if (event == null) { // event is null on system run
-       dispatch(CounterEventIncrease());
-     }
-   },);
+   .onRun(effect: (initialState, dispatch) {
+     // mock events
+     dispatch(CounterEventIncrease());
+   },);
We have other on* operators for different use cases. If we want to learn more please follow the API Reference:
- on
- onRun
- onDispose
State Based Trigger #
State Based Trigger will trigger effect by react state change.
We have a series of operators that has prefix react to approach this:
    ...
-   .add(effect: (state, oldState, event, dispatch) {
-     // effect - persistence
-     if (event != null  // exclude initial state
-       && oldState != state // trigger only when state changed
-     ) {
-       print('Simulate persistence save call with state: $state');
-     }
-   },)
+   .react<int>(
+     value: (state) => state,
+     effect: (value, dispatch) {
+       // effect - persistence
+       print('Simulate persistence save call with state: $value');
+     },
+   )
    ...
This effect will react state change then trigger a save call. Since it react to hold state (not partial value) change, we can use a convenience operator reactState instead, then we don't need a value map function here:
-   .react<int>(
-     value: (state) => state,
-     effect: (value, dispatch) {
-       // effect - persistence
-       print('Simulate persistence save call with state: $value');
-     },
-   )
+   .reactState(
+     effect: (state, dispatch) {
+       // effect - persistence
+       print('Simulate persistence save call with state: $state');
+     },
+   )
There is another important effect which use this trigger. Can you guess what is it?
Yes, it's presentation effect. With declarative UI library like Flutter or React, build (render) is triggered by react state change.
We'll discuss this later in Presentation Effect Section.
There are other react* operators for different use cases. If we want to learn more please follow API Reference:
- react
- reactLatest
- reactState
Run #
We've declared our counterSystem:
final counterSystem = System<int, CounterEvent>
  ...;
It dose nothing until run is called:
final dispose = counterSystem.run();
When run is called, a dispose function is returned. We can use this dispose function to stop system later:
await Future.delayed(Duration(seconds: 3));

dispose();
Optionally, We can provide additional reduce and effect when system run:
final dispose = counterSystem.run(
  reduce: (state, event) { ... },
  effect: (state, oldState, event, dispatch) { ... },
);
It has same behavior as this:
final dispose = counterSystem
  .add(
    reduce: (state, event) { ... },
    effect: (state, oldState, event, dispatch) { ... },
  )
  .run();
Code Review #
We've refactored our code a lot to make it better. Let's review it to increase muscle memory.
Old Code:
final counterSystem = System<int, CounterEvent>
  .create(initialState: 0)
  .add(reduce: (state, event) {
    if (event is CounterEventIncrease) {
      return state + 1;
    }
    return state;
  })
  .add(reduce: (state, event) {
    if (event is CounterEventDecrease) {
      return state - 1;
    }
    return state;
  })
  .add(effect: (state, oldState, event, dispatch) {
    print('\nEvent: $event');
    print('State: $state');
    print('OldState: $oldState');
  })
  .add(effect: (state, oldState, event, dispatch) async {
    if (event is CounterEventIncrease) {
      await Future.delayed(Duration(seconds: 3));
      dispatch(CounterEventDecrease());
    }
  })
  .add(effect: (state, oldState, event, dispatch) {
    if (event != null
      && oldState != state
    ) {
      print('Simulate persistence save call with state: $state');
    }
  },)
  .add(effect: (state, oldState, event, dispatch) {
    if (event == null) {
      dispatch(CounterEventIncrease());
    }
  });
New Code:
final counterSystem = System<int, CounterEvent>
  .create(initialState: 0)
  .on<CounterEventIncrease>(
    reduce: (state, event) => state + 1,
    effect: (state, event, dispatch) async {
      await Future.delayed(Duration(seconds: 3));
      dispatch(CounterEventDecrease());
    },
  )
  .on<CounterEventDecrease>(
    reduce: (state, event) => state - 1,
  )
  .add(effect: (state, oldState, event, dispatch) {
    print('\nEvent: $event');
    print('State: $state');
    print('OldState: $oldState');
  })
  .reactState(
    effect: (state, dispatch) {
      print('Simulate persistence save call with state: $state');
    },
  )
  .onRun(effect: (initialState, dispatch) {
    dispatch(CounterEventIncrease());
  },);
Presentation Effect (With Flutter) #
We've mentioned earlier presentation effect is triggered by react state change with declarative UI library:
  .reactState(
    effect: (state, dispatch) {
      print('Simulate presentation effect (build, render) with state: $state');
    },
  )
Since Flutter is full of widgets. How can we make react* operators works together with widgets?
Is this possible:
  // bellow are just imagination that only works in our mind
  .reactState(
    effect: (state, dispatch) {
      return TextButton(
        onPressed: () => dispatch(CounterEventIncrease()),
        child: Text('$state'),
      );
    },
  )
Yeah, we can introduce React* widgets, they are combination of react* operators and widget:
Widget build(BuildContext context) {
  return ReactState<int, CounterEvent>(
    system: counterSystem,
    builder: (context, state, dispatch) {
      return TextButton(
        onPressed: () => dispatch(CounterEventIncrease()),
        child: Text('$state'),
      );
    }
  );
}
Happy to see Flutter and React works together ^_-.
If we want to learn more please visit flutter_love.
Testing #
Test can be done straightforward:
- create system
- inject mock events and mock effects
- record states
- run the system
- expect recorded states
test('CounterSystem', () async {

  List<State> states = [];

  final counterSystem = System<int, CounterEvent>
    .create(initialState: 0)
    .on<CounterEventIncrease>(
      reduce: (state, event) => state + 1,
    )
    .on<CounterEventDecrease>(
      reduce: (state, event) => state - 1,
    );

  final dispose = counterSystem.run(
    effect: (state, oldState, event, dispatch) async {
      states.add(state);
      if (event == null) {
        // inject mock events
        dispatch(CounterEventIncrease());
        await Future.delayed(Duration(milliseconds: 20));
        dispatch(CounterEventDecrease());
      }
    },
  );

  await Future.delayed(Duration(milliseconds: 60));

  dispose();

  expect(states, [
    0, // initial state
    1,
    0,
  ]);

});
Credits #
Without community this library won't be born. So, thank ReactiveX community, Redux community and RxSwift community.
Thank @miyoyo for giving feedback that helped us shape this library.
Special thank to @kzaher who is original author of RxSwift and RxFeedback, he shared a lot of knowledge with us, that make this library possible today.
Last and important, thank you for reading.
License #
The MIT License (MIT)
End is Start #
Metadata
Publisher
unverified uploader
Metadata
A state management library that is functional, elegant and predictable.
Repository (GitHub)
View/report issues
License
![]() unknown (LICENSE)
unknown (LICENSE)