launchify 1.0.4  launchify: ^1.0.4 copied to clipboard
A powerful Flutter UI package to launch WhatsApp, Email, Phone, Maps, and URLs with customizable Action Buttons and Link Rows.
Launchify 🚀 #
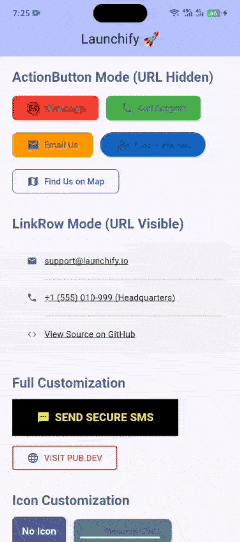
🎬 Demo #
A powerful Flutter UI package built on top of url_launcher that provides ready-to-use,
customizable UI widgets for launching URLs with an excellent developer experience.
✨ Features
• 📱 Multiple Launch Types: WhatsApp, Email, Phone, SMS, Website, Map, and Custom URLs.
• 🎨 Two Display Modes:
• Action Button Mode: Clean CTA buttons with hidden URLs.
• Link Row Mode: Visible URLs/text with icons for settings or info screens.
• 🌍 RTL/LTR Support: Automatically respects system directionality and flips layouts accordingly.
• 🛡️ Safe Launching: Built-in validation and security checks using canLaunchUrl.
• 💅 Highly Customizable: Full control over colors, icons, borders, padding, and more.
• 🛠️ Smart URL Builders: Automatically formats phone numbers, creates mailto queries, and more.
New in 1.0.4 #
Expanded Launch Types
We've significantly expanded the range of supported applications and actions:
- Instagram:
LaunchType.instagram- Launch Instagram profiles or content. - TikTok:
LaunchType.tiktok- Launch TikTok profiles or content. - LinkedIn:
LaunchType.linkedin- Launch LinkedIn profiles or content. - Calendar:
LaunchType.calendar- Open calendar apps to create events. - Share:
LaunchType.share- Utilize the native share sheet to share text or files. - Custom:
LaunchType.custom- For any URI scheme not explicitly covered.
Dynamic URI Builders
The package now includes robust internal URI builders that intelligently construct the correct URIs
for each LaunchType, handling parameters and encoding automatically. This simplifies usage and
reduces the chance of errors.
Multi-Choice Launch Dialogs
For actions that can be handled by multiple applications on a user's device (e.g., opening a map,
sharing content, or opening a web link), launchify now supports multi-choice dialogs. This allows
users to select their preferred application.
How to use Multi-Choice Dialogs:
You can enable this feature using the LaunchOptions class. Pass an instance of LaunchOptions to
the options parameter of LaunchLink, LaunchActionButton, or LaunchLinkRow.
import 'package:launchify/launchify.dart';
import 'package:flutter/material.dart';

// Example of launching a map with a multi-choice dialog
LaunchLink
(
type: LaunchType.map,
value: 'New York, NY',
label: 'Open Map with Chooser',
options: LaunchOptions(
useMultiChoiceDialog: true,
dialogTitle: 'Open Map With',
dialogMessage: 'Choose an app to open the map:',
),
)

// Example for sharing content
LaunchLink(
type: LaunchType.share,
shareText: 'Check out this awesome Flutter package!',
shareSubject: 'Launchify Package',
label: 'Share Content',
options: LaunchOptions(
useMultiChoiceDialog: true,
dialogTitle: 'Share With',
dialogMessage
    :
'
Select an app to share:
'
,
)
,
)
- Android: On Android, this will leverage the system's native app chooser dialog.
- iOS: On iOS, a custom bottom sheet dialog will be presented, listing available applications that can handle the URI.
Backward Compatibility
We've ensured that existing implementations of launchify will continue to work without changes. If
you're using the older launch method or not providing LaunchOptions, the package will
intelligently infer the LaunchType from the provided Uri and attempt to launch it directly,
maintaining your current functionality.
New in 1.0.3 #
App Awareness and Installation Checks
launchify now provides robust app awareness, allowing you to check if a target application is
installed before attempting to launch. If the app is not installed, a customizable dialog can be
displayed to guide the user.
How to use App Awareness:
Configure app awareness using the LaunchOptions class.
import 'package:launchify/launchify.dart';
import 'package:flutter/material.dart';

// Example of launching WhatsApp with app installation check
LaunchLink
(
type: LaunchType.whatsapp,
value: "+923001234567",
label: "Chat on WhatsApp",
options: LaunchOptions(
checkAppInstallation: true, // Enable app installation check
appStoreLink: 'https://apps.apple.com/us/app/whatsapp-messenger/id310633997', // iOS App Store link
// For Android, the package name is used automatically.
appNotInstalledDialogTitle: 'WhatsApp Not Installed',
appNotInstalledDialogMessage: 'It looks like WhatsApp is not installed on your device. Would you like to go to the App Store or open in web?',
fallbackMode: LaunchFallbackMode.prompt, // Prompt user for web fallback
),
)
checkAppInstallation: Set totrueto enable the app installation check.appStoreLink: Provide a link to the app store (e.g., Apple App Store, Google Play Store). If the app is not installed, this link will be used in the dialog.- Android: Uses
external_app_launcherto check for app installation via package names. - iOS: Leverages
canLaunchUrlandIosAppLauncherto validate app scheme availability. - "App Not Installed" Dialog: If the app is not installed, a dialog will be presented with
options to:
- Go to the App Store (if
appStoreLinkis provided). - Open in Web (if a web URI is available and
fallbackModeisprompt). - Cancel the launch action.
- Go to the App Store (if
📦 Installation
Add launchify to your pubspec.yaml:
dependencies:
  launchify: ^1.0.4 # Use the latest version
  external_app_launcher: ^3.0.0 # Required for app installation checks
Then run flutter pub get.
Platform Configuration #
Since this package uses url_launcher, android_intent_plus, and external_app_launcher, you must
follow its configuration steps for each platform:
Android
Add the following to your AndroidManifest.xml (inside <queries>):
<queries>
    <intent>
        <action android:name="android.intent.action.VIEW" />
        <data android:scheme="https" />
    </intent>
    <intent>
        <action android:name="android.intent.action.DIAL" />
    </intent>
    <intent>
        <action android:name="android.intent.action.SENDTO" />
        <data android:scheme="mailto" />
    </intent>
    <intent>
        <action android:name="android.intent.action.VIEW" />
        <data android:scheme="sms" />
    </intent>
    <!-- For multi-choice dialogs and specific app launches -->
    <intent>
        <action android:name="android.intent.action.VIEW" />
        <data android:scheme="instagram" />
    </intent>
    <intent>
        <action android:name="android.intent.action.VIEW" />
        <data android:scheme="tiktok" />
    </intent>
    <intent>
        <action android:name="android.intent.action.VIEW" />
        <data android:scheme="linkedin" />
    </intent>
    <intent>
        <action android:name="android.intent.action.VIEW" />
        <data android:scheme="whatsapp" />
    </intent>
    <intent>
        <action android:name="android.intent.action.VIEW" />
        <data android:scheme="geo" />
    </intent>
    <intent>
        <action android:name="android.intent.action.VIEW" />
        <data android:scheme="google.navigation" />
    </intent>
    <intent>
        <action android:name="android.intent.action.VIEW" />
        <data android:scheme="waze" />
    </intent>
    <intent>
        <action android:name="android.intent.action.EDIT" />
        <data android:mimeType="vnd.android.cursor.item/event" />
    </intent>
    <!-- Add any other custom schemes your app might launch -->
</queries>
iOS
Add the schemes you want to support to your Info.plist. This is crucial for the canLaunch method
to work correctly for custom schemes and for the multi-choice dialog to list available apps.
Example ios/Runner/Info.plist entry:
<key>LSApplicationQueriesSchemes</key><array>
<string>https</string>
<string>http</string>
<string>tel</string>
<string>mailto</string>
<string>sms</string>
<string>whatsapp</string>
<string>instagram</string>
<string>tiktok</string>
<string>linkedin</string>
<string>maps</string>
<string>googlemaps</string>
<string>waze</string>
<string>comgooglemaps</string>
<string>baidumap</string>
<string>iosamap</string>
<string>yandexmaps</string>
<string>yandexnavi</string>
<string>citymapper</string>
<string>uber</string>
<string>lyft</string>
<string>moovit</string>
<string>transit</string>
<string>here</string>
<string>tomtomgo</string>
<string>sygiic</string>
<string>navigon</string>
<string>calshow</string> <!-- For calendar -->
<!-- Add any other custom schemes your app might launch -->
</array>
🚀 Usage
Simple Action Button #
LaunchLink
(
type: LaunchType.whatsapp,
value: "+923001234567",
label
    :
"
Chat with Us
"
,
)
Visible Link Row #
LaunchLink
(
mode: LaunchDisplayMode.linkRow,
type: LaunchType.email,
value
    :
"
support@example.com
"
,
)
Custom Styling #
LaunchLink
(
type: LaunchType.website,
value: "https://flutter.dev",
style: LaunchStyle(
backgroundColor: Colors.deepPurple,
borderRadius: 20,
isOutlined: true,
),
)
🛠️ Components
LaunchLink #
The main unified widget. It automatically generates the correct URI based on the LaunchType.
| Property | Description |
|---|---|
mode |
actionButton or linkRow |
type |
whatsapp, phone, email, sms, website, map, instagram, tiktok, linkedin, calendar, share, custom |
value |
The primary data (phone number, email address, or URL) |
label |
Text for action button mode |
visibleText |
Text for link row mode |
style |
LaunchStyle for customization |
showIcon |
Whether to show an icon (default: true) |
icon |
IconData to override the default |
customIcon |
LaunchIcon for Assets, SVG, or Network images |
onResult |
Callback that returns true if launch succeeded |
options |
LaunchOptions for advanced configurations like multi-choice dialogs |
🎨 Icon & Image Customization
Launchify supports much more than just Material Icons. You can use SVG, PNG, JPG files from your assets or even from a network URL.
Using Default Icons #
By default, LaunchLink shows a context-relevant icon. To disable it:
LaunchLink
(
type: LaunchType.phone,
value: "123456",
showIcon
:
false
, // Removes the icon
)
Using SVG or Asset Images #
To use a custom image (e.g., a branded WhatsApp logo):
LaunchLink
(
type: LaunchType.whatsapp,
value: "+923001234567",
customIcon: LaunchIcon.fromAsset('assets/images/whatsapp_logo.svg')
,
)
Using Network Images #
LaunchLink
(
type: LaunchType.website,
value: "https://example.com",
customIcon: LaunchIcon.fromNetwork('https://example.com/logo.png')
,
)
LaunchStyle #
Provides deep customization for the widgets.
| Property | Default (Action Button) |
|---|---|
backgroundColor |
Theme Primary Color |
textColor |
White |
borderRadius |
8.0 |
isOutlined |
false |
iconWidth |
Derived from fontSize |
iconHeight |
Derived from fontSize |
iconFit |
BoxFit.contain |
🌍 RTL Support
Launchify is designed for global apps. It automatically detects Directionality.of(context) and:
- Position icons correctly relative to text.
- Aligns rows based on LTR/RTL settings.
- Supports Arabic, Urdu, Hebrew, and other RTL languages out of the box.
🔒 Security
• Always uses canLaunchUrl before attempting a launch.
• Supports allowedSchemes to restrict which URLs can be opened.
• Parses and validates URIs internally before hand-off to the OS.
📝 License
MIT License.
Metadata
Publisher
Weekly Downloads
Metadata
A powerful Flutter UI package to launch WhatsApp, Email, Phone, Maps, and URLs with customizable Action Buttons and Link Rows.
Repository (GitHub)
View/report issues
Topics
#ui #widget #url-launcher #whatsapp #email
Documentation
License
![]() MIT (license)
MIT (license)
Dependencies
android_intent_plus, cupertino_icons, external_app_launcher, flutter, flutter_localizations, flutter_svg, intl, platform, share_plus, url_launcher