input_quantity 2.5.2  input_quantity: ^2.5.2 copied to clipboard
A widget for input quantity. Built with TextFormField. Type manually or increase and decrease value with the btn
Input Quantity #
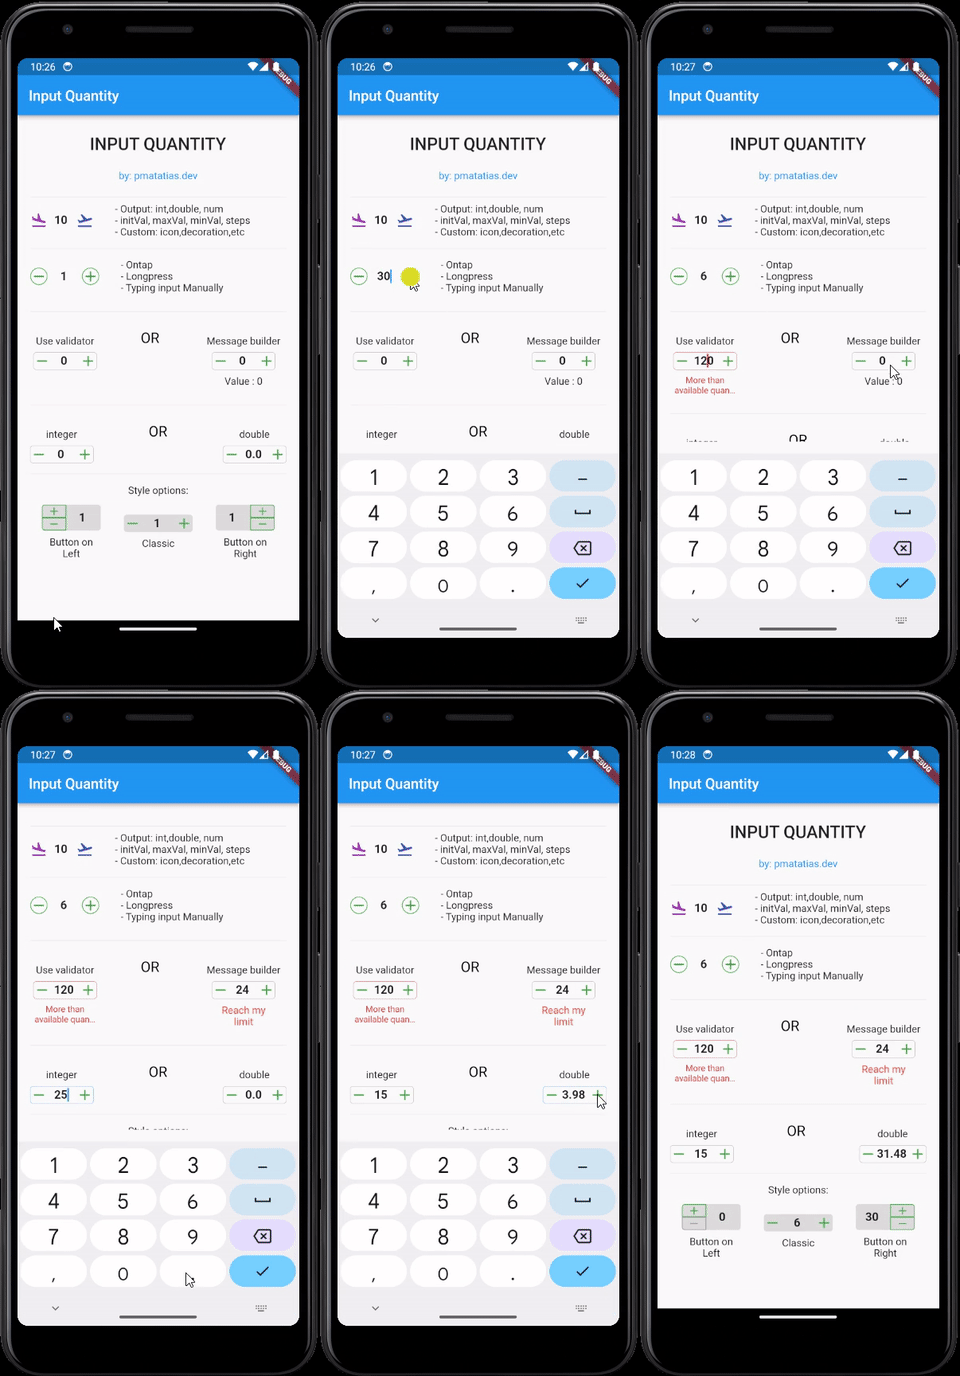
Flutter widget for quantity input. Increase or decrease the input value by pressing the button. It's built with text fields, so InputQty also supports manually typing quantities. Very flexible for large quantities. For example, if the user wants to enter the value 19243, it will be very difficult to only rely on buttons.
Set input limits so that input values automatically return to predefined maximum/minimum values.

Features #
- Simple and easy to use
- Customizable
- Output:
int,double, ornum - Style options: classic, button on the left or button on the right
- Tap once to update the value,
longpressfor update the value continuously, or type the value manually. - Add validator form, or use custom message builder
Installation #
To use this package, add input_quantity as a dependency in your pubspec.yaml file.
dependencies:
  input_quantity: ^2.5.0
Then, run flutter pub get to install the package.
Usage #
Basic Usage #
import 'package:input_quantity/input_quantity.dart';

InputQty(
  maxVal: 100,
  initVal: 0,
  minVal: -100,
  steps: 10,
  onQtyChanged: (val) {
    print(val);
  },
)
Typing Manually #
If you want to prevent typing manually, you can disable it from enableTyping.
InputQty(
  qtyFormProps: QtyFormProps(enableTyping: false),
  ...
)
Output Types #
By default, the output will be as a num.
InputQty(
  onQtyChanged: (val) {
    print(val.runtimeType); // num
  },
)
To specify the output type as int:
InputQty.int(
  onQtyChanged: (val) {
    print(val.runtimeType); // int
  },
)
To specify the output type as double:
InputQty.double(
  onQtyChanged: (val) {
    print(val.runtimeType); // double
  },
)
Customizing Appearance and Behavior #
Using QtyFormProps
You can customize the appearance and behavior of the input field using QtyFormProps.
InputQty(
  qtyFormProps: QtyFormProps(
    textAlign: TextAlign.center,
    style: TextStyle(fontWeight: FontWeight.bold),
    cursorColor: Colors.red,
    enableTyping: true,
  ),
)
Using QtyDecorationProps
You can customize the decoration of the input field using QtyDecorationProps.
InputQty(
  decoration: QtyDecorationProps(
    borderShape: BorderShapeBtn.circle,
    btnColor: Colors.blue,
    fillColor: Colors.grey[200],
    isBordered: true,+
  ),
)
Validation #
You can use the validator property to validate the input value.
InputQty(
  validator: (value) {
    if (value == null) {
      return "Required field";
    } else if (value >= 200) {
      return "More than available quantity";
    }
    return null;
  },
)
Custom Messages #
You can use the messageBuilder property to display custom messages based on the input value.
InputQty(
  messageBuilder: (minVal, maxVal, value) {
    if (value == null) return null;
    if (value < -20) {
      return Text(
        "Reach my limit",
        style: TextStyle(color: Colors.red),
        textAlign: TextAlign.center,
      );
    } else if (value > 20) {
      return Text(
        "Reach my limit",
        style: TextStyle(color: Colors.red),
        textAlign: TextAlign.center,
      );
    } else {
      return Text("Value : $value", textAlign: TextAlign.center);
    }
  },
)
Controlling Input Value Programmatically #
You can use TextEditingController to control the input value programmatically.
final TextEditingController _controller = TextEditingController();

InputQty(
  qtyFormProps: QtyFormProps(
    controller: _controller,
  ),
)
Button Orientation #
You can change the orientation of the buttons using ButtonOrientation.
InputQty(
  decoration: QtyDecorationProps(
    orientation: ButtonOrientation.horizontal,
  ),
)
Button Position #
You can change the position of the buttons using QtyStyle.
InputQty(
  decoration: QtyDecorationProps(
    qtyStyle: QtyStyle.btnOnRight,
  ),
)
Examples #
For more examples, check the example directory.

Contributons #
To contribute to this project, please follow the guidelines in the CONTRIBUTING.md file.
Thank you to all contributors for their valuable contributions!
Additional Information #
- Want to thank me? You can buy me a coffee.


