riverpod_navigator 0.36.0  riverpod_navigator: ^0.36.0 copied to clipboard
Simple but powerfull Flutter navigation with riverpod and Navigator 2.0
Riverpod navigation #
Simple but powerful Flutter navigation with riverpod and Navigator 2.0 that solves the following: #
- Strictly typed navigation:
you can usenavigate([HomeSegment(),BookSegment(id: 2)]);instead ofnavigate('home/book;id:2');in your code - asynchronous navigation ...
... is the case when changing the navigation state requires asynchronous actions (such as loading or saving data from the Internet) - multiple providers ...
... is the case when the navigation state depends on multiple riverpod providers - easier coding:
the navigation problem is reduced to manipulating the class collection - better separation of concerns: UI x Model (thanks to riverpod 👍):
navigation logic can be developed and tested without typing a single flutter widget - nested navigation
just use the nested riverpodProviderScope()and FlutterRouterwidget
Terminology used #
Take a look at the following terms related to URL path home/book;id=2
- string-path: e.g.
home/book;id=2 - string-segment: the string-path consists of two slash-delimited string-segments (
homeandbook;id=2) - typed-segment describes coresponding string-segments (
HomeSegment()for 'home' andBookSegment(id:2)for 'book;id=2')
typed-segment isclass TypedSegment {}'s descendant. - typed-path describes coresponding string-path (
[HomeSegment(), BookSegment(id:2)])
typed-path istypedef TypedPath = List<TypedSegment> - Flutter Navigator 2.0 navigation-stack is uniquely determined by the TypedPath (where each TypedPath's TypedSegment instance corresponds to a screen and page instance):
pages = [MaterialPage (child: HomeScreen(HomeSegment())), MaterialPage (child: BookScreen(BookSegment(id:2)))]
Simple example #
Create an application using these simple steps:
Step1 - define classes for the typed-segment #
class HomeSegment extends TypedSegment {
  const HomeSegment();
  // ignore: avoid_unused_constructor_parameters
  factory HomeSegment.fromUrlPars(UrlPars pars) => const HomeSegment();
}

class BookSegment extends TypedSegment {
  const BookSegment({required this.id});
  factory BookSegment.fromUrlPars(UrlPars pars) => BookSegment(id: pars.getInt('id'));
  @override
  void toUrlPars(UrlPars pars) => pars.setInt('id', id);

  final int id;
}
Note: fromUrlPars and toUrlPars helps to convert typed-segment to string-segment and back. This is needed for Flutter on the Web.
Step2 - configure AppNavigator... #
... by extending the RNavigator class.
class AppNavigator extends RNavigator {
  AppNavigator(Ref ref)
      : super(
          ref,
          [
            // 'home' and 'book' strings are used in web URL, e.g. 'home/book;id=2'
            // fromUrlPars is used to decode web URL string-segment to typed-segment
            // HomeScreen.new and BookScreen.new are screens for a given segment
            RRoute<HomeSegment>('home', HomeSegment.fromUrlPars, HomeScreen.new),
            RRoute<BookSegment>('book', BookSegment.fromUrlPars, BookScreen.new),
          ],
        );
}
Step3 - use the AppNavigator in MaterialApp.router #
If you are familiar with the Flutter Navigator 2.0 and the riverpod, the following code is clear:
class App extends ConsumerWidget {
  const App({Key? key}) : super(key: key);

  @override
  Widget build(BuildContext context, WidgetRef ref) {
    final navigator = ref.read(navigatorProvider) as AppNavigator;
    return MaterialApp.router(
      title: 'Riverpod Navigator Example',
      routerDelegate: navigator.routerDelegate,
      routeInformationParser: navigator.routeInformationParser,
    );
  }
}
Step4 - place and configure riverpod ProviderScope ... #
... in main entry point
void main() => runApp(
      ProviderScope(
        // aaaign ProviderScope.overrides. home typed-path and navigator constructor are required
        overrides: providerOverrides([HomeSegment()], AppNavigator.new),
        child: const App(),
      ),
    );
And that's all #
Navigation to a specific screen is performed as follows:
// navigation to PageScreen
ElevatedButton(
  onPressed: () => ref.read(navigatorProvider).navigate([HomeSegment(), PageSegment(title: 'Page')]),

// navigation to HomeScreen
ElevatedButton(
  onPressed: () => ref.read(navigatorProvider).navigate([HomeSegment()]),
See:
Note: The link Go to book: [3, 13, 103] in the running example would not make much sense in the real Books application.
It provide navigation to the stack of four screens:
- string-path =
home/book;id=3/book;id=13/book;id=103. - typed-path =
[HomeSegment(), BookSegment(id:3), BookSegment(id:13), BookSegment(id:103)]. - navigation-stack pages =
[MaterialPage (child: HomeScreen(HomeSegment())), MaterialPage (child: BookScreen(BookSegment(id:3))), MaterialPage (child: BookScreen(BookSegment(id:13))), MaterialPage (child: BookScreen(BookSegment(id:103)))].
Development and testing without GUI #
Navigation logic can be developed and tested without typing a single flutter widget:
  test('navigation model', () async {
    final container = ProviderContainer(
      overrides:
        providerOverrides(
          [HomeSegment()],
          AppNavigator.new,
        ),
      );
    final navigator = container.read(navigatorProvider);

    Future navigTest(Future action(), String expected) async {
      await action();
      await container.pump();
      expect(navigator.navigationStack2Url, expected);
    }

    await navigTest(() => navigator.navigate([HomeSegment()]), 'home');

    await navigTest(() => navigator.navigate([HomeSegment(), BookSegment(id: 1)]), 'home/book;id=1');

    await navigTest(() => navigator.pop(), 'home');

    await navigTest(() => navigator.push(BookSegment(id: 2)), 'home/book;id=2');

    await navigTest(() => navigator.replaceLast<BookSegment>((old) => BookSegment(id: old.id + 1)), 'home/book;id=3');
  });
Other features and examples #
Installation of examples #
After cloning the riverpod_navigator repository, go to examples/doc subdirectory and execute:
flutter create .flutter pub get
See the /lib subdirectory for examples.
Navigator Data Flow Diagram: #
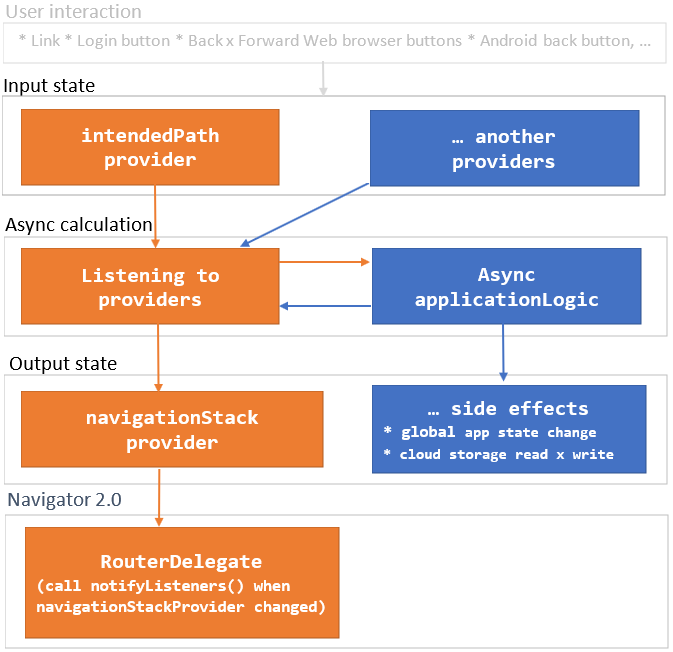
As you can see, changing the Input state starts the async calculation. The result of the calculations is Output state which can have app-specific Side effects. Navigator 2.0 RouterDelegate is then synchronized with navigationStackProvider
Roadmap #
I prepared this package for my new project. Its further development depends on whether the community will use it.
- proofreading because my English is not good. Community help is warmly welcomed.
- parameterization allowing Cupertino
Metadata
Publisher
unverified uploader
Metadata
Simple but powerfull Flutter navigation with riverpod and Navigator 2.0
Repository (GitHub)
View/report issues
License
![]() unknown (LICENSE)
unknown (LICENSE)
Dependencies
flutter, flutter_riverpod, meta, riverpod_navigator_core