riverpod_navigator 0.35.0  riverpod_navigator: ^0.35.0 copied to clipboard
Simple but powerfull Flutter navigation with riverpod and Navigator 2.0.
Riverpod navigation #
Simple but powerful Flutter navigation with riverpod and Navigator 2.0 that solves the following: #
- Strictly typed navigation:
you can usenavigate([HomeSegment(),BookSegment(id: 2)]);instead ofnavigate('home/book;id:2');in your code - asynchronous navigation
is the case when changing the navigation state requires asynchronous actions (such as loading or saving data from the Internet) - multiple providers
is the case when the navigation state depends on multiple riverpod providers - easier coding:
the problem of navigation is reduced to manipulation an immutable collection - better separation of concerns: UI x Model (thanks to riverpod 👍):
navigation logic can be developed and tested without typing a single flutter widget - nested navigation
just use the nested riverpodProviderScope()and FlutterRouterwidget
Terminology used #
Take a look at the following terms related to URL path home/book;id=2
- string-path:
final stringPath = 'home/book;id=2'; - string-segment: the string-path consists of two slash-delimited string-segments (
homeandbook;id=2) - typed-segment: (
class TypedSegment {}'s descendant) describes coresponding string-segment's (HomeSegment()andBookSegment(id:2)) - typed-path: (
typedef TypedPath = List<TypedSegment>) describes coresponding string-path ([HomeSegment(), BookSegment(id:2)];) - Flutter Navigator 2.0 navigation-stack is uniquely determined by the TypedPath (where each TypedSegment instance corresponds to a screen and page instance):
[MaterialPage (child: HomeScreen(HomeSegment())), MaterialPage (child: BookScreen(BookSegment(id:2)))]
Simple example #
Create an application using these simple steps:
Step1 - define classes for the typed-segment #
class HomeSegment extends TypedSegment {
  const HomeSegment();
  // ignore: avoid_unused_constructor_parameters
  factory HomeSegment.fromUrlPars(UrlPars pars) => const HomeSegment();
}

class BookSegment extends TypedSegment {
  const BookSegment({required this.id});
  factory BookSegment.fromUrlPars(UrlPars pars) => BookSegment(id: pars.getInt('id'));
  @override
  void toUrlPars(UrlPars pars) => pars.setInt('id', id);

  final int id;
}
Note: fromUrlPars and toUrlPars helps to convert typed-segment to string-segment and back. This is needed for Flutter on the Web.
Step2 - configure AppNavigator... #
by extending the RNavigator class.
class AppNavigator extends RNavigator {
  AppNavigator(Ref ref)
      : super(
          ref,
          [
            // 'home' and 'book' strings are used in web URL, e.g. 'home/book;id=2'
            // fromUrlPars is used to decode web URL to segment
            // HomeScreen.new and BookScreen.new are screens for a given segment
            RRoute<HomeSegment>('home', HomeSegment.fromUrlPars, HomeScreen.new),
            RRoute<BookSegment>('book', BookSegment.fromUrlPars, BookScreen.new),
          ],
        );
}
Step3 - use the AppNavigator in MaterialApp.router #
If you are familiar with the Flutter Navigator 2.0 and the riverpod, the following code is clear:
class App extends ConsumerWidget {
  const App({Key? key}) : super(key: key);

  @override
  Widget build(BuildContext context, WidgetRef ref) {
    final navigator = ref.read(navigatorProvider) as AppNavigator;
    return MaterialApp.router(
      title: 'Riverpod Navigator Example',
      routerDelegate: navigator.routerDelegate,
      routeInformationParser: navigator.routeInformationParser,
      debugShowCheckedModeBanner: false,
    );
  }
}
Step4 - place and configure riverpod ProviderScope ... #
... in main entry point
void main() => runApp(
      ProviderScope(
        // home-path and navigator constructor are required
        overrides: RNavigatorCore.providerOverrides([HomeSegment()], AppNavigator.new),
        child: const App(),
      ),
    );
And that's all #
Navigation to a specific screen is performed as follows:
// navigation to PageScreen
ElevatedButton(
  onPressed: () => ref.read(navigatorProvider).navigate([HomeSegment(), PageSegment(title: 'Page')]),

// navigation to HomeScreen
ElevatedButton(
  onPressed: () => ref.read(navigatorProvider).navigate([HomeSegment()]),
See:
Note: The link Go to book: [3, 13, 103] in the running example would not make much sense in the real Books application.
It just shows the transition to the navigation stack with four screens (or four segments or four Navigator MaterialPages):
- string-path =
'home/book;id=3/book;id=13/book;id=103'. - typed-path =
[HomeSegment(), BookSegment(id:3), BookSegment(id:13), BookSegment(id:103)]. - navigation-stack =
[MaterialPage (child: HomeScreen(HomeSegment())), MaterialPage (child: HomeScreen(BookSegment(id:3))), MaterialPage (child: HomeScreen(BookSegment(id:13))), MaterialPage (child: HomeScreen(BookSegment(id:103)))].
See HomeScreen source code for details.
Development and testing without GUI #
Navigation logic can be developed and tested without typing a single flutter widget:
  test('navigation model', () async {
    final container = ProviderContainer(overrides: RNavigatorCore.providerOverrides([HomeSegment()], AppNavigator.new));
    final navigator = container.read(navigatorProvider);

    Future navigTest(Future action(), String expected) async {
      await action();
      await container.pump();
      expect(navigator.navigationStack2Url, expected);
    }

    await navigTest(() => navigator.navigate([HomeSegment()]), 'home');

    await navigTest(() => navigator.navigate([HomeSegment(), BookSegment(id: 1)]), 'home/book;id=1');

    await navigTest(() => navigator.pop(), 'home');

    await navigTest(() => navigator.push(BookSegment(id: 2)), 'home/book;id=2');

    await navigTest(() => navigator.replaceLast<BookSegment>((old) => BookSegment(id: old.id + 1)), 'home/book;id=3');
  });
Other features and examples #
Installation of examples #
After cloning the riverpod_navigator repository, go to examples/doc subdirectory and execute:
flutter create .flutter pub get
See the /lib subdirectory for examples.
Navigator Data Flow Diagram: #
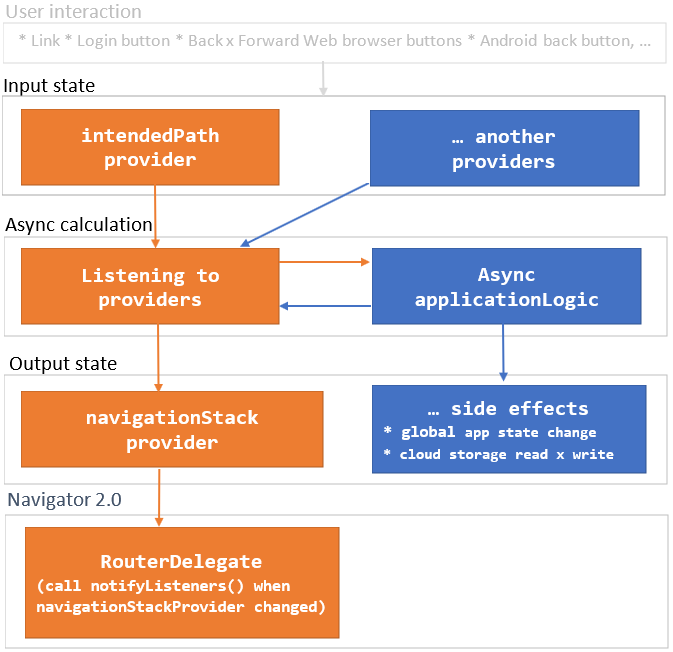
As you can see, changing the Input state starts the async calculation. The result of the calculations is Output state which can have app-specific Side effects. Navigator 2.0 RouterDelegate is then synchronized with navigationStackProvider
Roadmap #
I prepared this package for my new project. Its further development depends on whether the community will use it.
- proofreading because my English is not good. Community help is warmly welcomed.
- parameterization allowing Cupertino
Metadata
Publisher
unverified uploader
Metadata
Simple but powerfull Flutter navigation with riverpod and Navigator 2.0.
Repository (GitHub)
View/report issues
License
![]() unknown (LICENSE)
unknown (LICENSE)
Dependencies
flutter, flutter_riverpod, meta, riverpod_navigator_core