native_splash_screen 3.0.0  native_splash_screen: ^3.0.0 copied to clipboard
A fully configurable native splash screen plugin for Flutter apps, supporting static linking, runtime animations, and CLI-based asset generation.
🖼️ native_splash_screen #
Native splash screens provide faster startup visuals, smoother transitions, and eliminate the first-frame jank common with typical Flutter splash workarounds.
native_splash_screen is a Flutter plugin that delivers fully configurable, animated splash screens on Linux, Windows and Macos — powered by GTK + Cairo, Win32 GDI and AppKit + Cocoa, respectively.
🔧 Image composition and layout are handled at compile-time via a CLI tool, while rendering is performed natively at runtime using high-performance platform APIs.
📚 Table of Contents #
- ✨ Features
- 📦 Installation
- ⚙️ Setup
- 🚀 Usage
- 🍎 macOS Configuration Notes
- 🛠️ How It Works
- 📝 Configuration
- 🎥 Demos
- 📄 License
✨ Features #
- 🖼️ Native splash screens on Linux (GTK + Cairo) and Windows (WinGDI) and Macos (AppKit + Cocoa)
- 🖥️ Retina Display Support: Automatically generates 1x and 2x assets for macOS, ensuring crystal-clear splash screens on all displays.
- 🎞️ Runtime closing animations e.g : fading
- ⚙️ CLI-driven image layout and asset generation
- 🧩 Static linking — zero runtime dependencies
- 🛠️ Easily extensible for other platforms
- 🌟 Supports raster formats like PNG and JPEG. Transparency and scaling are fully handled at compile time by the CLI.
📦 Installation #
Add native_splash_screen to your pubspec.yaml:
dependencies:
  native_splash_screen: ^3.0.0
Also add the CLI tool under dev_dependencies:
dev_dependencies:
  native_splash_screen_cli: ^3.0.0
⚠️ Caution: To avoid errors, ensure
native_splash_screenandnative_splash_screen_cliare on the same major version (e.g.,3.x.x). The runtime and CLI tool are designed to work together.
Then run:
flutter pub get
⚙️ Setup #
Setting up native_splash_screen involves a few steps: generating configuration, integrating platform-specific build files, and adding minimal native code to show the splash screen early.
1. Generate the splash screen configuration file #
First, generate the main YAML configuration file (native_splash_screen.yaml) in your project's root directory. This file allows you to customize the splash screen's appearance and behavior for each platform.
Run:
dart run native_splash_screen_cli init
- This command will create
native_splash_screen.yamlpre-filled with comments and examples to guide you through the available options.
2. Generate platform-specific build/integration files #
Once you've configured native_splash_screen.yaml (e.g., enabled desired platforms, set image paths), run the setup command. This prepares platform-specific files that help integrate the splash screen into your native builds.
Run:
dart run native_splash_screen_cli setup
-
For Linux and Windows: This typically creates
native_splash_screen.cmakefiles in your respective platform runner directories (linux/runnerandwindows/runner). These CMake files define how the native splash screen code (generated in the next step) will be compiled and linked. -
For macOS: This step primarily prepares the ground. The actual Swift configuration files are generated by the gen command (see next step), and integration involves Xcode project modifications.
3. Generate the splash screen code #
Now make sure to add the images path in the configuration file and put a valid window size and image size.
Then you can generate the splash screen code by running:
dart run native_splash_screen_cli gen
This command:
- Reads your
native_splash_screen.yaml. - Processes the specified images (resizing, applying effects as configured).
- Generates the actual native source code for the splash screen:
- Linux & Windows: Creates C++ source files that are then compiled via the
.cmakefiles. - macOS: Creates Swift files (
NativeSplashScreen.swiftand its flavor-specific counterparts likeNativeSplashScreen_Debug.swift) in yourmacos/Runner/directory. These files contain your splash screen configuration as Swift code.
- Linux & Windows: Creates C++ source files that are then compiled via the
Important: Do not run your app yet. You still need to integrate these generated files and add platform-specific initialization code as described below.
4. Integrate the build files #
Now, you need to tell each platform's build system how to use the files generated in the previous steps.
🐧 Linux #
Click to Expand
Apply the following patch to your linux/runner/CMakeLists.txt:
if you edited the linux path in
native_splash_screen.yaml, you need to apply the patch in to the correct CMakefile.txt
+ # Include splash screen library configuration
+ include("${CMAKE_CURRENT_SOURCE_DIR}/native_splash_screen.cmake")

  add_executable(${BINARY_NAME}
          "main.cc"
          "my_application.cc"
          "${FLUTTER_MANAGED_DIR}/generated_plugin_registrant.cc"
  )
🪟 Windows #
Click to Expand
Apply the following patch to your windows/runner/CMakeLists.txt:
if you edited the windows path in
native_splash_screen.yaml, you need to apply the patch in to the correct CMakefile.txt
+ # Include splash screen library configuration
+ include("${CMAKE_CURRENT_SOURCE_DIR}/native_splash_screen.cmake")

  add_executable(${BINARY_NAME} WIN32
    "flutter_window.cpp"
    "main.cpp"
    "utils.cpp"
    "win32_window.cpp"
    "${FLUTTER_MANAGED_DIR}/generated_plugin_registrant.cc"
    "Runner.rc"
    "runner.exe.manifest"
  )
🍎 Macos #
Xcode is required for macos setup.
Click to Expand
For macOS, integration involves adding the Swift files generated by native_splash_screen_cli gen to your Xcode project and setting a compilation flag. Xcode is required for these steps.
A. Add Generated Swift Files to Runner Target:
The gen command creates these files in [YourApp]/macos/Runner/:
NativeSplashScreen.swiftNativeSplashScreen_Debug.swiftNativeSplashScreen_Profile.swiftNativeSplashScreen_Release.swift
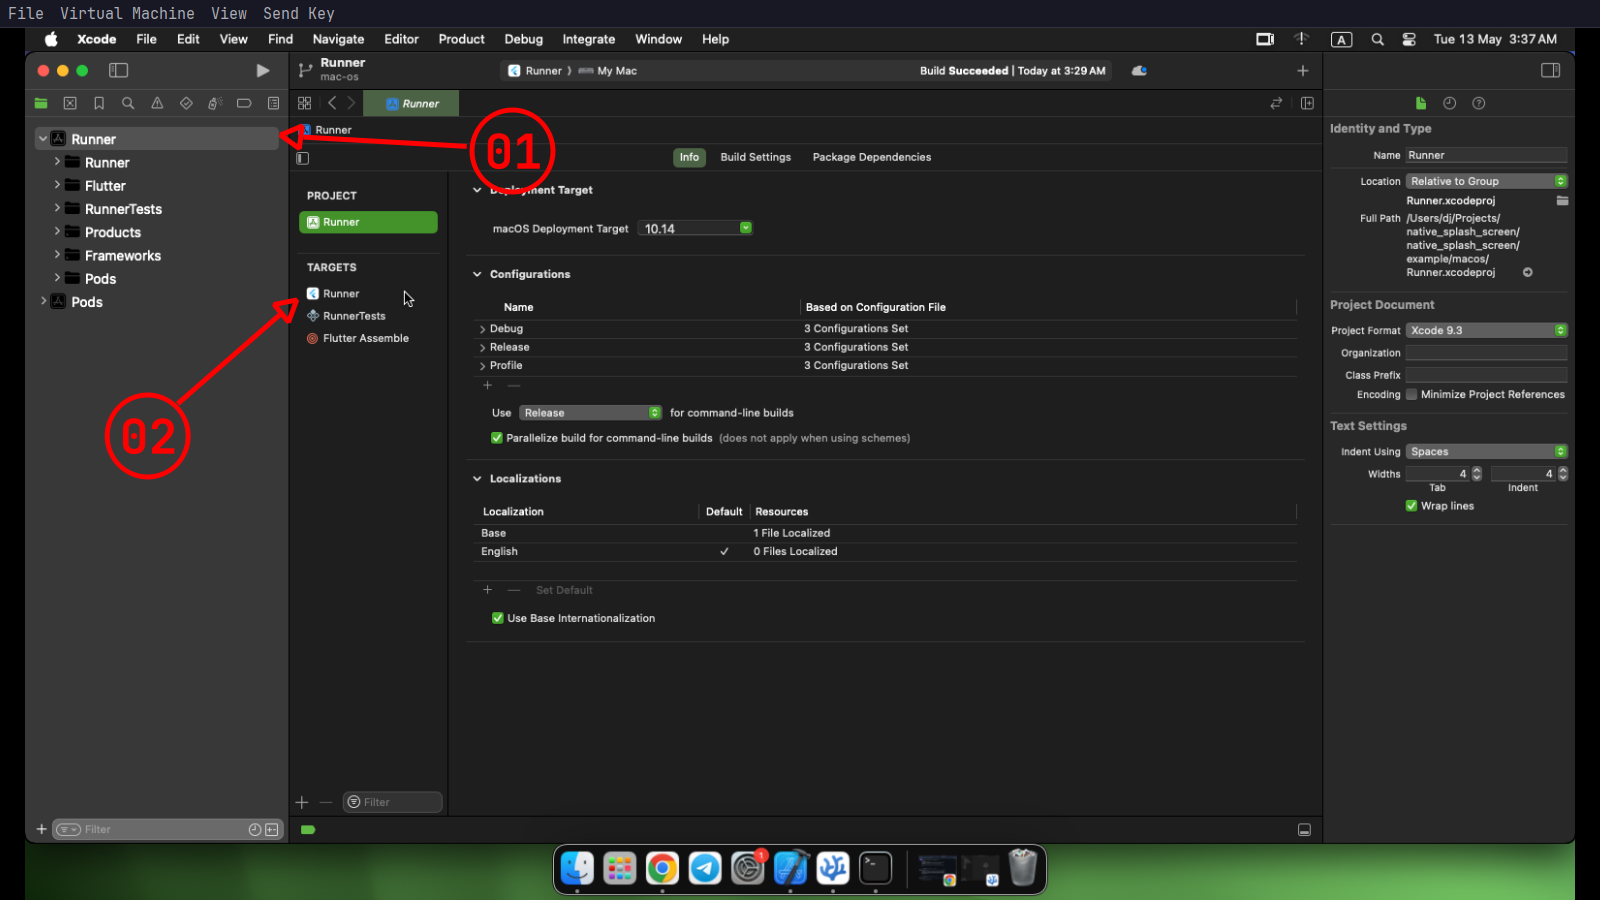
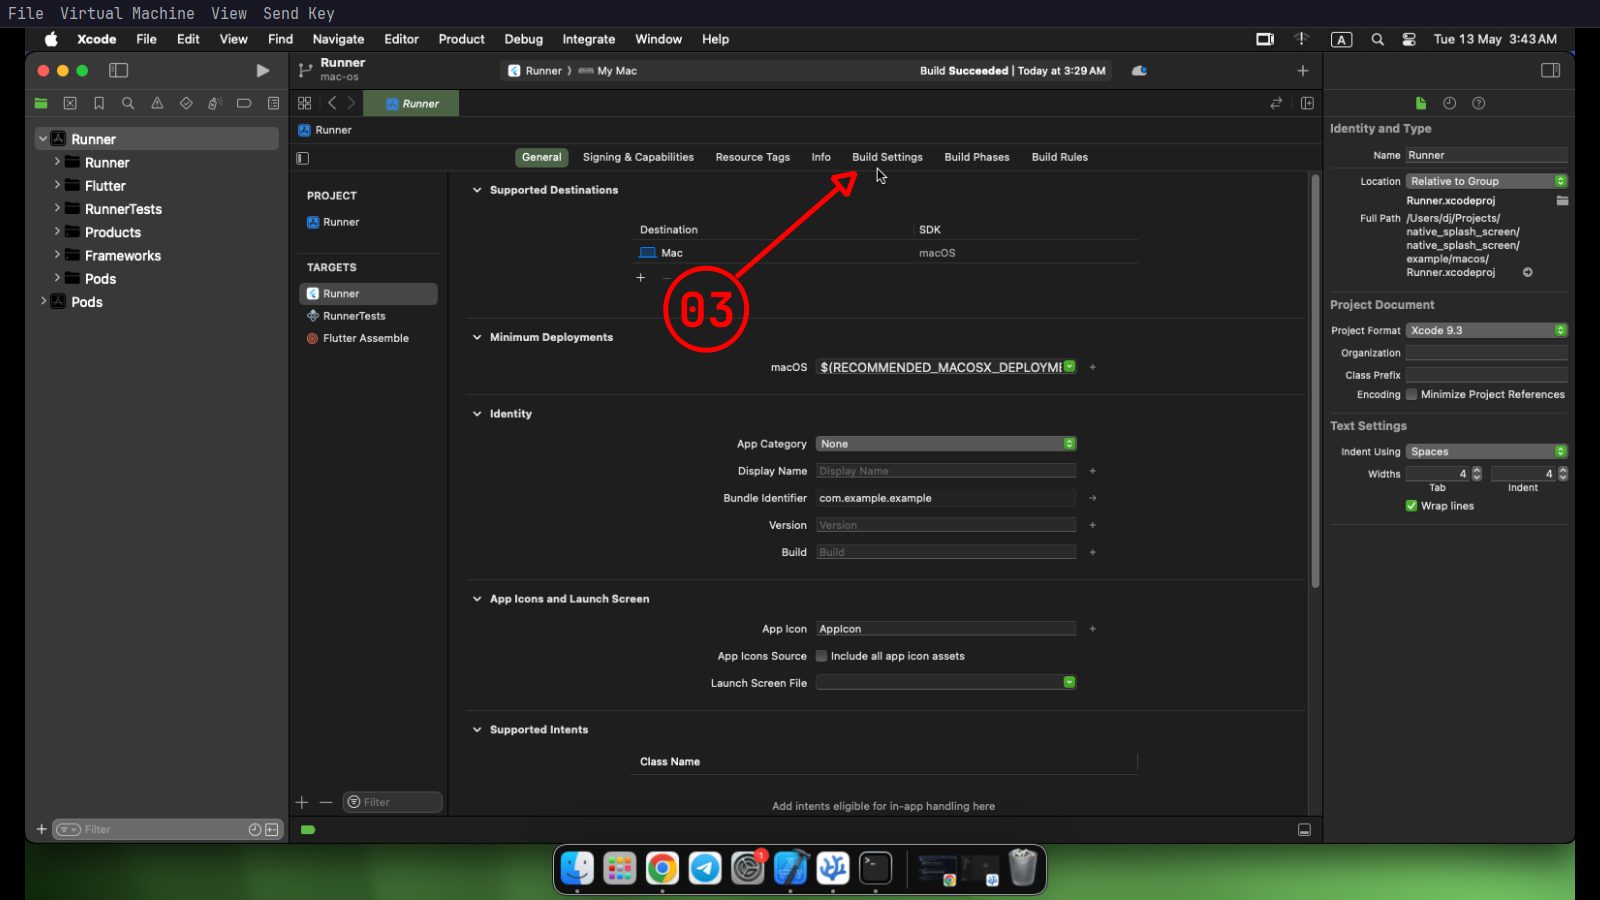
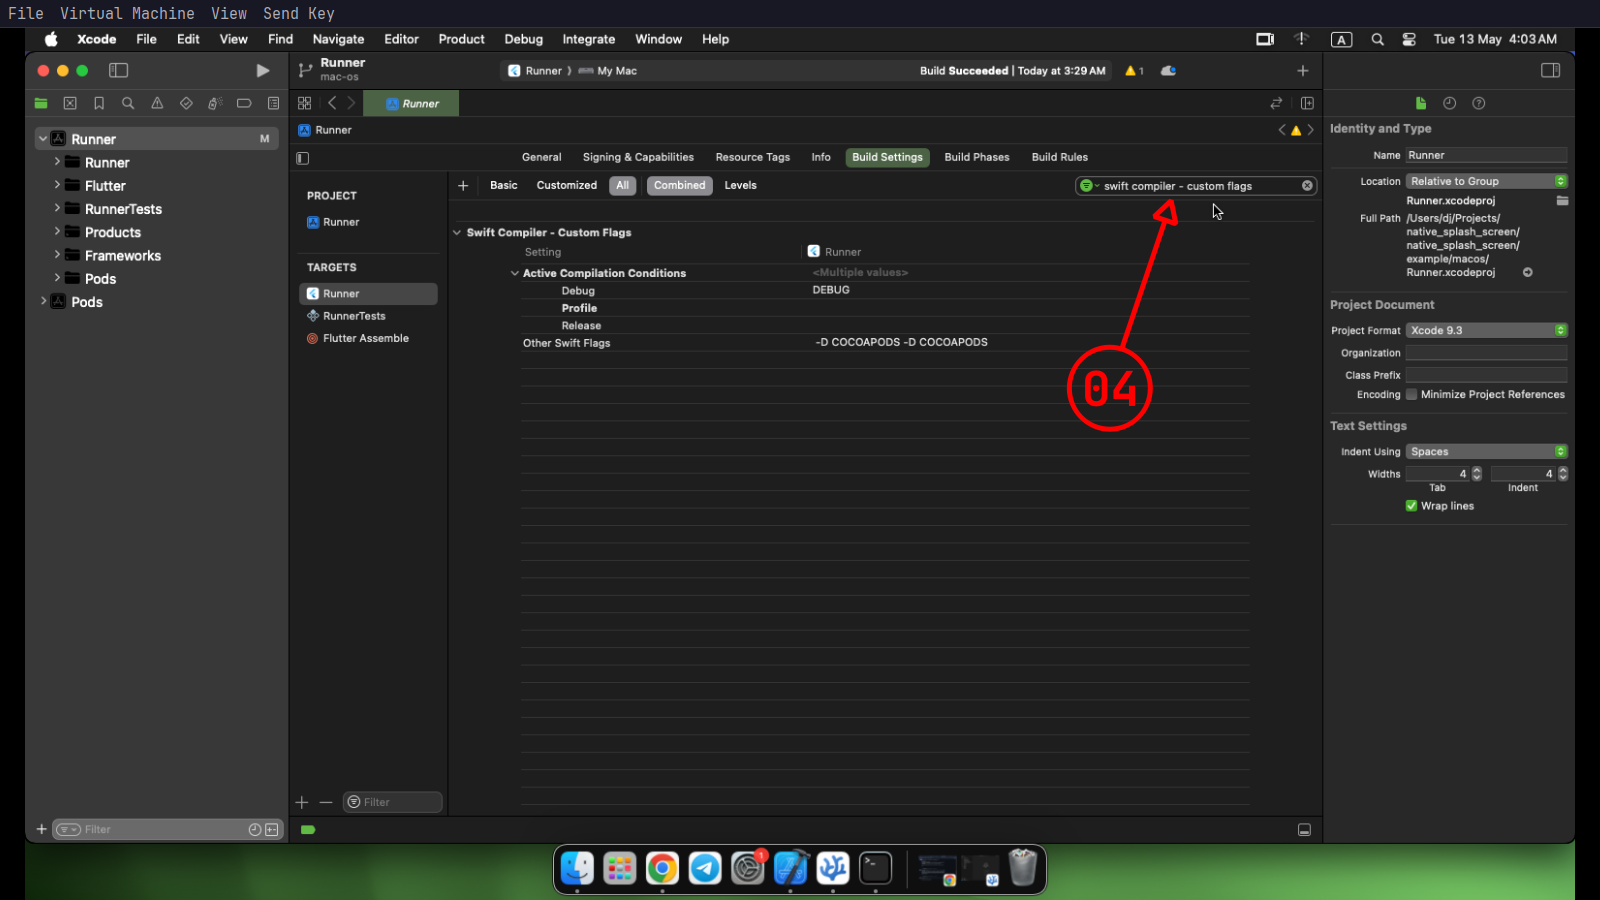
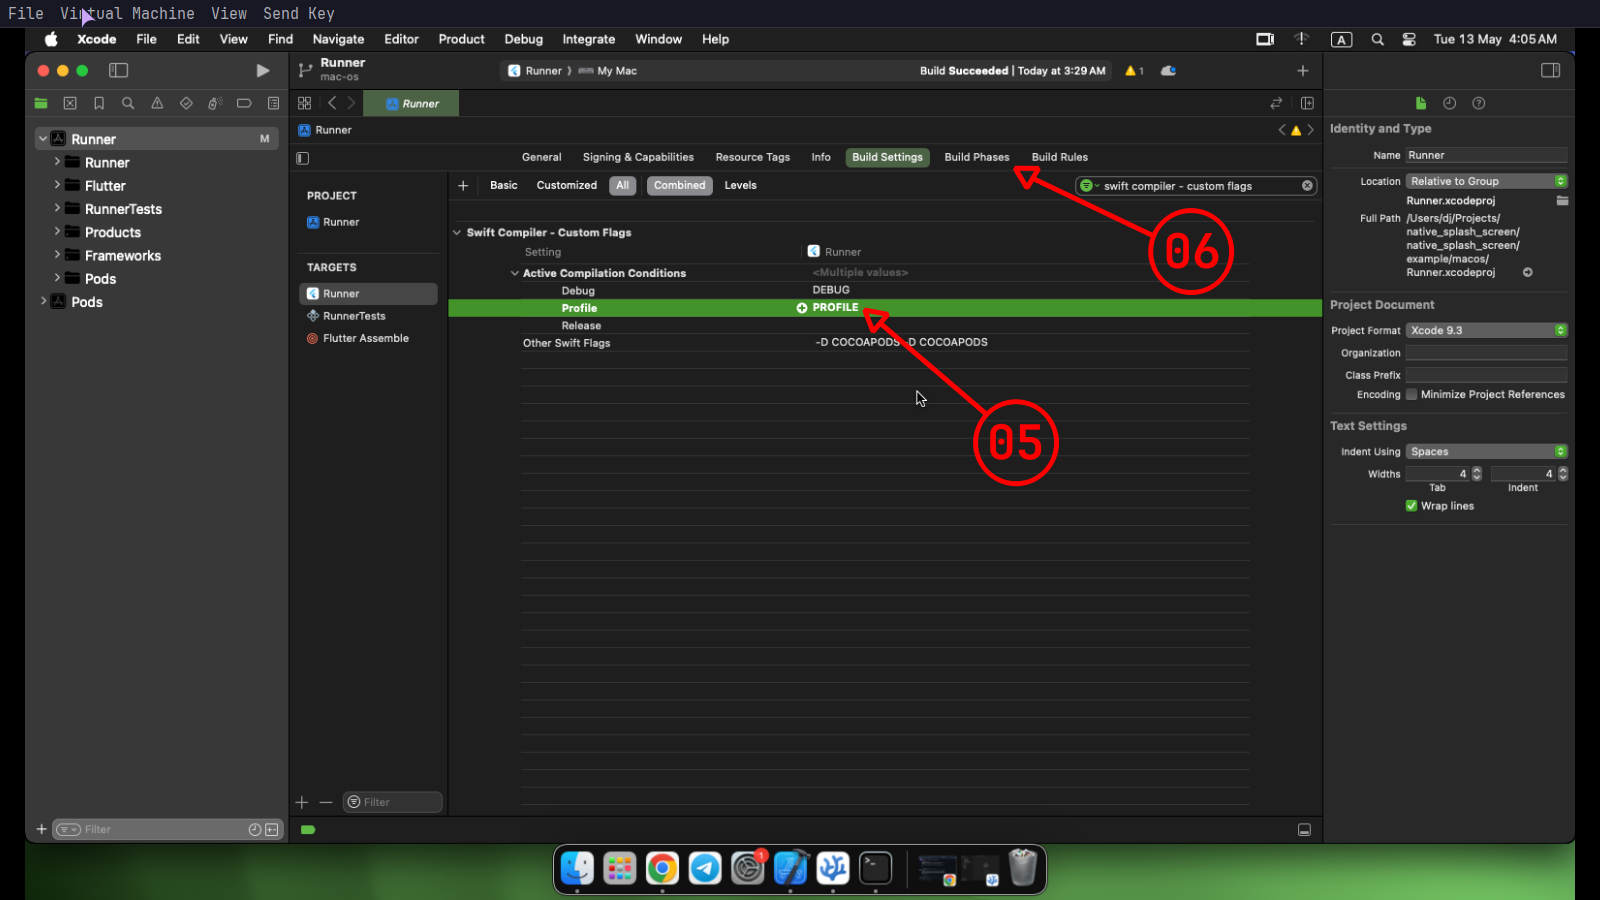
Follow these visual steps to add them to Xcode:
1 - click on 01 then 02.
2 - then click on 03.
3 - then search for swift compiler - custom flags on 04.
4 - click ↵ in 05 and type PROFILE then click ↵ to confirm and click 06.
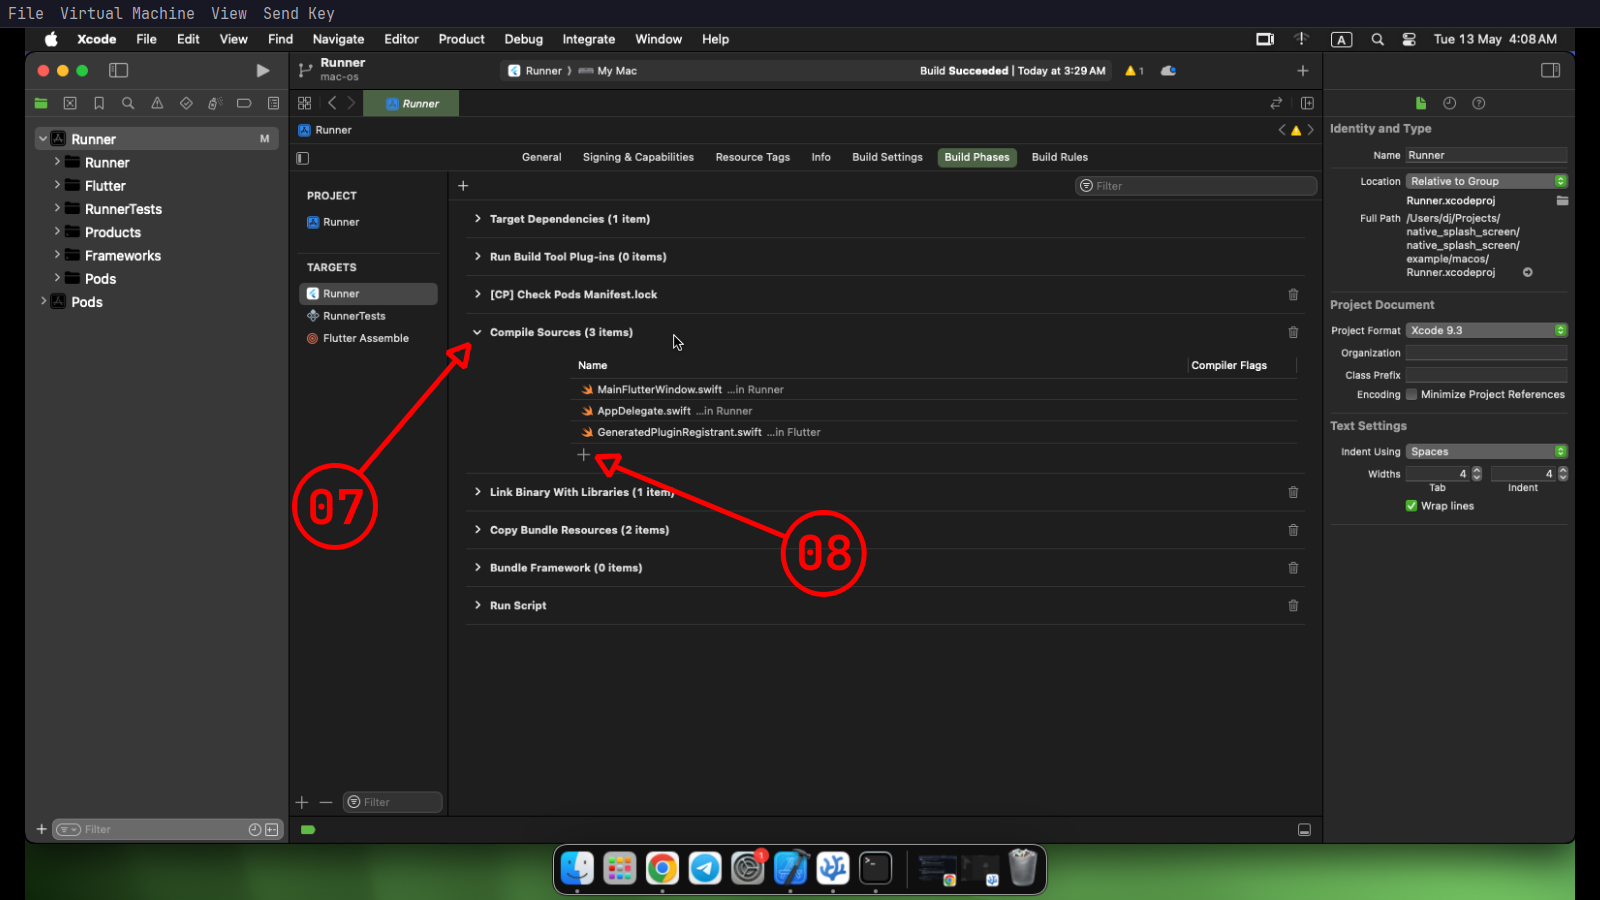
5 - click 07 to expand it then click 08 to add new files.
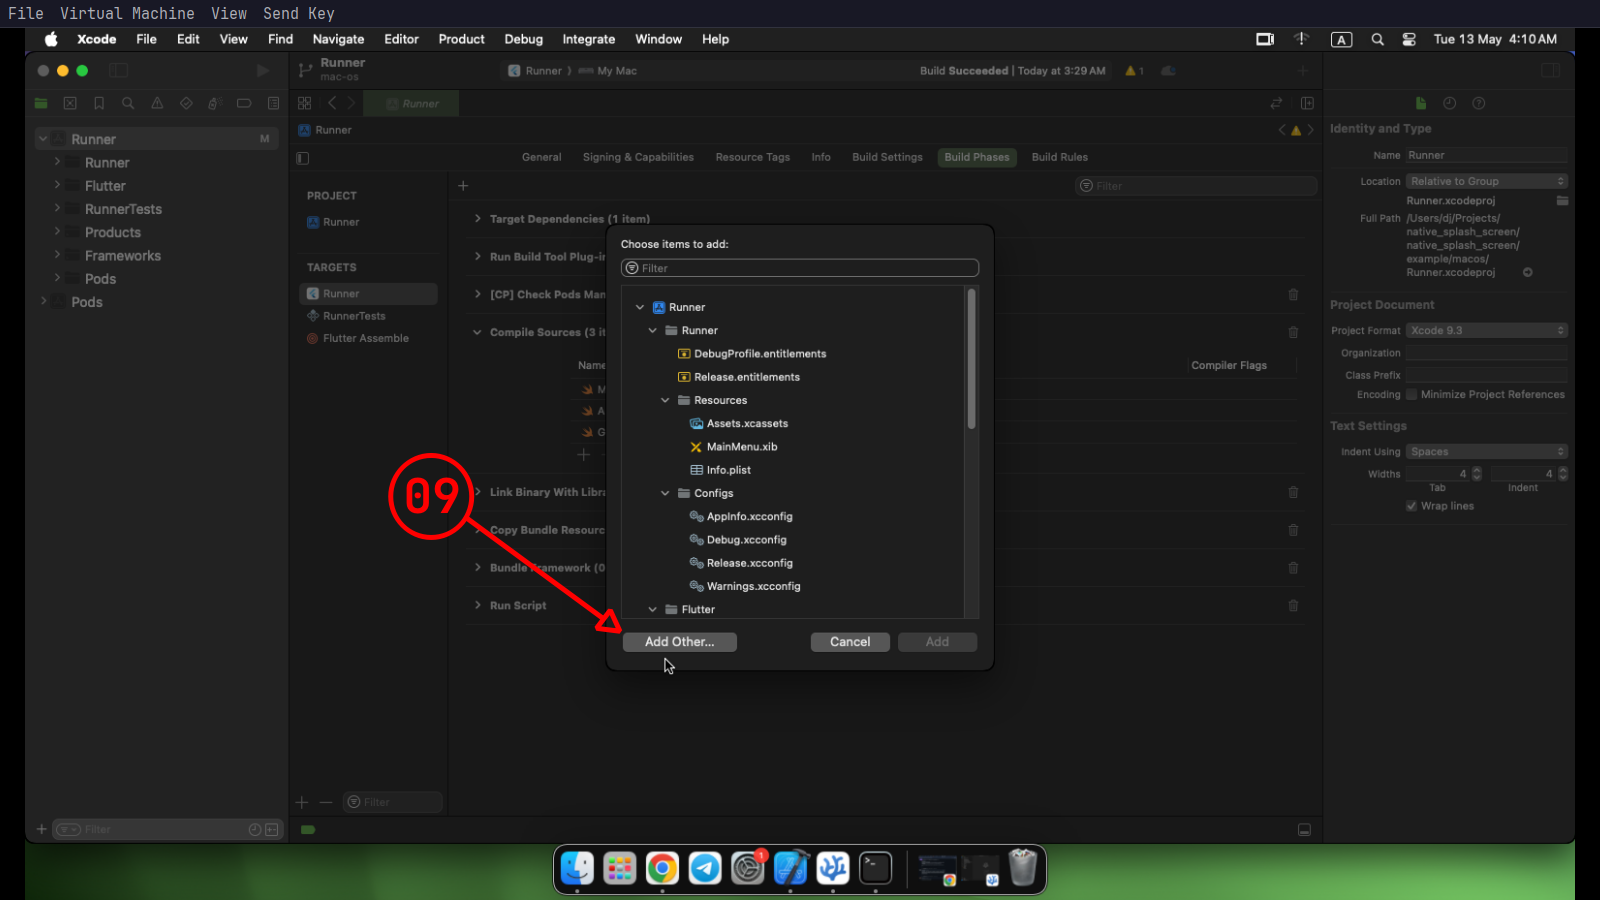
6 - click 09 to choose the files.
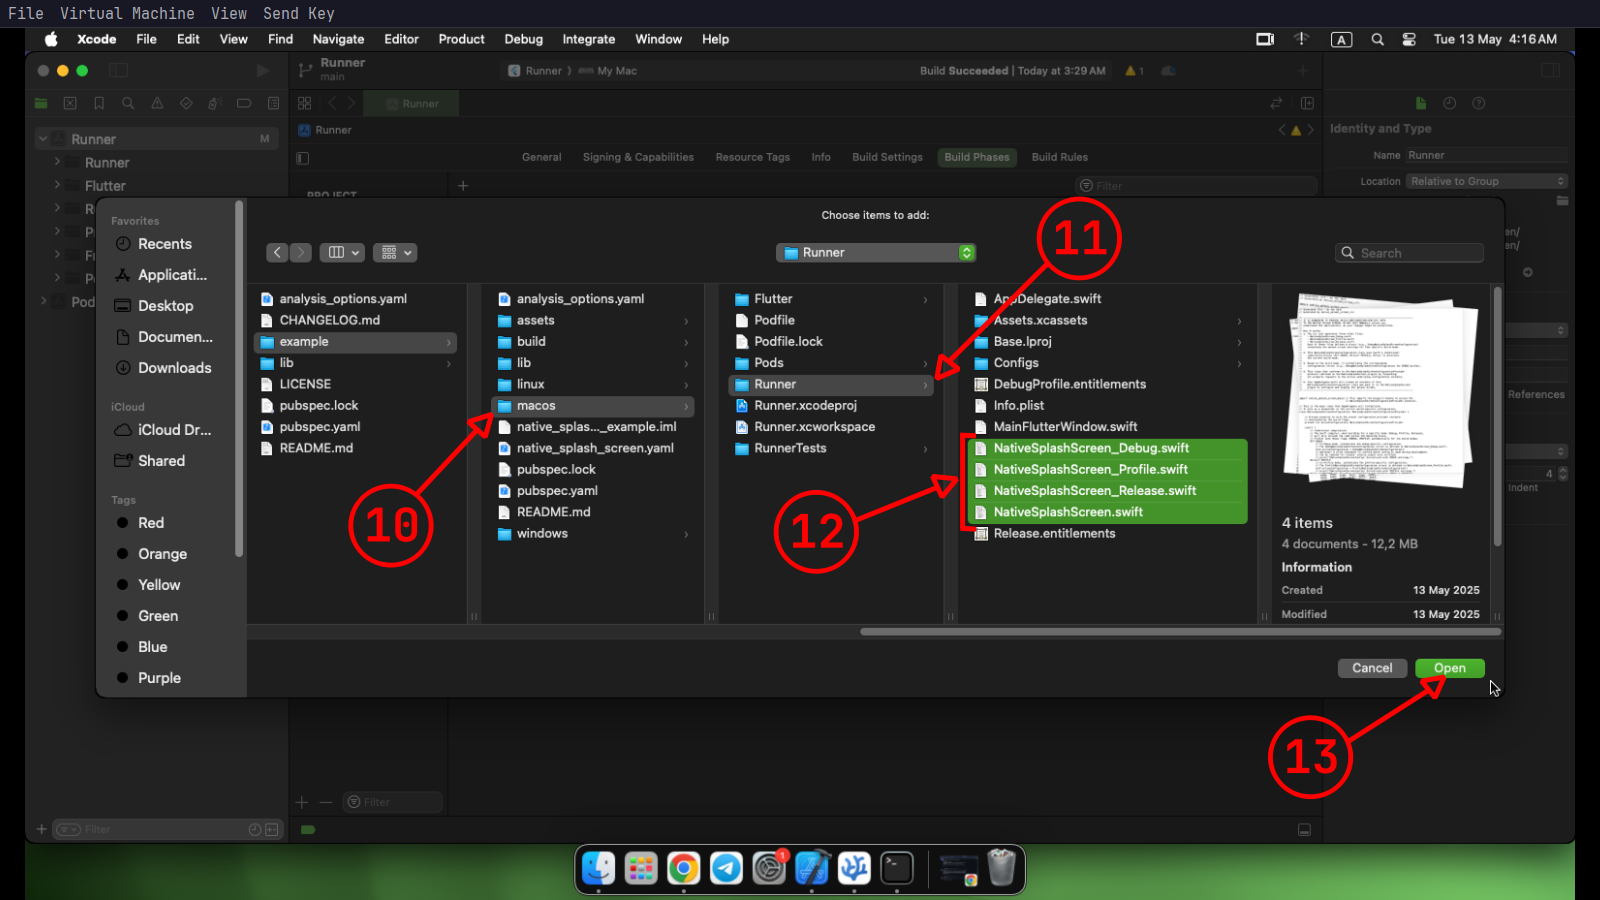
7 - in the project root folder open the macos folder like 10 then open the Runner folder like 11 after that choose all the swift files which contain "NativeSplashScreen" like 12, cause those get generated by the native_splash_screen_cli the click open like 13.
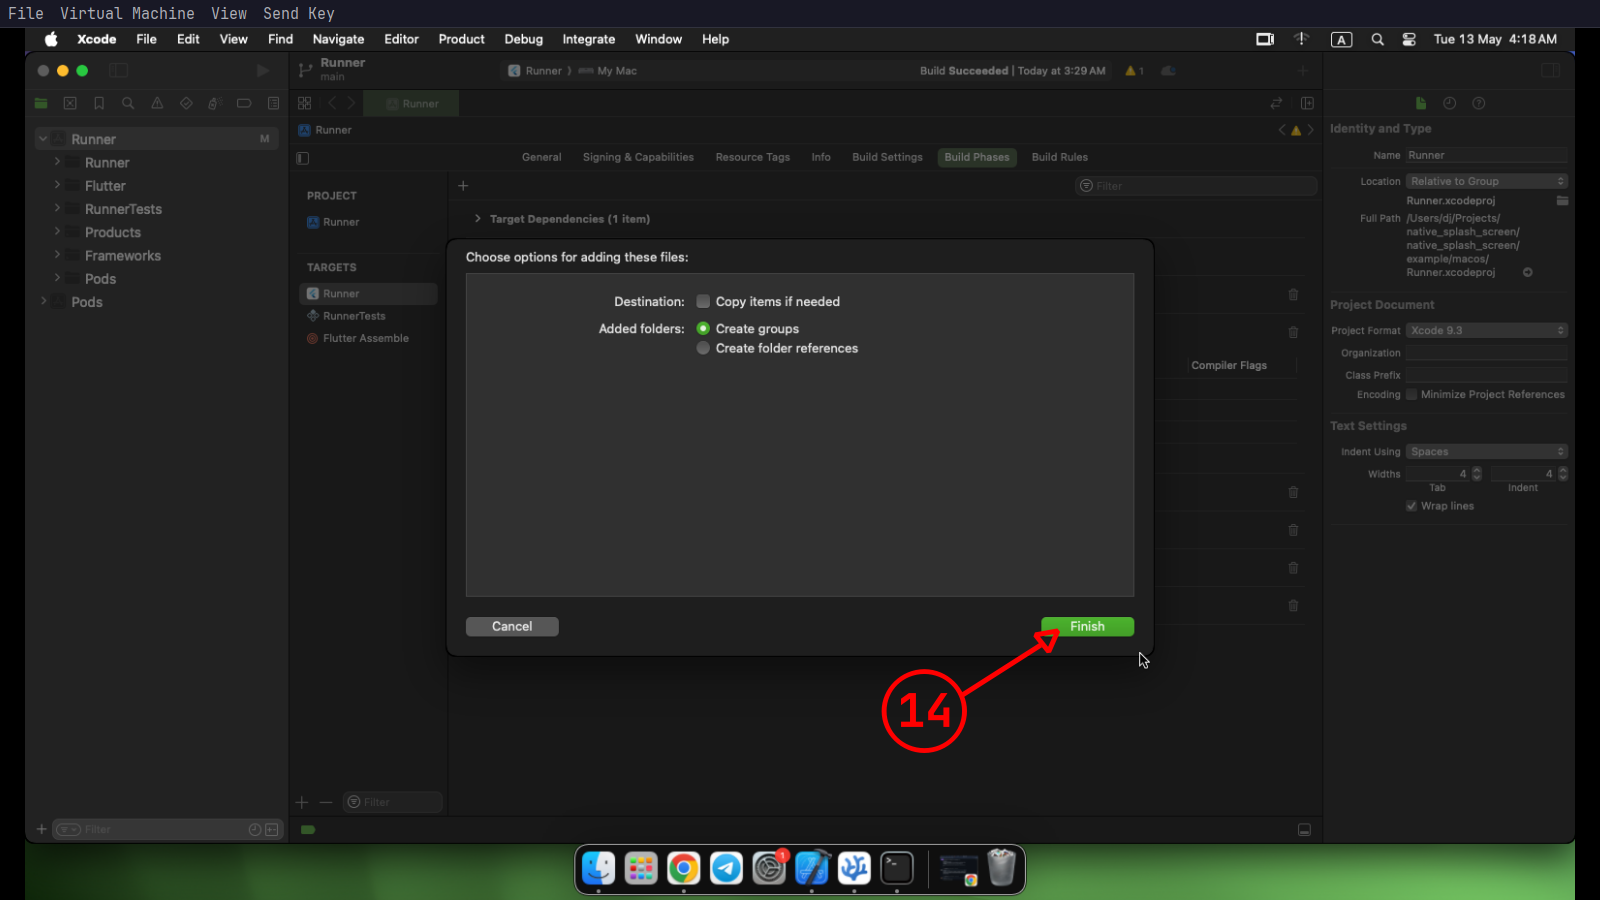
8 - finally click finish like 14 .
5. Add the missing code on each platform #
🐧 Linux #
Click to Expand
Apply the following patch to your linux/runner/main.cc:
+#include <native_splash_screen_linux/native_splash_screen_linux_plugin.h>
#include "my_application.h"

int main(int argc, char** argv) {
    // Initialize GTK first
+    gtk_init(&argc, &argv);

    // So can safely show the splash screen first.
+    show_splash_screen();

    // Then initialize and run the application as normal
    g_autoptr(MyApplication) app = my_application_new();
    return g_application_run(G_APPLICATION(app), argc, argv);
}
🪟 Windows #
Click to Expand
Apply the following patch to your windows/runner/main.cpp:
+#include <native_splash_screen_windows/native_splash_screen_windows_plugin_c_api.h>

#include "flutter_window.h"
#include "utils.h"

int APIENTRY wWinMain(_In_ HINSTANCE instance, _In_opt_ HINSTANCE prev,
                      _In_ wchar_t *command_line, _In_ int show_command) {
   // Show the splash screen first.
+  ShowSplashScreen();
🍎 Macos #
Click to Expand
Apply the following patch to your macos/Runner/AppDelegate.swift:
import Cocoa
import FlutterMacOS
+import native_splash_screen_macos

@main
class AppDelegate: FlutterAppDelegate {
    override func applicationShouldTerminateAfterLastWindowClosed(_ sender: NSApplication) -> Bool {
        return true
    }

    override func applicationSupportsSecureRestorableState(_ app: NSApplication) -> Bool {
        return true
    }
+
+    override func applicationWillFinishLaunching(_ notification: Notification) {
+        NativeSplashScreen.configurationProvider = NativeSplashScreenConfiguration()
+        NativeSplashScreen.show()
+    }
}
🚀 Usage #
Run #
If everything completes successfully, you can now run and test your app. If you encounter any issues during generation, please open an issue.
Closing the splash screen #
So now you need to close the splash screen in your app when you're ready:
import 'package:flutter/material.dart';
import 'package:native_splash_screen/native_splash_screen.dart' as nss;

void main() {
  WidgetsFlutterBinding.ensureInitialized();
  runApp(const MyApp());
}

class MyApp extends StatefulWidget {
  const MyApp({super.key});

  @override
  State<MyApp> createState() => _MyAppState();
}

class _MyAppState extends State<MyApp> {
  @override
  void initState() {
    super.initState();
    // Close splash screen after the first frame renders
    WidgetsBinding.instance.addPostFrameCallback((_) {
      nss.close(animation: nss.CloseAnimation.fade);
    });
  }

  @override
  Widget build(BuildContext context) {
    return MaterialApp(
      home: Scaffold(
        appBar: AppBar(title: const Text('Native Splash Screen')),
      ),
    );
  }
}
💡 Calling
close()multiple times or when the splash screen is already closed has no effect and is completely safe.
See the example app for more details.
🍎 macOS Configuration Notes #
The package automatically generates assets for both standard (1x) and high-resolution Retina (2x) displays to ensure your splash screen looks sharp on all devices.
Quality Recommendation for Retina Displays
For the best visual quality, your source image in image_path should have pixel dimensions that are at least twice the configured image_width and image_height.
Example: For an
image_widthof 400 andimage_heightof 200, provide a source image that is at least 800x400 pixels.
How image_scaling works on macOS
The scaling logic is designed to prevent quality loss.
-
image_scaling: false(Default): Prevents a small source image from being upscaled (stretched), which causes blurriness. If the image is smaller than the target dimensions, it will be centered on the splash screen at its original size. Large images will still be cleanly downscaled to fit. -
image_scaling: true: Forces the image to be resized to exactly match the configuredimage_widthandimage_height, whether it's upscaling or downscaling.
🛠️ How It Works #
At compile time (gen):
- Parses your YAML configuration
- Composes and rasterize your image layout
- Generates native C++ an swift source code
- Builds platform-specific static libraries (Linux and Windows)
At runtime:
-
Linux: Uses GTK & Cairo to render the splash screen.
-
Windows: Uses Win32 GDI for fast native rendering.
-
Macos: Uses AppKit & Cocoa to render the splash screen.
-
You call
close()from Dart when your app is ready, triggering the animation.
📝 Configuration #
See native_splash_screen_cli for configuration reference.
🎥 Demos #
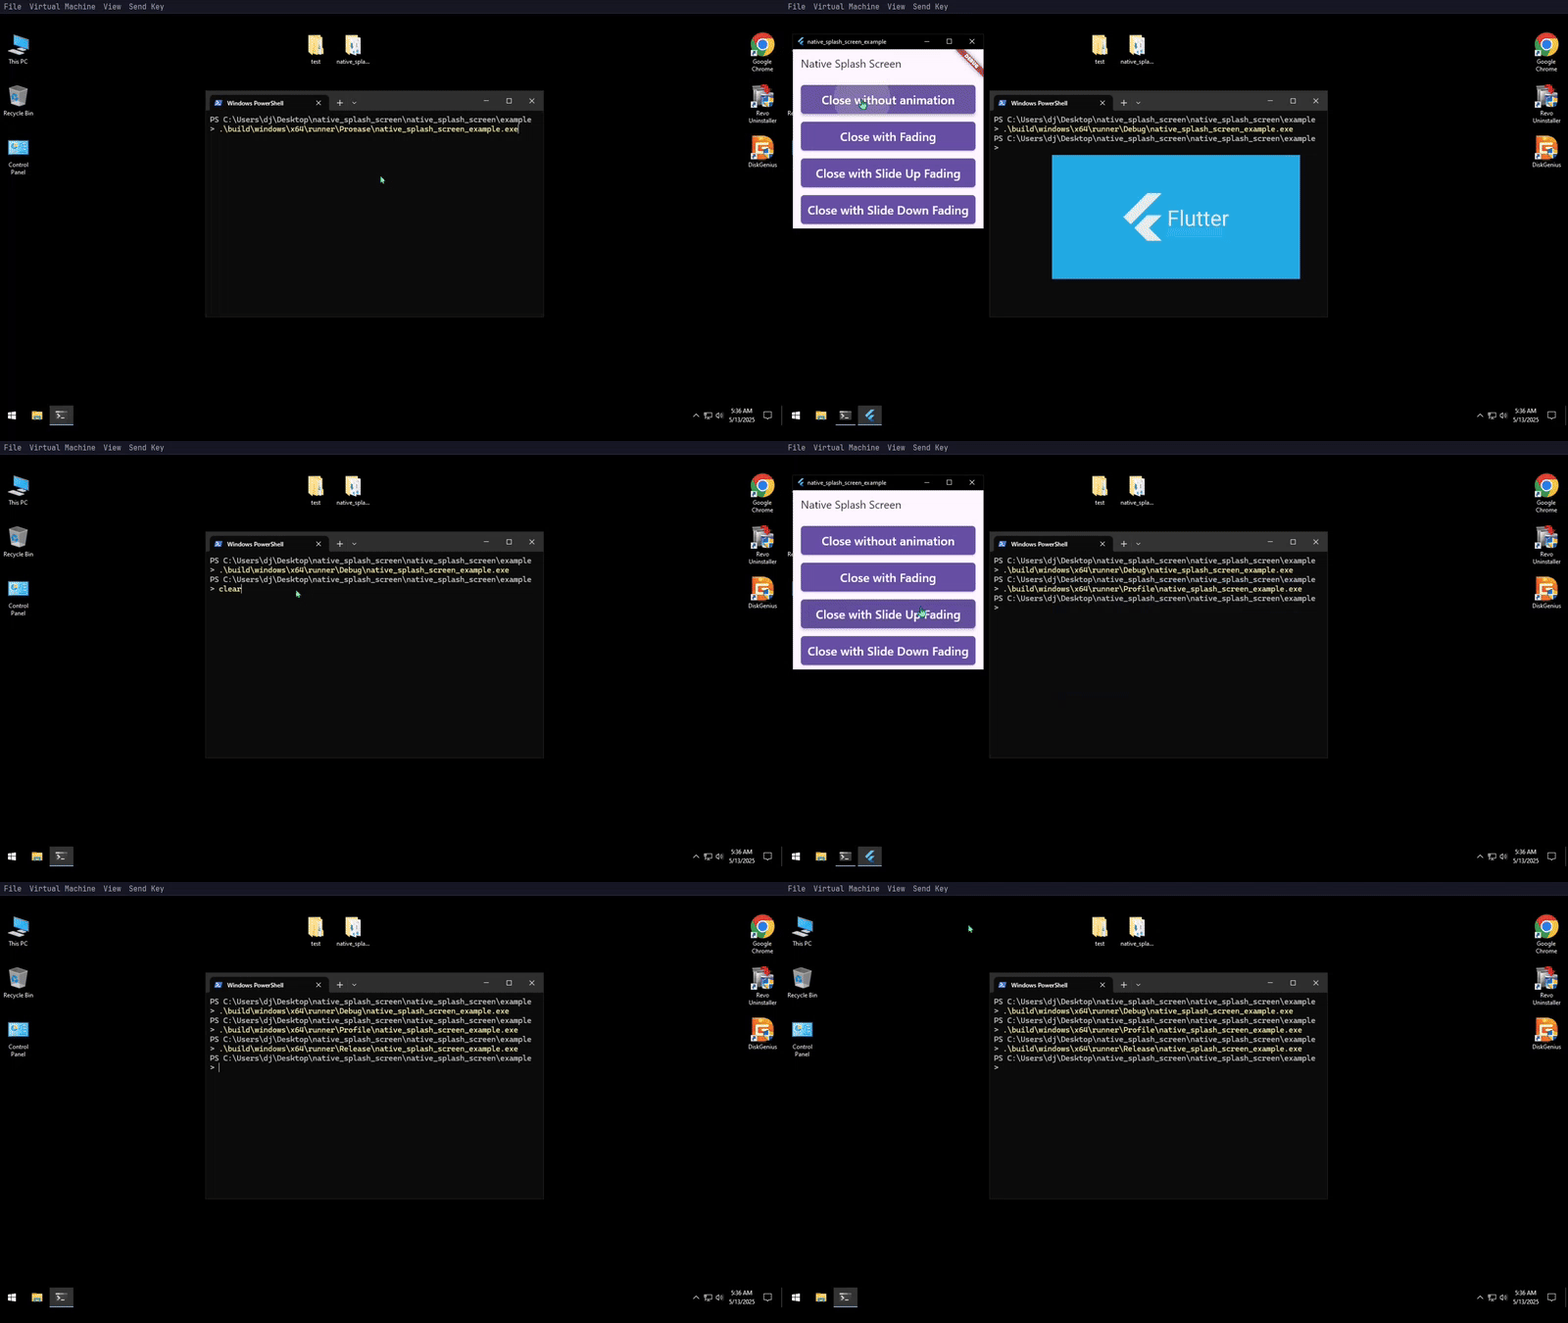
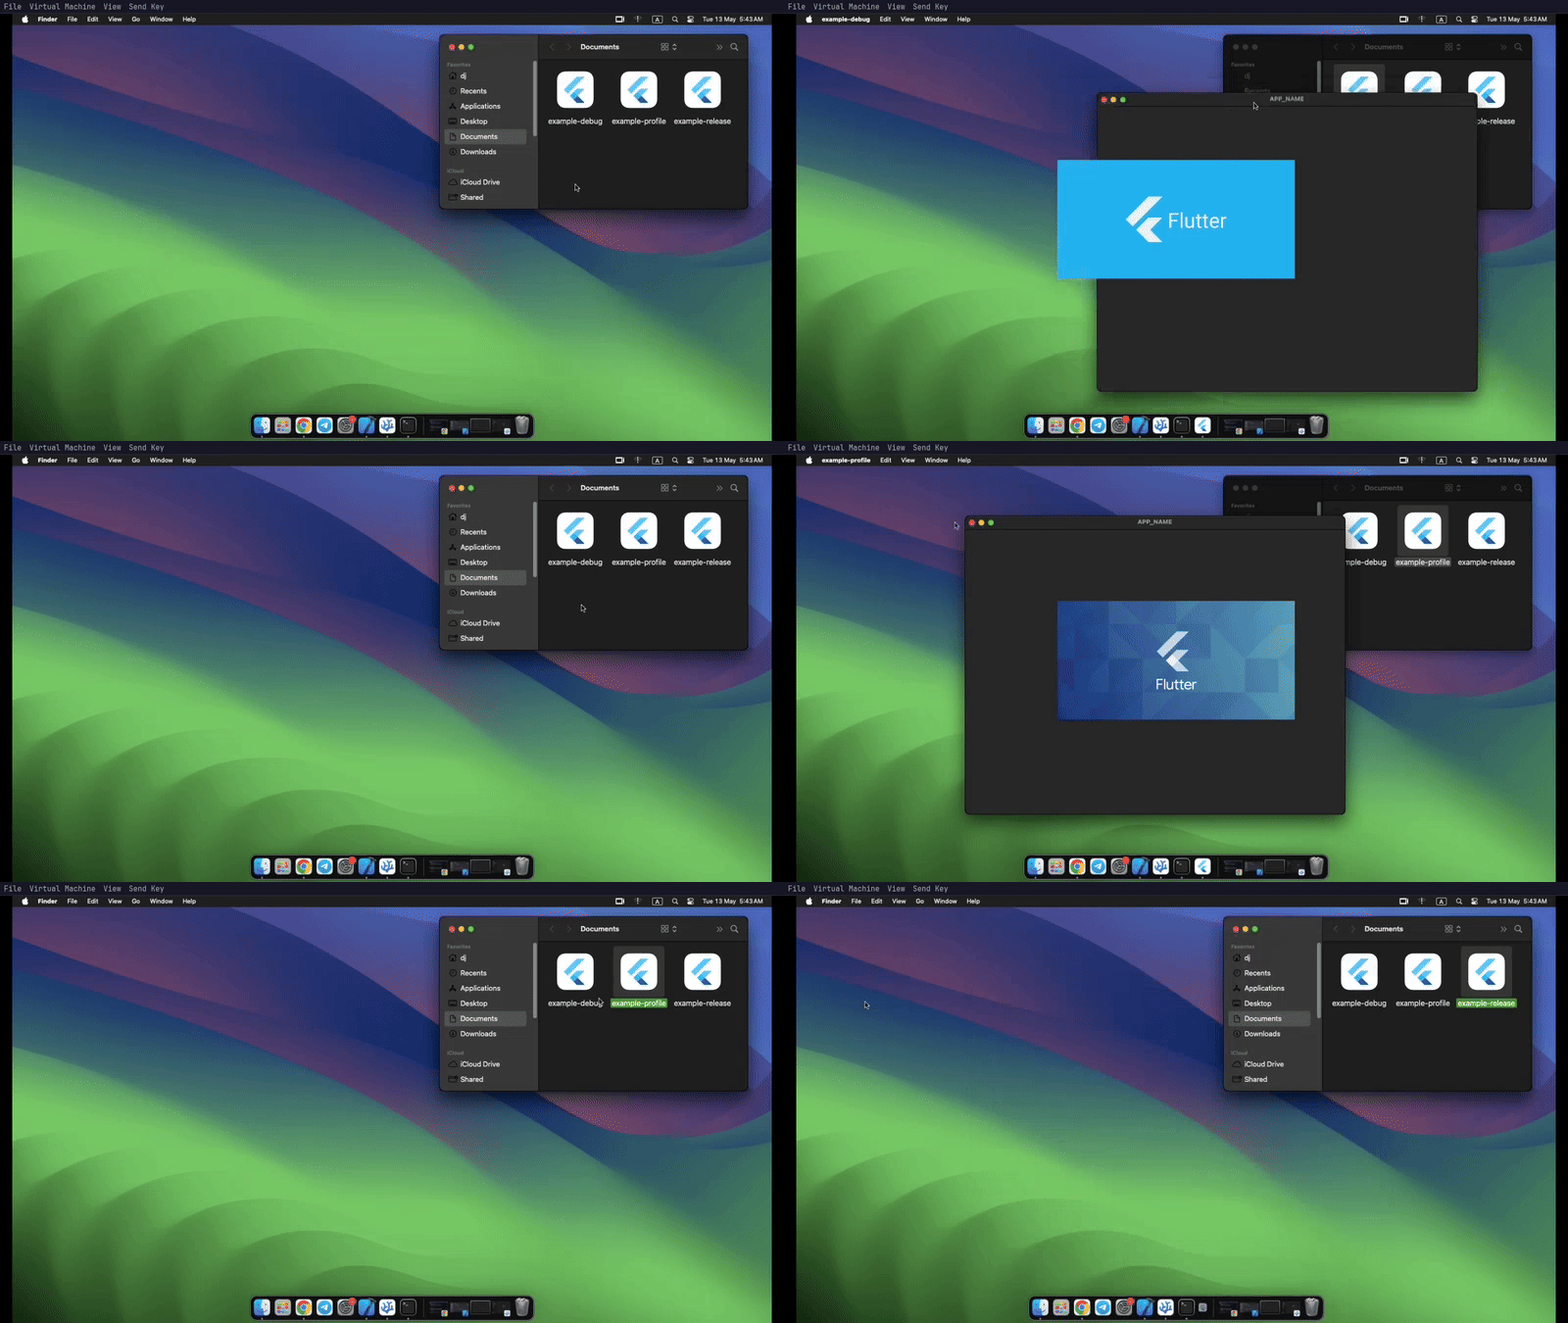
Here are some recorded demos of the splash screen in different environments:
🐧 Hyprland (Wayland) #
Click to Expand
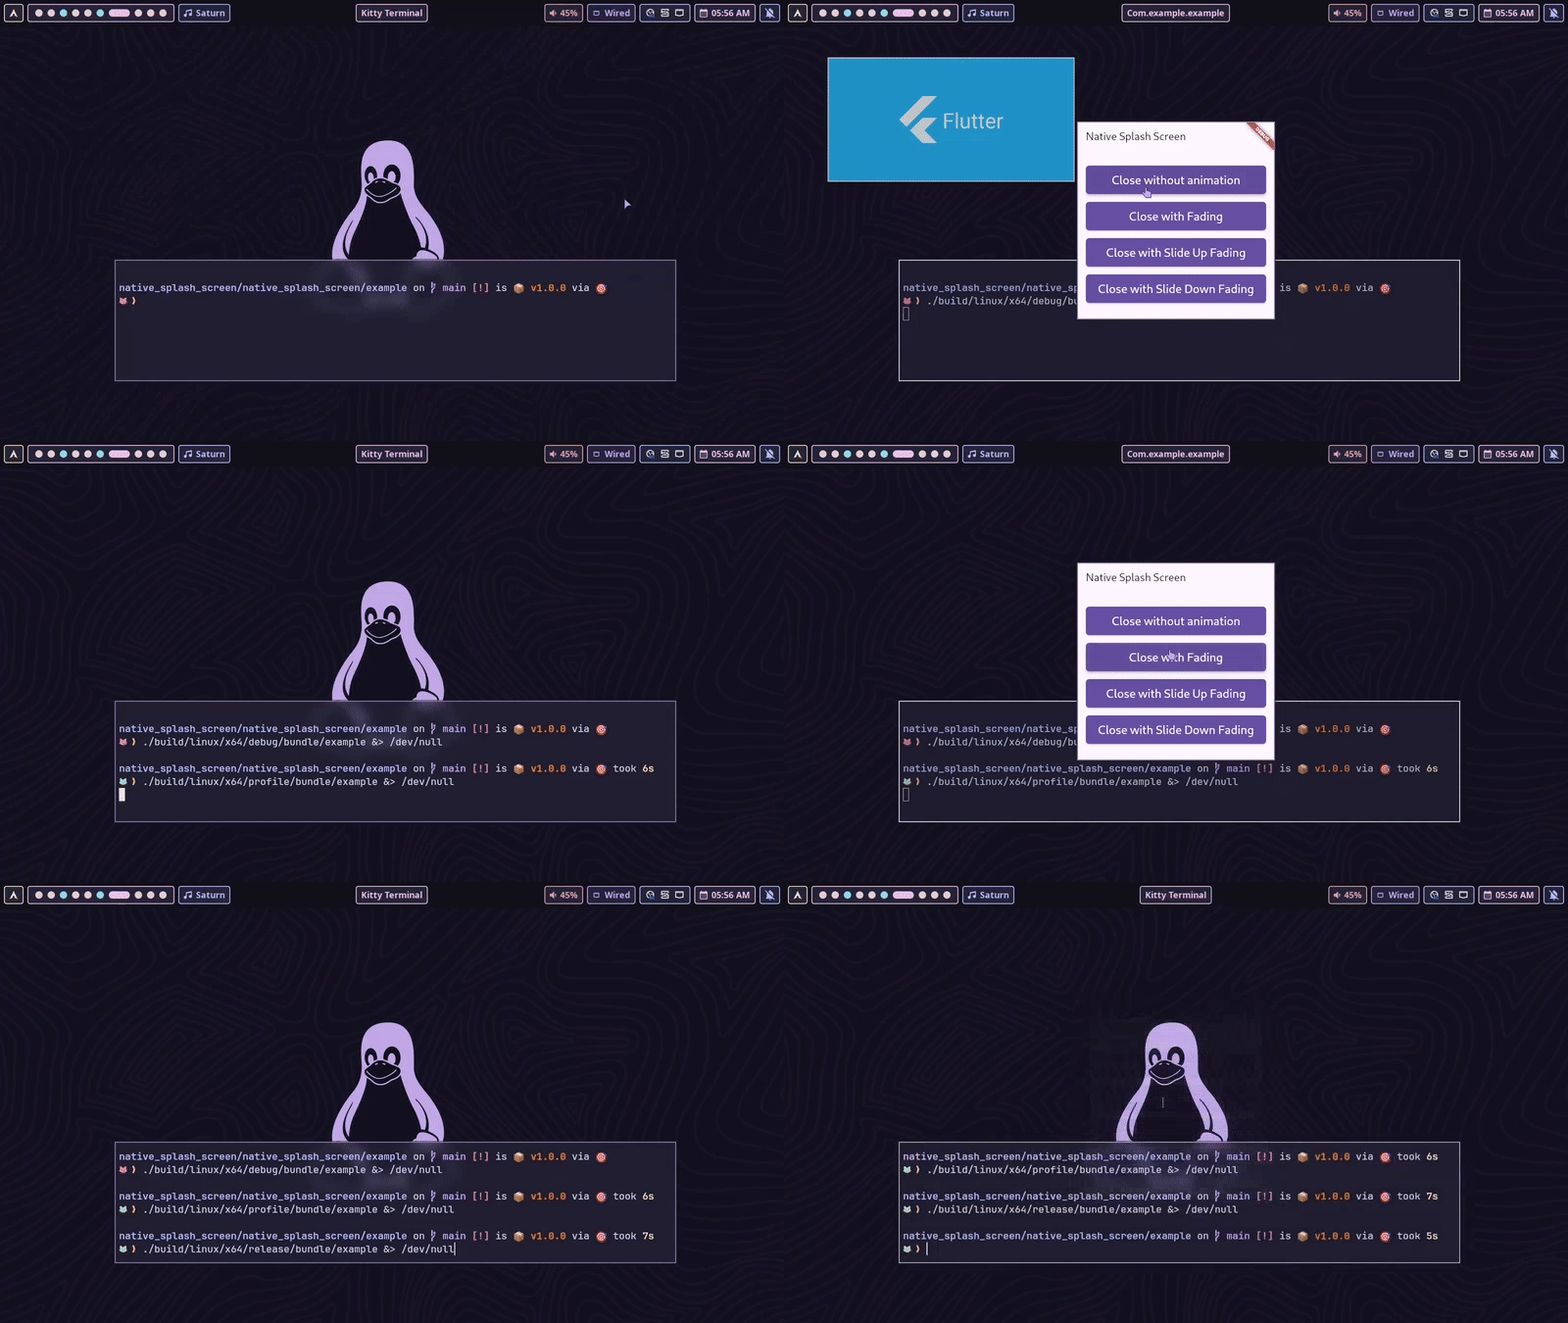
⚠️ Note: Most Wayland window managers — especially tiling WMs like Hyprland — are very strict about client-side window movement.
Because of this, only the fade animation is supported reliably. Slide or Move transitions may not behave as expected.
🐧 Linux Mint (X11) #
Click to Expand
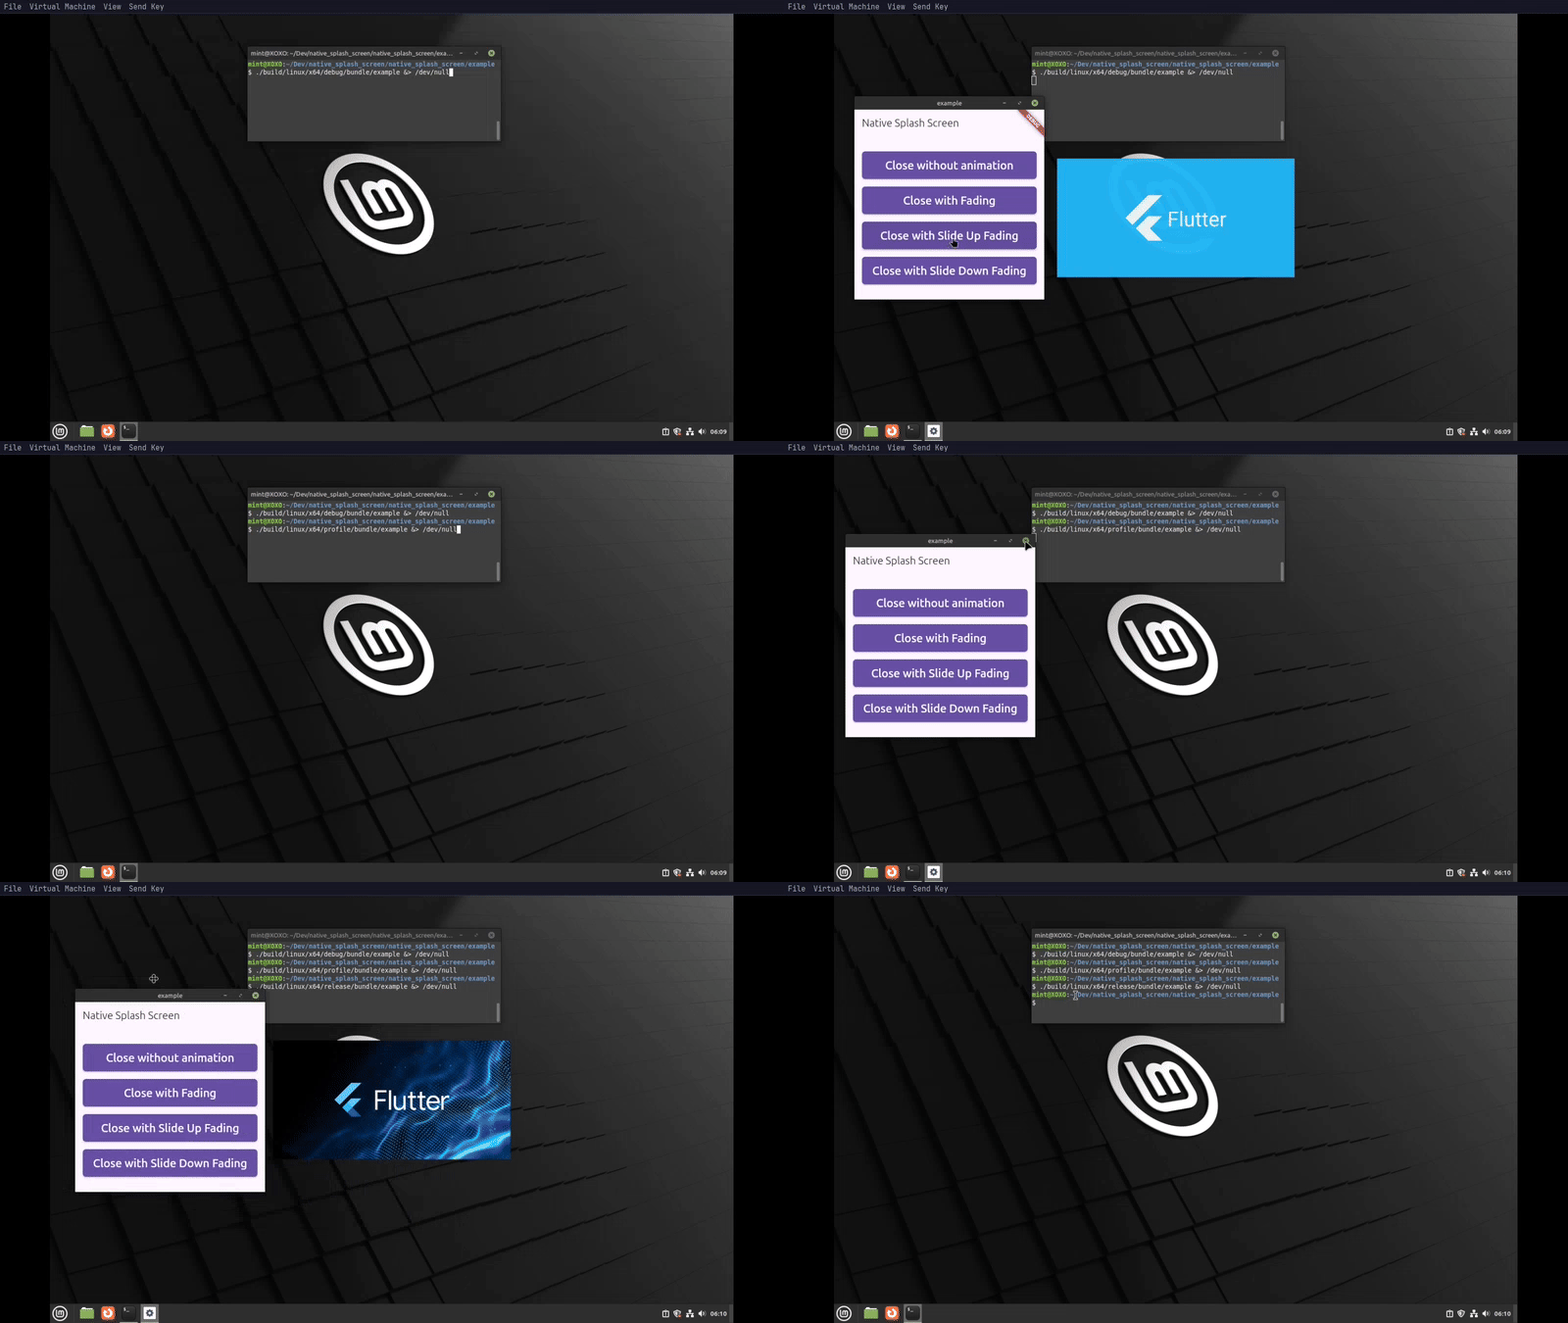
🪟 Windows #
Click to Expand
🍎 Macos #
Click to Expand
📄 License #
BSD 3-Clause License

Copyright (c) 2025, Anicine Project

Redistribution and use in source and binary forms, with or without
modification, are permitted provided that the following conditions are met:

1. Redistributions of source code must retain the above copyright notice, this
   list of conditions and the following disclaimer.

2. Redistributions in binary form must reproduce the above copyright notice,
   this list of conditions and the following disclaimer in the documentation
   and/or other materials provided with the distribution.

3. Neither the name of the copyright holder nor the names of its
   contributors may be used to endorse or promote products derived from
   this software without specific prior written permission.

THIS SOFTWARE IS PROVIDED BY THE COPYRIGHT HOLDERS AND CONTRIBUTORS "AS IS"
AND ANY EXPRESS OR IMPLIED WARRANTIES, INCLUDING, BUT NOT LIMITED TO, THE
IMPLIED WARRANTIES OF MERCHANTABILITY AND FITNESS FOR A PARTICULAR PURPOSE ARE
DISCLAIMED. IN NO EVENT SHALL THE COPYRIGHT HOLDER OR CONTRIBUTORS BE LIABLE
FOR ANY DIRECT, INDIRECT, INCIDENTAL, SPECIAL, EXEMPLARY, OR CONSEQUENTIAL
DAMAGES (INCLUDING, BUT NOT LIMITED TO, PROCUREMENT OF SUBSTITUTE GOODS OR
SERVICES; LOSS OF USE, DATA, OR PROFITS; OR BUSINESS INTERRUPTION) HOWEVER
CAUSED AND ON ANY THEORY OF LIABILITY, WHETHER IN CONTRACT, STRICT LIABILITY,
OR TORT (INCLUDING NEGLIGENCE OR OTHERWISE) ARISING IN ANY WAY OUT OF THE USE
OF THIS SOFTWARE, EVEN IF ADVISED OF THE POSSIBILITY OF SUCH DAMAGE.