mvp_flutter 0.0.2  mvp_flutter: ^0.0.2 copied to clipboard
A framework that easily implements the MVP(Model-View-Presenter) architecture in Flutter
Package Concept #
This package aims to use the MVP (Model-View-Presenter) pattern to achieve simple and effective state management in Flutter. It prevents beginners from mixing GUI and logic, and achieves a clean architecture.
Motivation #
The following points were considered when creating this package:
-
Complexity of state management:
- There are various state management tools in Flutter, each of which requires a special way of using it.
- Especially for beginners, learning the unique usage of state management tools is an additional burden on top of the difficulty of Flutter itself.
-
Challenges with conventional state management tools:
- When using state management tools, you often have to introduce special widgets instead of standard StatefulWidgets.
- This means you have to learn about state management-specific widgets in addition to regular widgets, which reduces code maintainability.
-
The importance of simplicity:
- It is very important for beginners to separate the GUI and logic by taking advantage of the basic structure of Dart, which is similar to Java and C#.
- You can build a Model and Presenter using standard Dart functions without using special state management tools.
-
Simple approach for beginners:
- This package uses only regular StatefulWidgets on the View side, and does not mix in widgets dedicated to state management. Just implement the BaseView class in the State!
- By enforcing the roles of each class in the MVP, you can prevent the mixing of GUI and logic that beginners tend to do.
-
Testability:
- Because the structure is simpler than that of a normal state management tool, development can be carried out quickly, including test creation.
- In particular, it is characterized by the fact that it is easy to implement and execute tests for logic that originally requires user operation by utilizing the Hamble object.
What is MVP architecture? #
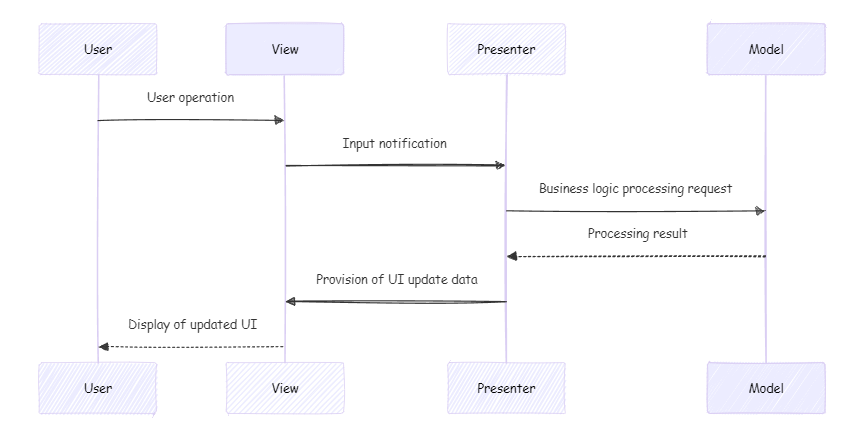
It is a clean design that separates the GUI into three parts: Model, View, and Presenter.
- Presenter: Separates the View (UI) and Model (business logic, data), and acts as an intermediary between them. Includes business logic, but does not directly depend on the View.
- Model: Represents the business logic and data of the application. Responsible for managing and updating data.
- View: Responsible for the user interface (UI), displaying data on the screen based on data from the Presenter.

Usage #
Let's use this package to create an MVP architecture using the Flutter standard count-up app as an example.
Model #
The counter has a value, so we'll hold onto that. Also, as the logic, we need a method to increase the value, so we'll implement that. The method should return a new Model with the updated state
class CounterModel {
  const CounterModel(this.counter);
  final int counter;

  CounterModel increase() => CounterModel(counter + 1);
}
Presenter #
It holds the View passed in the constructor. It creates a Model and passes it to _delegate. It's a bit complicated. This creates a bridge between the Model and the Presenter.
It defines the properties and methods to be exposed to the View. By making _model and _delegate private, only the counter property and incrementCounter() method that you want to expose are public. The value is updated using _delegate.refresh(_view, _model.increase()). The retained Model is updated, and the View is asked to refresh the screen, which is then updated. Since the data update and the request to refresh the screen are combined, you can concentrate on the logic. (setState and notifyListeners() are not required)
class CounterPresenter {
  CounterPresenter(this._view);
  CounterModel get _model => _delegate.model;

  final BaseView _view;
  final _delegate = PresenterDelegate<CounterModel>(const CounterModel(0));

  // public property and method
  int get counter => _model.counter;
  void incrementCounter() => _delegate.refresh(_view, _model.increase());
}
View #
This is the familiar CoutnUp app. The following points are different.
- It implements BaseView
- It defines _presenter
- The values you want to display and the methods you want to implement are implemented via _presenter
The View is responsible for the StatefulWidget State. Please implement BaseView. Also, define the Presenter with late final _presenter = CounterPresenter(this); and pass _MyHomePageState, which corresponds to the View, to _presenter. This creates a bridge between the View and Presenter.
class _MyHomePageState extends State<MyHomePage> implements BaseView {
  late final _presenter = CounterPresenter(this);

  @override
  Widget build(BuildContext context) {
    return Scaffold(
      appBar: AppBar(
        backgroundColor: Theme.of(context).colorScheme.inversePrimary,
        title: Text(widget.title),
      ),
      body: Center(
        child: Column(
          mainAxisAlignment: MainAxisAlignment.center,
          children: <Widget>[
            const Text(
              'You have pushed the button this many times:',
            ),
            Text(
              '${_presenter.counter}',
              style: Theme.of(context).textTheme.headlineMedium,
            ),
          ],
        ),
      ),
      floatingActionButton: FloatingActionButton(
        onPressed: _presenter.incrementCounter,
        tooltip: 'Increment',
        child: const Icon(Icons.add),
      ),
    );
  }
}
More advanced usage #
-
I want to test using a humbel object Tests are being conducted based on user input. in this test
-
I want to use multiple models The counter and display format models are separated in this sample
-
I want to separate the domain model from the screen model. This is possible. You can create a model that inherits the domain model and adds screen logic.
Future Works #
- Automatic code generation for MVP architecture
- Improved documentation
- Additional sample code
Contributing #
Pull requests are welcome. For major changes, please open an issue first to discuss what you would like to change.
Please make sure to update tests as appropriate.
License #
This project is licensed under the MIT License.