loplat_plengi 1.0.8-dev.5  loplat_plengi: ^1.0.8-dev.5 copied to clipboard
loplat plengi(Place Engine) SDK plugin project.
loplat_plengi #
loplat plengi(Place Engine) SDK plugin project.
Supported platforms #
- Flutter Android(plengi v2.1.1.9.6)
- Flutter iOS(MiniPlengi v1.4.2.2)
| Android | iOS | |
|---|---|---|
| Support | SDK 21+ | 12.0+ |
Usage #
plugin을 사용하기 위해서 pubspec.yaml에 'loplat_plengi' 종속성을 추가해주세요. dependency in your pubspec.yaml file.
dependencies:
  flutter:
    sdk: flutter

  loplat_plengi: ^[plugin_version]
Examples #
아래는 plugin API를 사용하는 에시입니다.
Android #
자세한 내용은 로플랫 개발자 사이트에 설명되어 있습니다.
iOS 개발자는 iOS 가이드를 확인 부탁드립니다.
loplat SDK 종속성 추가
안드로이드 디렉토리 최상위 build.gradle에 아래의 코드를 추가하세요.
allprojects {
  repositories {
    jcenter()
    mavenCentral()
    maven { url "https://maven.loplat.com/artifactory/plengi"}
    google()
  }
}
앱의 build.gradle에 아래의 코드를 추가하세요.
WARNING plugin이 정상적으로 동작하기 위해서 반드시 아래 지정된 버전만을 사용해야 합니다.
implementation 'com.loplat:placeengine:2.1.1.9.6'
Google Play Service libraries 적용
- 효율적인 위치 정보 획득을 위해서 build.gradle의 dependency에 아래와 같이 라이브러리 적용이 필요합니다.
implementation 'com.google.android.gms:play-services-location:21.0.1'
- loplat X를 사용하기 위해서 build.gradle 의 dependency에 아래와 같이 Google Play Services 라이브러리 적용이 필요합니다.
implementation 'com.google.android.gms:play-services-ads-identifier:18.0.1'
RETROFIT and GSON libraries 적용
위치 확인 요청시 서버와의 통신을 위해 Retrofit 및 GSON 라이브러리를 사용합니다. Retrofit 및 GSON 라이브러리 적용을 위해서 프로젝트의 build.gradle 에 아래와 같이 추가합니다.
implementation 'com.squareup.retrofit2:retrofit:2.9.0'
implementation 'com.squareup.retrofit2:converter-gson:2.9.0'
implementation 'com.squareup.okhttp3:okhttp:3.14.9'
Proguard를 사용한다면, 아래와 같이 proguard 설정을 추가해야 합니다.
-dontwarn okio.**
-dontwarn javax.annotation.**
# R8 compatibility for GSON, Serialization 관련한 룰보다 반드시 위에 먼저 선언
-keepclassmembers,allowobfuscation class * {
@com.google.gson.annotations.SerializedName <fields>;
}
-keepclasseswithmembers class * {
@retrofit2.http.* <methods>;
}

-keep class com.loplat.placeengine.cloud.ResponseMessage** {*;}

-keep, allowobfuscation, allowshrinking interface retrofit2.Call
-keep, allowobfuscation, allowshrinking class retrofit2.Response
장소 인식 결과 리스너 등록
- Android native code에 PlengiListener를 구현해주세요.
import android.util.Log;
import com.google.gson.Gson;
import com.loplat.placeengine.PlengiListener;
import com.loplat.placeengine.PlengiResponse;

public class LoplatPlengiListener implements PlengiListener {
  private static final String TAG = LoplatPlengiListener.class.getSimpleName();
  @Override
  public void listen(PlengiResponse response) {
    try {
      String jsonStr = new Gson().toJson(response);
      Log.d(TAG, jsonStr);
    } catch (Exception ignored) {
      Log.e(TAG, ignored.toString());
    }
  }
}
- MainApplication.onCreate()에서 setListener()를 호출해서 구현한 PlengiListener를 등록해주세요.
import io.flutter.app.FlutterApplication;

import android.content.Context;
import com.loplat.placeengine.Plengi;

public class MainApplication extends FlutterApplication {
  @Override
  public void onCreate() {
    super.onCreate();

    Context applicationContext = getApplicationContext();
    Plengi plengi = Plengi.getInstance(applicationContext);
    plengi.setListener(new LoplatPlengiListener());
    plengi.setEchoCode("[your_echo_code]");
  }
}
캠페인 알림 수신 설정
loplat X를 통해 알림(FCM 아님)을 받기 위해서는 마케팅 알림 설정하기 전, plengi start 전에 아래와 같은 코드 작성이 필요 합니다.
- 마케팅 알림 설정이 ON 인 경우
import 'package:loplat_plengi/loplat_plengi.dart';

// 앱이 만든 알림을 사용할 경우 (장소인식결과에서 advertisement 객체를 참고하여 알림 생성)
await LoplatPlengiPlugin.enableAdNetwork(true, false);
// SDK 가 만든 알림을 사용할 경우
await LoplatPlengiPlugin.enableAdNetwork(true, true);
- 마케팅 알림 설정이 OFF 인 경우
import 'package:loplat_plengi/loplat_plengi.dart';

await LoplatPlengiPlugin.enableAdNetwork(false);
Start / Stop Plengi
start는 사용자의 위치약관동의 직후 호출해주세요. 앱 시작 혹은 로그인 할 때 마다 사용자의 위치약관동의 여부를 매번 확인해서 start를 호출해줘야만 합니다.
import 'package:loplat_plengi/loplat_plengi.dart';

await LoplatPlengiPlugin.start("[client_id]", "[client_secret]");
stop은 사용자의 위치약관동의에 대한 거부시에만 호출해주세요. 예외적인 케이스(사용자의 위치 권한 제거, 단말기 재부팅, 앱 비정상종료 등)에도 위치 모니터링이 가능합니다. 예외적인 케이스에 Stop을 호출하지 마세요.
await LoplatPlengiPlugin.stop();
iOS #
자세한 내용은 로플랫 개발자 사이트에 설명되어 있습니다.
android 개발자는 android 가이드를 확인 부탁드립니다.
권한 추가
loplat SDK를 사용하기 위해서는 권한을 추가해야합니다. 필요한 권한은 아래와 같습니다.
-
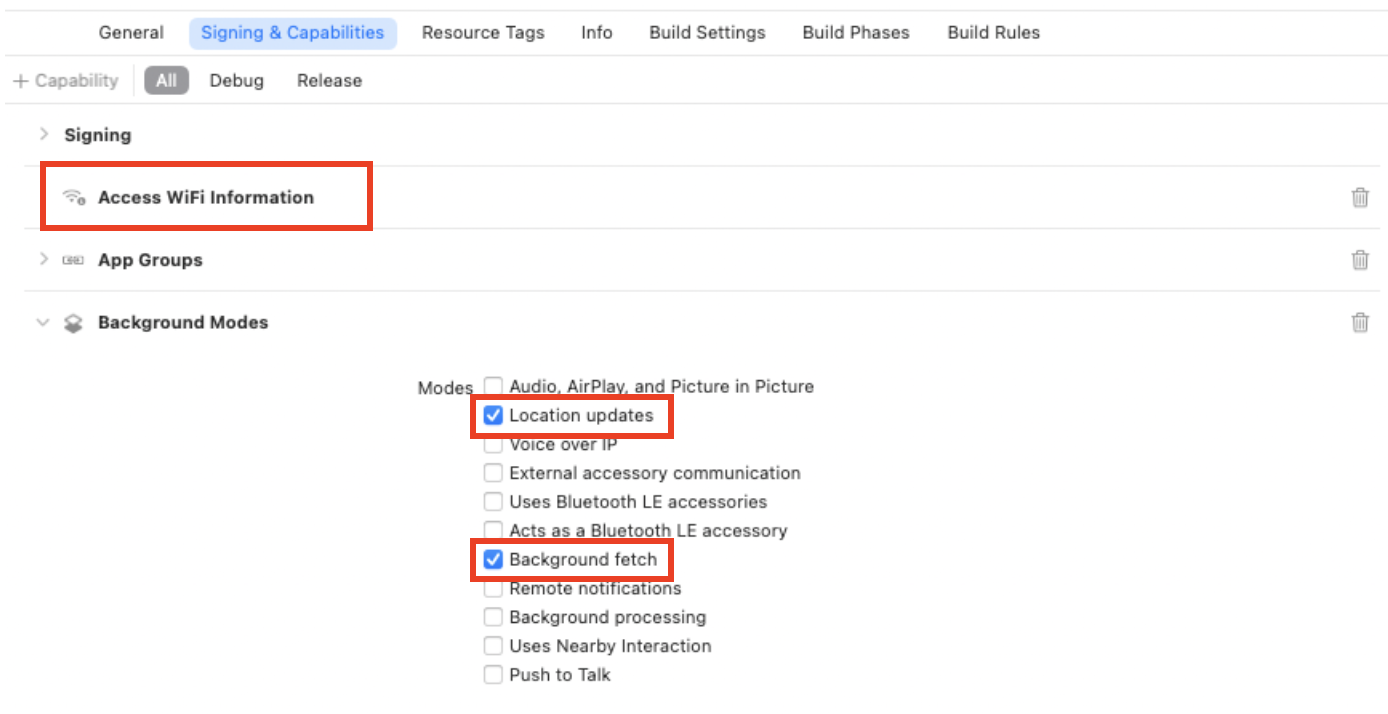
Signing
Access WiFi Information: iOS 12 이상부터 현재 연결되어 있는 와이파이 정보를 가져오기 위해 사용합니다. (iOS 13 이상부터 위치권한이 있어야만 작동하는 권한입니다.) -
Background Modes
Location Updates: 백그라운드에서도 위치 정보를 수신하기 위해 사용합니다.Background fetch: 앱을 백그라운드로 살려주기 위해 사용합니다.
Xcode 에서 Project > Capabilities 에 들어가 위 권한 목록에 있는 권한들을 허용해줍니다.
Background Fetch 설정
앱이 백그라운드에서 살아날 수 있도록 info.plist 파일에 아래 내용을 추가합니다.
<?xml version="1.0" encoding="UTF-8">
<!DOCTYPE plist PUBLIC "=//Apple//DTD PLIST 1.0//EN" "http://www.apple.com/DTDs/PropertyList-1.0.dtd">
<plist version="1.0">
<dict>
    <!-- 중간 생략 -->
    <key>BGTaskSchedulerPermittedIdentifiers</key>
    <array>
	    <string>com.MiniPlengi.Background.Task</string>
    </array>
    <!-- 이하 생략 -->
</dict>
</plist>
사용자에게 ATT(App Tracking Transparency) 권한 요청하기
!WARNING iOS 14.5부터 IDFA(광고아이디)를 사용하기 위하여 유저가 권한을 부여해야 합니다.
서비스 시나리오에 따라 권한 요청 사유를 명시해주세요.
!Tip 예시 문구는 다음과 같습니다.
‘허용을 하시면 알맞는 정보를 받아 보실 수 있습니다.’
프로젝트의 info.plist 파일에 아래 값을 추가합니다.
(필수) 서비스 시나리오에서 권한을 요청하지 않더라도 추가를 해주셔야 합니다.
<?xml version="1.0" encoding="UTF-8">
<!DOCTYPE plist PUBLIC "=//Apple//DTD PLIST 1.0//EN" "http://www.apple.com/DTDs/PropertyList-1.0.dtd">
<plist version="1.0">
<dict>
    <!-- 중간 생략 -->
    <key>NSUserTrackingUsageDescription</key>
    <string>예 : 허용을 하시면 알맞는 정보를 받아보실수 있습니다.</string>
    <!-- 이하 생략 -->
</dict>
</plist>
      await LoplatPlengiPlugin.requestAlwaysLocationAuthorization();
      await LoplatPlengiPlugin.requestAlwaysAuthorization();
SDK 적용법
- import 하기
AppDelegate.h(Objective-C) /AppDelegate.swift(Swift) 파일에, 아래의 구문을 추가해줍니다.
#import <MiniPlengi/MiniPlengi-Swift.h>
import MiniPlengi
- Plengi 초기화
!DANGER Plengi.initialize() 함수는 반드시 AppDelegate 안의 application(_:didFinishLaunchingWithOptions:) 에서 호출되어야 합니다.
다른 곳에서 호출할 경우, SDK가 작동하지 않습니다.
AppDelegate 클래스 선언부를 아래와 같이 수정합니다.
@interface AppDelegate : UIResponder <UIApplicationDelegate, PlaceDelegate>
class AppDelegate: UIResponder, UIApplicationDelegate, PlaceDelegate {
이후, AppDelegate 클래스에 실제 SDK를 초기화하는 코드를 추가합니다.
(BOOL)application:(UIApplication *)application
        didFinishLaunchingWithOptions:(NSDictionary *)launchOptions {
  // ********** 중간 생략 ********** //
  if ([Plengi initializeWithClientID:@"로플랫에서 발급받은 클라이언트 아이디"
                clientSecret:@"로플랫에서 발급받은 클라이언트 키"
                          ] == Result.SUCCESS) {
        // init 성공
	    //필요 시 호출
	    [Plengi setEchoCodeWithEchoCode: @“고객사 별 사용자를 식별할 수 있는 코드 (개인정보 주의바람)“];
  } else {
        // init 실패
  }
  // ********** 중간 생략 ********** //
}
func application(_ application: UIApplication,
        didFinishLaunchingWithOptions launchOptions: [IOApplicationLaunchOptionsKey: Any]?) -> Bool {
        // ********** 중간 생략 ********** //
        if Plengi.initialize(clientID: "로플랫에서 발급받은 클라이언트 아이디",
                 clientSecret: "로플랫에서 발급받은 클라이언트 키")
                == .SUCCESS) {
                // init 성공
                //필요 시 호출
                Plengi.setEchoCode(echoCode: "고객사 별 사용자를 식별할 수 있는 코드 (개인정보 주의바람)")
        } else {
                // init 실패
        }
        // ********** 중간 생략 ********** //
}
- PlaceDelegate 등록하기
서버로부터 장소 인식 이벤트를 받았을 때, loplat X 광고 수신 등이 되었을 때의 이벤트를 수신하기 위해
PlaceDelegate를 등록해줍니다.
Plengi.init 이 호출된 후, setDelegate 를 호출합니다.
if ([Plengi setDelegate:self] == ResultSUCCESS) {
        // setDelegate 등록 성공
} else {
        // setDelegate 등록 실패
}
if Plengi.setDelegate(self) == .SUCCESS {
    // setDelegate 등록 성공
} else {
        // setDelegate 등록 실패
}
이후, PlaceDelegate 를 구현해줍니다.
@implementation AppDelegate

(void)responsePlaceEvent:(PlengiResponse *)plengiResponse {
    if ([plengiResponse echoCode] != nil) {
            // 고객사에서 넣은 echoCode
    }

    if ([plengiResponse result] == ResultSUCCESS) {
		// Lite 요금제를 사용할 경우 실시간 위치기반 메시지 발송 기능 제공에 따라 Advertisement 정보만 제공됩니다.
		if ([plengiResponse advertisement] != nil) {
            // loplat X 광고 정보가 있을 때
            // 기본으로 Plengi SDK에서 광고이벤트를 직접 알림으로 처리합니다.
            // 하지만 설정값에 따라 광고이벤트를 직접 처리할 경우 해당 객체를 사용합니다.
        }

		// Basic / Premium 요금제를 사용할 경우 Lite 요금제 기능에 더하여 위치인식 결과 데이터를 확인할 수 있습니다.
        if ([plengiResponse place] != nil) {
            if ([plengiResponse placeEvent] == PlaceEventENTER) {
                // 사용자가 장소에 들어왔을 때
            } else if ([plengiResponse placeEvent] == PlaceEventNEARBY) {
                // NEARBY로 인식되었을 때
            }
        }
    } else {
        /* 여기서부터는 오류인 경우입니다 */
        // [plengiResponse errorReason] 에 위치 인식 실패 / 오류 이유가 포함됨

        // FAIL : 위치 인식 실패
        // NETWORK_FAIL : 네트워크 오류
        // ERROR_CLOUD_ACCESS : 클라이언트 ID/PW가 틀렸거나 인증되지 않은 사용자가 요청했을 때
    }
}
func responsePlaceEvent(_ plengiResponse: PlengiResponse) {
    if plengiResponse.echoCode != nil {
        // 고객사에서 설정한 echoCode
    }

    if plengiResponse.result == .SUCCESS {
        if plengiResponse.place != nil {
        	if plengiResponse.placeEvent == .ENTER {
                // PlaceEvent가 ENTER 일 경우, 들어온 장소 정보 객체가 넘어옴
            } else if plengiResponse.placeEvent == .NEARBY {
                // PlaceEvent가 NEARBY 일 경우, NEARBY 로 인식된 장소 정보가 넘어옴
            }
        }

        if plengiResponse.advertisement != nil {
        	// loplat X 광고 정보가 있을 때
		    // 기본으로 Plengi SDK에서 광고이벤트를 직접 알림으로 처리합니다.
		    // 하지만 설정값에 따라 광고이벤트를 직접 처리할 경우 해당 객체를 사용합니다.
        }
  } else {
    /* 여기서부터는 오류인 경우입니다 */
    // plengiResponse.errorReason 에 위치 인식 실패 / 오류 이유가 포함됨

    // FAIL : 위치 인식 실패
    // NETWORK_FAIL : 네트워크 오류
    // ERROR_CLOUD_ACCESS : 클라이언트 ID/PW가 틀렸거나 인증되지 않은 사용자가 요청했을 때
    // Location Acquisition Fail : plengiResponse.location에서 위경도 값만 있는 경우
  }
}
- Start / Stop Plengi
사용자 장소/매장 방문 모니터링을 시작하거나 정지 할 수 있습니다. start는 사용자의 위치약관동의 직후 호출해주세요.
!WARNING 앱 시작 혹은 로그인 할 때 마다 사용자의 위치약관동의 여부를 매번 확인해서 start를 호출해줘야만 합니다.
!TIP SDK에는 Start / Stop 이 중복으로 호출될 수 없도록 처리되어 있습니다.
start/stop을 중복 호출 하더라도 SDK 내에서 1회만 호출되도록 구현되어 있습니다.
사용자의 위치 정보는 PlaceDelegate로 전달됩니다.
모니터링 시작과 정지는 다음과 같이 선언합니다.
import 'package:loplat_plengi/loplat_plengi.dart';

await LoplatPlengiPlugin.start("[client_id]", "[client_secret]");
!DANGER 예외적인 케이스에 대해서는 Stop을 호출하면 안됩니다.
예외적인 케이스에 대해서 stop을 호출하지 마세요. stop은 사용자의 위치약관동의에 대한 거부시에만 호출해주세요.
await LoplatPlengiPlugin.stop();
캠페인 알림 수신 설정
loplat X를 통해 알림(FCM 아님)을 받기 위해서는 마케팅 알림 설정하기 전, plengi start 전에 아래와 같은 코드 작성이 필요 합니다.
- 마케팅 알림 설정이 ON 인 경우
import 'package:loplat_plengi/loplat_plengi.dart';

// 앱이 만든 알림을 사용할 경우 (장소인식결과에서 advertisement 객체를 참고하여 알림 생성)
await LoplatPlengiPlugin.enableAdNetwork(true, false);
// SDK 가 만든 알림을 사용할 경우
await LoplatPlengiPlugin.enableAdNetwork(true, true);
- 마케팅 알림 설정이 OFF 인 경우
import 'package:loplat_plengi/loplat_plengi.dart';

await LoplatPlengiPlugin.enableAdNetwork(false);
알림 권한이 허용된 후, SDK에서 loplat X 광고 수신을 사용하기 위해서 시스템에 이벤트를 등록해야 합니다.
AppDelegate 클래스에 application_handleActionWithIdentifier 이벤트를 추가하고, 아래의 코드를 추가해주세요.
if (@available(iOS 10.0, *)) {
  UNUserNotificationCenter.currentNotificationCenter.delegate = self;
}

(void)application:(UIApplication *)application
handleActionWithIdentifier:(NSString *)identifier
    forLocalNotification:(UILocalNotification *)notification
        completionHandler:(void (^)())completionHandler {
  [Plengi processLoplatAdvertisement:application
          handleActionWithIdentifier:identifier
                      for:notification
              completionHandler:completionHandler];
}

(void)userNotificationCenter:(UNUserNotificationCenter *)center
      willPresentNotification:(UNNotification *)notification
        withCompletionHandler:(void  (^)(UNNotificationPresentationOptions))
      completionHandler API_AVAILABLE(ios(10.0)) {

  completionHandler(UNNotificationPresentationOptionAlert |
            UNNotificationPresentationOptionBadge |
            UNNotificationPresentationOptionSound);

  // iOS 10 이상에서도 포그라운드에서 알림을 띄울 수 있도록 하는 코드
  // (가이드에는 뱃지, 소리, 경고 를 사용하지만, 개발에 따라 빼도 상관 없습니다.)
}

(void)userNotificationCenter:(UNUserNotificationCenter *)center
didReceiveNotificationResponse:(UNNotificationResponse *)response
      withCompletionHandler:(void  (^)(void))completionHandler API_AVAILABLE(ios(10.0)) {

  [Plengi processLoplatAdvertisement:center
              didReceive:response
              withCompletionHandler:completionHandler];
  completionHandler();
  // loplat SDK가 사용자의 알림 트래킹 (Click, Dismiss) 를 처리하기 위한 코드
}
if #available(iOS  10.0, *) {
  UNUserNotificationCenter.current().delegate = self
}

func application(_ application: UIApplication,
                  handleActionWithIdentifier identifier: String?,
                  for notification: UILocalNotification,
                  completionHandler: @escaping () -> Void)
  Plengi.processLoplatAdvertisement(application,
                                      handleActionWithIdentifier: identifier,
                                      for: notification,
                                      completionHandler: completionHandler)
}

@available(iOS 10.0,  *)
func userNotificationCenter(_ center: UNUserNotificationCenter,
                            didReceive response: UNNotificationResponse,
                            withCompletionHandler completionHandler: @escaping ()  ->  Void) {
  Plengi.processLoplatAdvertisement(center,
                                      didReceive: response,
                                      withCompletionHandler: completionHandler)
  completionHandler()

  // loplat SDK가 사용자의 알림 트래킹 (Click, Dismiss) 를 처리하기 위한 코드
}

@available(iOS 10.0, *)
func userNotificationCenter(_ center: UNUserNotificationCenter,
                            willPresent notification: UNNotification,
                            withCompletionHandler completionHandler: @escaping  (UNNotificationPresentationOptions) -> Void) {

  completionHandler([.alert,  .sound,  .badge])
  // iOS 10 이상에서도 포그라운드에서 알림을 띄울 수 있도록 하는 코드
  // (가이드에는 뱃지, 소리, 경고 를 사용하지만, 개발에 따라 빼도 상관 없습니다.)
}
Metadata
Publisher
unverified uploader
Metadata
loplat plengi(Place Engine) SDK plugin project.
Homepage
Repository (GitHub)
View/report issues
License
![]() unknown (license)
unknown (license)
Dependencies
flutter, plugin_platform_interface