flutter_easy_dialogs 2.0.1-alpha-2  flutter_easy_dialogs: ^2.0.1-alpha-2 copied to clipboard
Easy, lightweight and flexible service for showing dialogs inside your Flutter application.
FlutterEasyDialogs #
Introduction #
What is FlutterEasyDialogs ?
It is an open-source package for the Flutter framework that provides easy-to-use and customizable dialogs based on Overlay for use in your mobile app. With this library, you can quickly create and display dialogs such as alerts, confirmation dialogs, info dialogs, and more. The library is designed to be lightweight, efficient, and easy to use, making it ideal for developers who want to add dialog functionality to their apps without having to write complex code.
With FlutterEasyDialogs you can quickly create and customize dialogs. The package provides a flexible API that allows to customize various aspects of the dialogs, including animations, appearance, positions and providing completely handmade realizations of dialog manipulation.
Overall, if you're looking for an easy-to-use and customizable dialog package for your Flutter app, you should take a try FlutterEasyDialogs.
Installation #
In the pubspec.yaml of your flutter project, add the following dependency:
dependencies:
  flutter_easy_dialogs: <latest_version>
You can optionally connect pre-built Manager implementations from separate packages:
dependencies:
  full_screen_dialog_manager: <latest_version>
  positioned_dialog_manager: <latest_version>
In your library add the following import:
import 'package:flutter_easy_dialogs/flutter_easy_dialogs.dart';
import 'package:full_screen_dialog_manager/full_screen_dialog_manager.dart';
import 'package:positioned_dialog_manager/positioned_dialog_manager.dart';
Setup and usage #
Wrap your MaterialApp with FlutterEasyDialogs.builder() and register desired Managers.
class MyApp extends StatelessWidget {
  const MyApp({Key? key}) : super(key: key);

  @override
  Widget build(BuildContext context) {
    return MaterialApp(
      builder: FlutterEasyDialogs.builder(
        /// register managers
        setupManagers: (overlayController, managerRegistrar) {
          managerRegistrar
            ..registerFullScreen(overlayController)
            ..registerPositioned(overlayController);
        },
      ),
    );
  }
}
You're done. Now you are able to call show methods from IEasyDialogController like so:
FlutterEasyDialogs.controller.showPositioned(
  const PositionedShowParams(
    content: Text('dialog'),
  )
);
Or
FlutterEasyDialogs.controller.showFullScreen(
  const FullScreenShowParams(
    content: Text('dialog'),
  ),
);
Basics #
Manager
What is Manager, exactly?
They are objects that are responsible for showing, hiding, and taking care of all related dialogs (including positioning, playing animations, inserting in overlay etc.)
We have a class that serves as the base for all Managers that have exactly two responsibilities: to show and to hide
abstract class EasyDialogManager<S extends EasyDialogManagerShowParams?,
    H extends EasyDialogManagerHideParams?> {
  final IEasyOverlayController overlayController;

  const EasyDialogManager({
    required this.overlayController,
  });

  Future<void> show({
    required S params,
  });

  Future<void> hide({
    required H params,
  });
}
You may wonder what IEasyOverlayController is and why it's there. We'll talk about it a bit later.
Parameters
The generic data which the Manager operates on are the Show/Hide parameters. Each Manager is able to extend the base parameters or not define them at all:
abstract class EasyDialogManagerShowParams {
  final Widget content;

  final EasyAnimationConfiguration animationConfiguration;

  const EasyDialogManagerShowParams({
    required this.content,
    this.animationConfiguration = const EasyAnimationConfiguration(),
  });
}

abstract class EasyDialogManagerHideParams {
  const EasyDialogManagerHideParams();
}
The mandatory things are Widget-content and EasyAnimationConfiguration-animationConfiguration. The purpose of the first one is pretty obvious, while the last one is responsible for providing options that the Manager may use to configure the AnimationController.
Strategies
The core thing that allows you to inject your beautiful dialogs into the Overlay is encapsulated within the Insert/Remove Strategy, which will be covered a bit later in the Overlay section. Now you are just need to know that they exists and they are similar to the Strategy/Command pattern.
Overlay
Controller
Here comes IEasyOverlayController which suddenly has pretty similar responsibilities to that of the Manager, such as inserting and removing dialogs into the Overlay using two methods.
abstract class IEasyOverlayController implements TickerProvider {
  void insertDialog(EasyOverlayBoxInsert strategy);

  void removeDialog(EasyOverlayBoxRemove strategy);
}
You may notice the strategy named argument, and you would be correct in thinking that it refers to the strategies mentioned earlier.
Box
It is the strict variation of Map with generic types which is using only for storing Overlay entries and associated Managers:
abstract class IEasyOverlayBox {
  void put(Object key, Object value);

  T? remove<T>(Object key);

  T? get<T>(Object key);

  T putIfAbsent<T>(Object key, T Function() ifAbsent);
}
Note:
EachManagercan provide its own complex structure for state as complex as it needs to be. For example, the PositionedManager stores its data in the format of anotherMap, or BasicDialogInsertStrategy uses aList ofintegersas identifiers of inserted dialogs.
Box mutation
So that's it - the strategy for inserting/removing Manager data into IEasyOverlayBox. The basis of this is called BoxMutation, which has the single responsibility of mutating the storage state of this Box:
abstract class EasyOverlayBoxMutation<M extends EasyDialogManager,
    R extends EasyOverlayEntry?> {
  const EasyOverlayBoxMutation();

  Type get key => M;

  R apply(IEasyOverlayBox box);
}
The result of applying of the mutation strategy must be an any derived class of EasyOverlayEntry (specific class derived from OverlayEntry) which can later could be used within IEasyOverlayController to insert that entry into EasyOverlay.
For the sake of simplicity, there are two classes.
One is for inserting:
abstract class EasyOverlayBoxInsert<M extends EasyDialogManager>
    extends EasyOverlayBoxMutation<M, EasyOverlayEntry> {
  final Widget dialog;

  const EasyOverlayBoxInsert({
    required this.dialog,
  });
}
Which provides the dialog to be inserted into EasyOverlay.
And the another is for removing, which result could be nullable as it could be no such dialog entry existing withing the IEasyOverlayBox
abstract class EasyOverlayBoxRemove<M extends EasyDialogManager>
    extends EasyOverlayBoxMutation<M, EasyOverlayEntry?> {
  const EasyOverlayBoxRemove();
}
Easy overlay
This is the core widget that provides all possibilities of dialogs to appear at any time and in any place within the wrapped application.
Its state is responsible for storing IEasyOverlayBox and implementing IEasyOverlayController. There isn't much to know, to be honest.
Decorators #
This is a special abstraction that is commonly used by Managers to decorate the behavior or appearance of the content provided to be presented within the dialog.
It's very simple to use:
abstract class EasyDialogDecorator<D extends EasyDialogDecoratorData?> {
  const EasyDialogDecorator();

  Widget decorate(D data);
}
You just need to implement the decorate method and provide your EasyDialogDecoratorData to it. The only mandatory property is dialog. As you may notice, you can extend this data class and specify a generic parameter within the EasyDialogDecorator bounds to be able to pass any kind of data as per your needs.
class EasyDialogDecoratorData {
  final Widget dialog;

  const EasyDialogDecoratorData({required this.dialog});
}
Animators
This is the way to animate the dialogs:
abstract class EasyDialogAnimator<D extends EasyDialogAnimatorData>
    extends EasyDialogDecorator<D> {
  /// Desired curve to be applied to the animation.
  final Curve curve;

  const EasyDialogAnimator({this.curve = Curves.linear});
}
It is used within the Manager logic of showing the dialogs with specific data:
class EasyDialogAnimatorData extends EasyDialogDecoratorData {
  final Animation<double> parent;

  const EasyDialogAnimatorData({required this.parent, required super.dialog});
}
The stumbling block is parent argument. Simply put, it is AnimationController that was created by a specific Manager and provided to Animator, so it could apply some transitions or any other change-based value to the dialog.
Note: There are several
Manager-specificAnimatorssuch as PositionedAnimator or FullScreenBackgroundAnimator. The point is that the usage of animators could be simplified and scoped to a singleManager.
Dismissible
Generally, it is the way to dismiss dialogs with provided VoidCallback. It's responsibility is to provide specific dismissible behavior to the dialog and to handle the dismissing:
typedef OnEasyDismissed = void Function();

typedef DismissHandler<P extends EasyDismissiblePayload> = FutureOr<void>
    Function(P payload);

abstract class EasyDialogDismissible<D extends EasyDismissibleData<P>,
    P extends EasyDismissiblePayload> extends EasyDialogDecorator<D> {
  final OnEasyDismissed? onDismissed;

  const EasyDialogDismissible({this.onDismissed});
}
There are several data classes:
EasyDismissibleData, that provides thedismissHandlerfunction which is optional. Sometimes it is necessary to perform certain actions when the actualonDismissedcallback is called:
class EasyDismissibleData<P extends EasyDismissiblePayload>
    extends EasyDialogDecoratorData {
  final DismissHandler<P>? dismissHandler;

  const EasyDismissibleData({required super.dialog, this.dismissHandler});
}
The desired payload that the dismissible may pass back to the Manager on handle, as always, this class may be extended and specified in the generic parameter of an EasyDialogDismissible:
class EasyDismissiblePayload {
  final bool instantDismiss;

  const EasyDismissiblePayload({this.instantDismiss = false});
}
Similar to the Animators, the Dismissible is provided to the Manager, and the Manager is responsible for providing the specified dismissible behavior to the dialog.
Shells
This is the wrapper Widget that provides some sort of shape to the content of the dialog. It is not mandatory, but it could be very handy to apply some additional components around the provided content.
Registering and using
Before the Manager can be used, it must be registered using IEasyDialogsManagerRegistrar, which is a simple register/unregister class. An example of this can be observed there
Now you are able to use registered Manager via IEasyDialogController:
abstract class IEasyDialogManagerController {
  M use<M extends EasyDialogManager>();
}

// Show
FlutterEasyDialogs.controller.use<MyDialogManager>().show(
       params: const EasyDialogManagerShowParams(
         content: Text('My custom manager'),
       ),
     );

// Hide
FlutterEasyDialogs.controller.use<MyDialogManager>().hide();
The specified use method provides access to the instance of a registered Manager. You don't need to worry about instances and other details, as all registrations and initializations are done lazily.
Positioned #
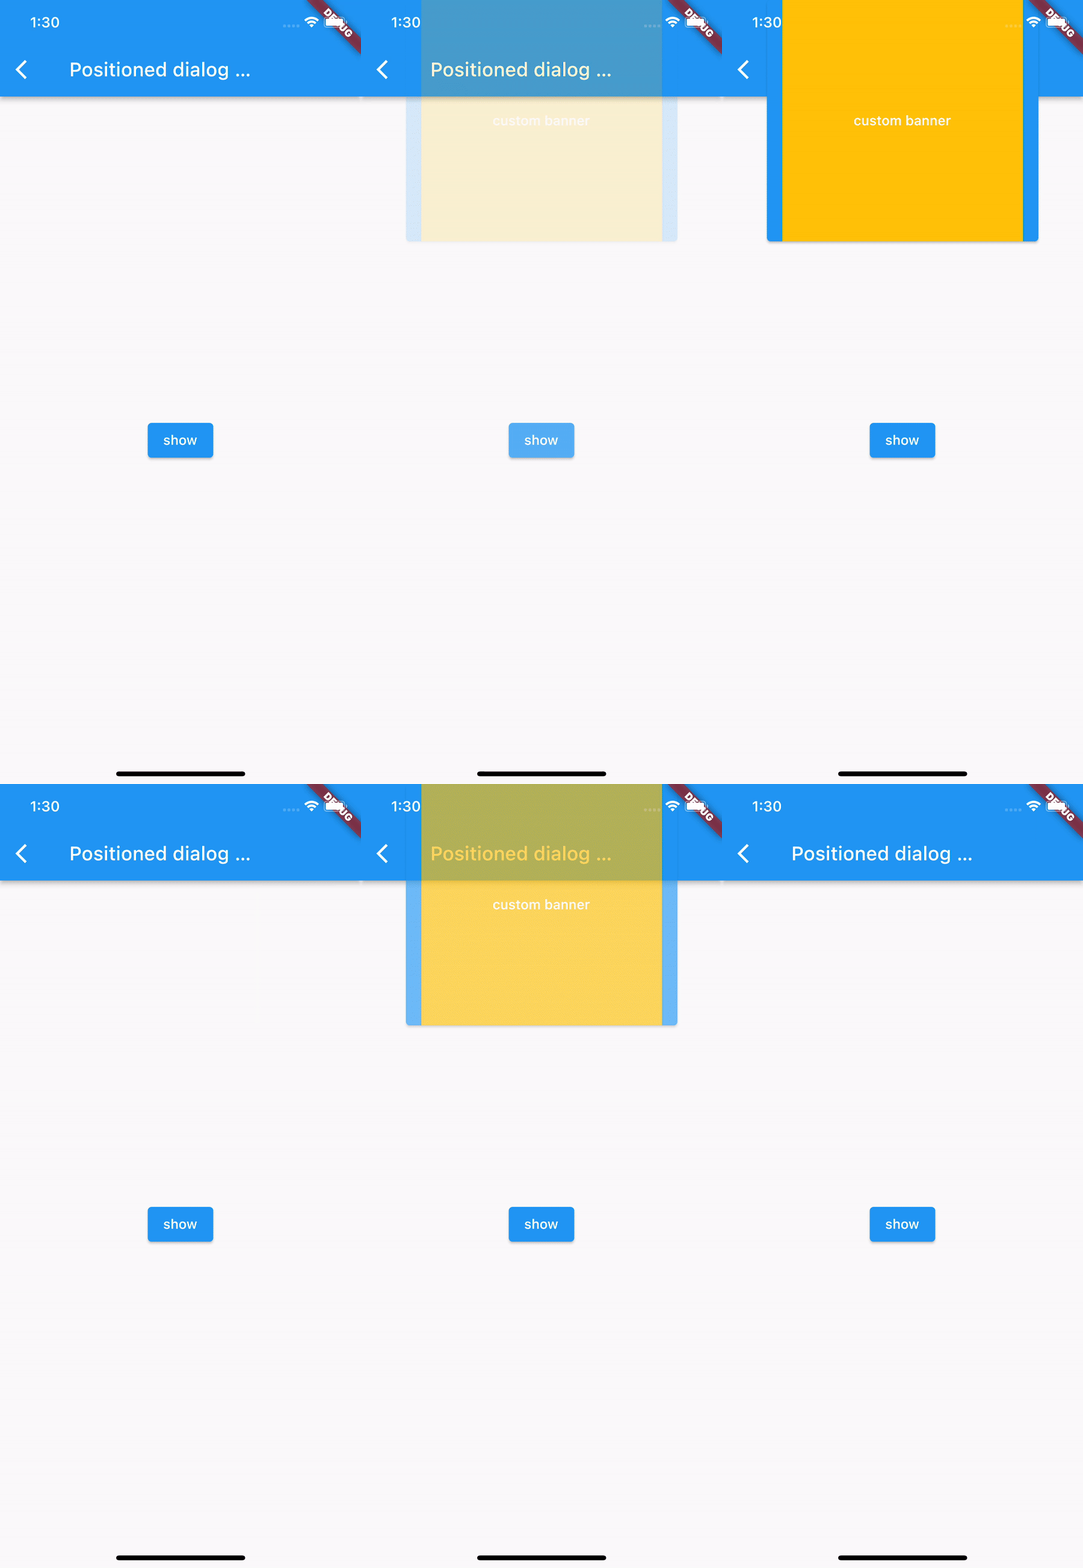
Positioned Examples


Positioned customization

You can observe the example in: example/lib/screens/positioned_dialog_customization_screen.dart
Slide:

Fade:

Expansion:

Full screen #
Full screen examples


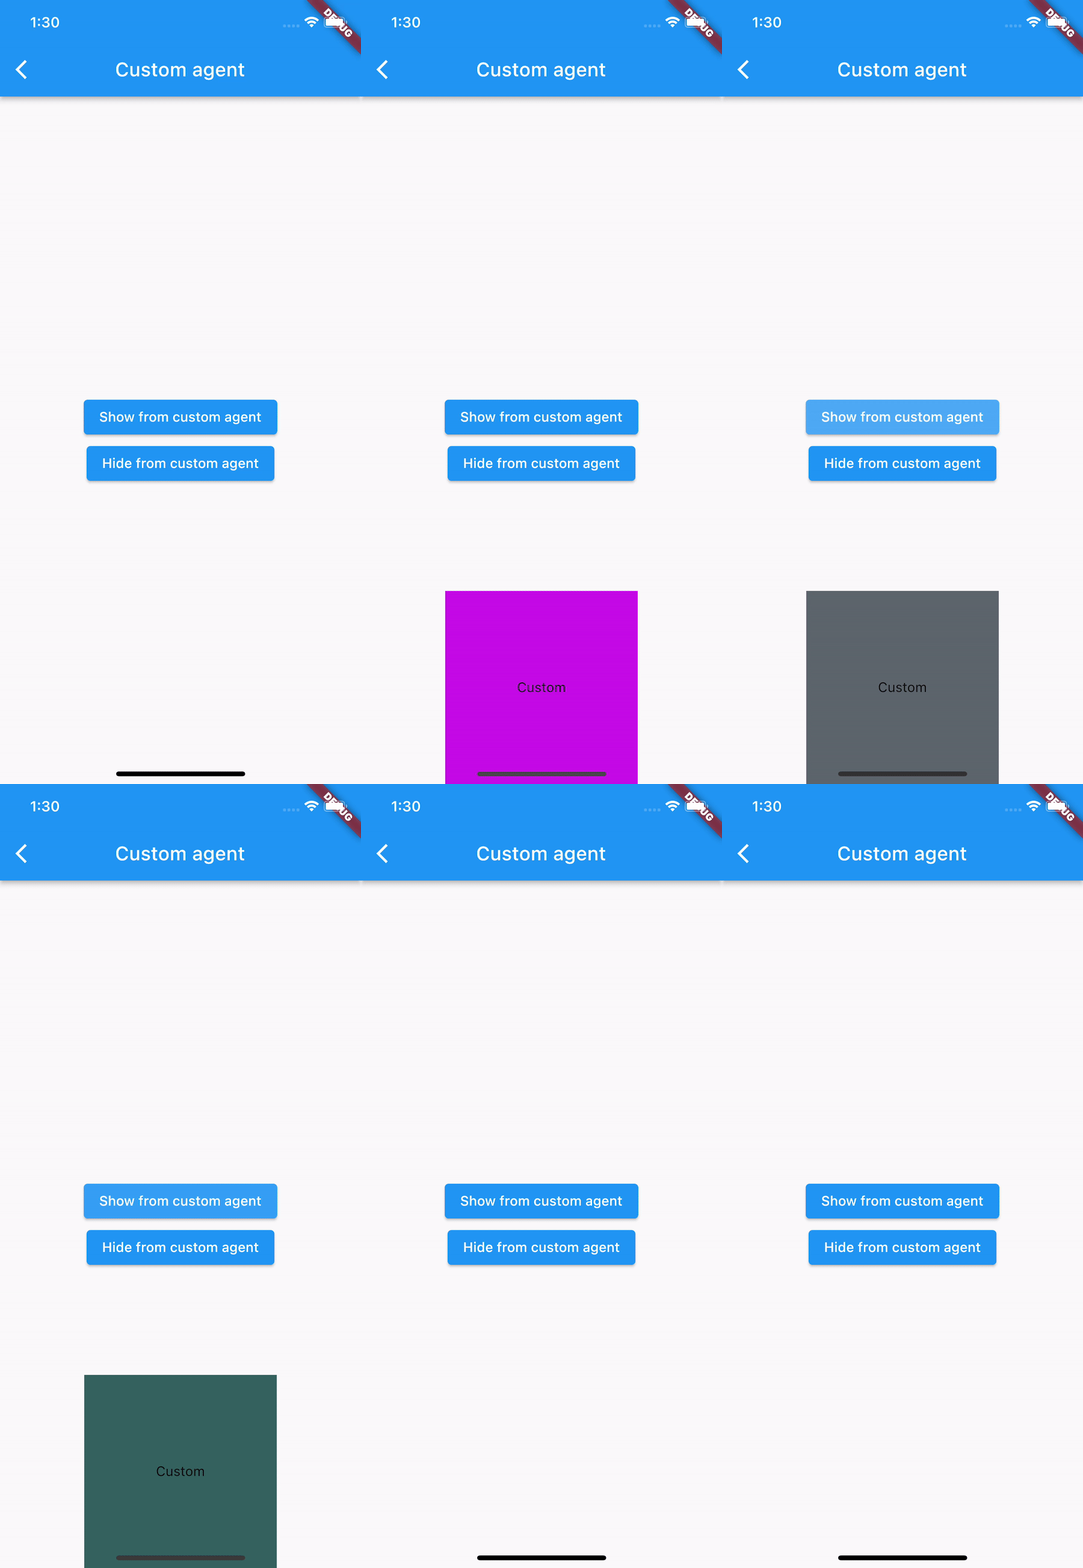
Custom #
Custom manager setup
If you want to use your own handmade Manager, you can define a class that extends CustomManager and optionally specify your hide/show parameters. Pay attention to the usage of CustomInsert/Remove Strategy. The insertion strategy callback passes an ID of the inserted dialog entry within EasyOverlay, which later can be used to remove that dialog.
Lastly, it is necessary to provide a List of CustomManagers that you want to be able to use within the IEasyDialogsController.useCustom() method:
int? _customDialogId;

class MyDialogManager extends CustomManager<CustomManagerShowParams,
    EasyDialogManagerHideParams?> {
  MyDialogManager({required super.overlayController});

  @override
  Future<void> hide({EasyDialogManagerHideParams? params}) async {
    super.overlayController.removeDialog(
          CustomDialogRemoveStrategy(
            dialogId: _customDialogId!,
          ),
        );
  }

  @override
  Future<void> show({required CustomManagerShowParams params}) async {
    if (_customDialogId != null) {
      super.overlayController.removeDialog(
            CustomDialogRemoveStrategy(
              dialogId: _customDialogId!,
            ),
          );
    }
    super.overlayController.insertDialog(
          CustomDialogInsertStrategy(
            dialog: Align(
              alignment: Alignment.bottomCenter,
              child: Container(
                height: 200.0,
                width: 200.0,
                color: params.color,
                child: Center(child: params.content),
              ),
            ),
            onInserted: (dialogId) => _customDialogId = dialogId,
          ),
        );
  }
}

class CustomManagerShowParams extends EasyDialogManagerShowParams {
  final Color color;

  const CustomManagerShowParams({
    required super.content,
    required this.color,
  });
}
class MyApp extends StatelessWidget {
  const MyApp({Key? key}) : super(key: key);

  @override
  Widget build(BuildContext context) {
    return MaterialApp(
      builder: FlutterEasyDialogs.builder(
        customManagerBuilder: (overlayController) =>
            [MyDialogManager(overlayController: overlayController)],
      ),
    );
  }
}
Custom manager usage
Simply call with your Manager type provided as a generic:
    FlutterEasyDialogs.controller.useCustom<MyDialogManager>().show(
          params: CustomManagerShowParams(
            content: const Text('Custom'),
            color: Color((math.Random().nextDouble() * 0xFFFFFF).toInt())
                .withOpacity(1.0),
          ),
        );
Custom manager example

Special thanks #
Special thanks to back_button_interceptor