credential_manager 2.0.0  credential_manager: ^2.0.0 copied to clipboard
Credential Manager plugin,Help one-tap Login functionality and store credentials in Google service account of user on Android and for iOS it will use Keychain to store credentials.
Credential Manager #

Credential Manager is a Jetpack API that supports multiple sign-in methods, such as username and password, passkeys, and federated sign-in solutions (like Sign-in with Google) in a single API, simplifying integration for developers on Android. For iOS, it uses Keychain for storing credentials.
For users, Credential Manager unifies the sign-in interface across authentication methods, making it clearer and easier to sign into apps, regardless of the chosen method.
 #
#
- Removed Encrypted Credentials for Android, as it was using old API and not needed Credentials API are enough to handle all.
getPasswordCredentialschanged togetCredentialsfor both android and ios, as now it will return onlyPasskeyCredentialon iOS and on Android it will return all the types of credentials that are saved and perameter passed into function.
 #
#
Add the dependency to your pubspec.yaml file:
credential_manager: <latest_version>
Or run:
flutter pub add credential_manager
Setup Android  #
#
-
Add proguard rules: Create or update
android/app/proguard-rules.pro:-if class androidx.credentials.CredentialManager -keep class androidx.credentials.playservices.** { *; } -
Update
android/app/build.gradle:android { buildTypes { release { minifyEnabled true proguardFiles getDefaultProguardFile('proguard-android-optimize.txt'), 'proguard-rules.pro' } } }
Setup for iOS  #
#
- Add Associated Domain to XCode
- Open your project settings, select your target and go to the Signing & Capabilities tab

-
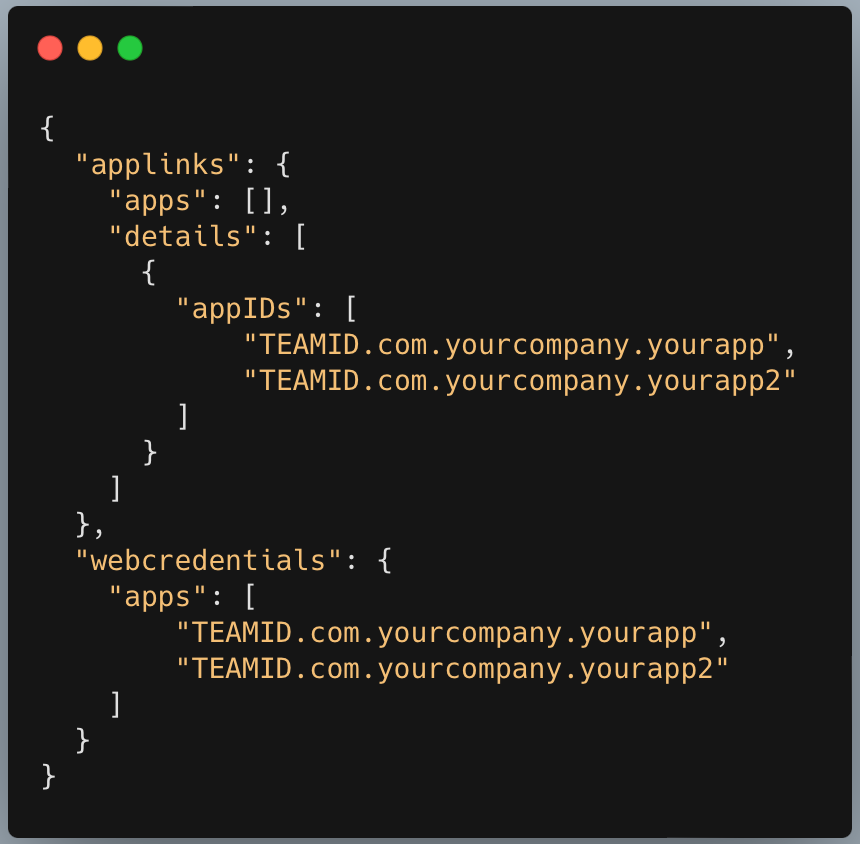
Configure Apple App Site Association
-
Create an apple-app-site-association file and host it at
https://yourdomain.com/.well-known/apple-app-site-association

Note: The apple-app-site-association file must be served over HTTPS and must be served with the correct Content-Type header set to application/json. and replace
TeamIDandBundle Indentifierwith your own.
- Enable Keychain Sharing in XCode using sign and capabilites tab.
Note: Passkey is a new feature introduced by Apple in iOS 16 and later versions. It provides a more secure and convenient way to handle credentials. This plugin supports passkey operations such as saving and retrieving passkey credentials on iOS 16+ devices. Make sure your app is targeting iOS 16 or higher to utilize this feature.
Usage in Flutter  #
#
-
Import the package:
import 'package:credential_manager/credential_manager.dart'; -
Create a
CredentialManagerinstance:CredentialManager credentialManager = CredentialManager(); -
Check if the platform is supported:
if (credentialManager.isSupportedPlatform) { // Supported android and ios } -
Initialize the Credential Manager:
await credentialManager.init(
  preferImmediatelyAvailableCredentials: true,
  googleClientId: googleClientId // Optional for Google Sign-In
);
Note:
googleClientIdis optional for Google Sign-In, it being used only in android not ios.
- Save credentials:
- For Android:
await credentialManager.savePasswordCredentials( PasswordCredential(username: username, password: password) ); - For iOS:
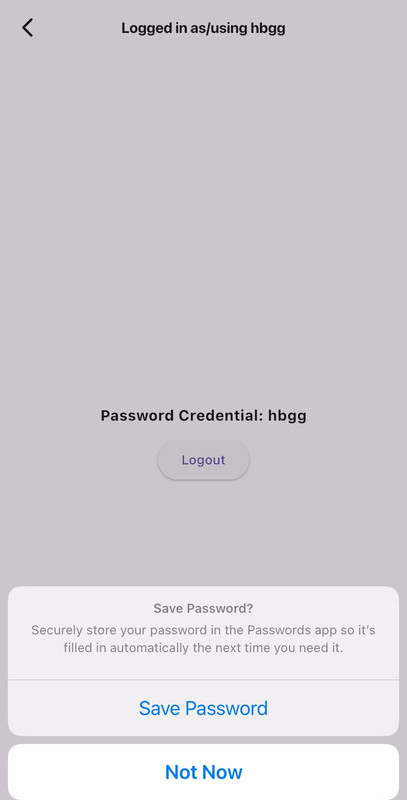
Wrap your TextFields using
AutoFillGroup, after action it give you option to save in keychain if not exists and.
-
Save Google credentials(Only Android):
final GoogleIdTokenCredential? gCredential = await credentialManager.saveGoogleCredential();For Google button flow:
await credentialManager.saveGoogleCredential(useButtonFlow: true);

-
Get saved credentials:
Credentials credential = await credentialManager.getCredentials(
   //passkey request data, if passkey is needed to be fetched
           passKeyOption: passKeyLoginOption,
   //only for android
   fetchOptions: FetchOptionsAndroid.all(),
);
Note:
fetchOptionsis only for android, it is not supported in ios. if use want specify which credential to be fetched then usefetchOptionsand set values totruefor respective credentials, otherwise if you want to fetch all credential then don't pass this parameter.
 #
#


 #
#


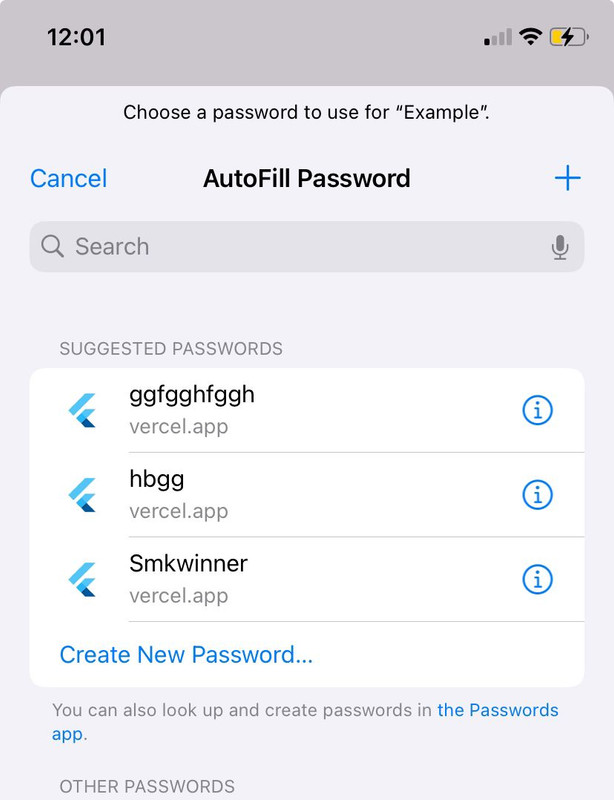
Note: In Android, you can pass perameter which type of credential you want either it could be
PasswordBasedCredential,GoogleIdTokenCredentialorPasskeyCredentialbut in ios it will be onlyPasskeyCredential.
-
Logout (Only Android):
await credentialManager.logout();
Note:
logoutwill remove session from the credential manager.
Google Sign-In Setup (Android Only)  #
#
Follow these steps to set up Google Sign-In for your application:
-
Access Google Cloud Console
- Visit the Google Cloud Console
-
Create or Select a Project
- Create a new project or select an existing one
-
Configure OAuth Consent Screen
- In the left sidebar, navigate to "APIs & Services" > "OAuth consent screen"
- Choose the user type (External or Internal)
- Fill in the required information and save
-
Create Credentials
- In the left sidebar, go to "APIs & Services" > "Credentials"
- Click the "Create Credentials" button and select "OAuth client ID"
-
Set Application Type
- For Android apps, choose "Android" as the Application Type
-
Configure Android App
- Enter your app's package name
- Obtain the SHA-1 certificate fingerprint:
cd android ./gradlew signingReport - Add the SHA-1 fingerprint to the Google Cloud Console
-
Create Web Application Credentials
- Go back to the Credentials page
- Click "Create Credentials" > "OAuth client ID" again
- Select "Web application" as the Application Type
- You can leave "Authorized JavaScript Origins" and "Authorized redirect URIs" blank for now
- Click "Create"
-
Obtain Client ID
- After creation, copy the "Client ID" for the web application
- You'll use this Client ID in your Flutter app's
credentialManager.init()method
Implementation in Flutter
Use the obtained Client ID in your Flutter app:
await credentialManager.init(
  preferImmediatelyAvailableCredentials: true,
  googleClientId: 'YOUR_WEB_CLIENT_ID_HERE',
);
Note:
- Ensure you've enabled the necessary APIs (like Google Sign-In API) for your project in the Google Cloud Console
- For production apps, make sure to add your app's release SHA-1 fingerprint as well
- Keep your Client ID secure and don't expose it in public repositories
Integrate Passkey(Android Setup):  #
#
Steps: #
-
Create a Digital Asset Links JSON file (assetlinks.json):
- Open a text editor and create a new file named
assetlinks.json. - Paste the following content into the file, replacing the placeholders with your specific information:
[ { "relation": [ "delegate_permission/common.handle_all_urls", "delegate_permission/common.get_login_creds" ], "target": { "namespace": "android_app", "package_name": "com.example.android", "sha256_cert_fingerprints": [ "SHA_HEX_VALUE" ] } } ] - Open a text editor and create a new file named
-
Host the Digital Asset Links JSON file:
- Place the file at the following location on your sign-in domain:
https://domain[:optional_port]/.well-known/assetlinks.json
- Place the file at the following location on your sign-in domain:
-
Configure your host:
- Ensure that your host permits Google to retrieve your Digital Asset Link file.
- If you have a
robots.txtfile, it must allow the Googlebot agent to retrieve/.well-known/assetlinks.json. - Most sites can use the following configuration:
User-agent: *
Allow: /.well-known/
Create Passkey #
Use the following code to save passkey credentials:
dart
final credentialCreationOptions = {
  "challenge": EncryptData.getEncodedChallenge(),
  "rp": {"name": "CredMan App Test", "id": "<domain.com>"},
  "user": {
    "id": EncryptData.getEncodedUserId(),
    "name": "<username>",
    "displayName": "<username>",
  },
  "excludeCredentials": [
    {"id": "ghi789", "type": "public-key"},
    {"id": "jkl012", "type": "public-key"}
  ],
};

if (Platform.isAndroid) {
  credentialCreationOptions.addAll({
    "pubKeyCredParams": [
      {"type": "public-key", "alg": -7},
      {"type": "public-key", "alg": -257}
    ],
    "timeout": 1800000,
    "attestation": "none",
    "authenticatorSelection": {
      "authenticatorAttachment": "platform",
      "residentKey": "required",
      "userVerification": "required"
    }
  });
}

final res = await credentialManager.savePasskeyCredentials(
  request: CredentialCreationOptions.fromJson(credentialCreationOptions),
);
Note: This payload should be received from backend services.
Read more about the payload here
Fetch Generated Passkey: #
-
Create a pass request object:
CredentialLoginOptions? passKeyLoginOption = CredentialLoginOptions( challenge: "<challenge>", rpId: "<domain.com>", userVerification: "required", //only for ios ); -
Pass this object to
getCredentialsfor fetching the passkey in the list of login options:Credentials credential = await credentialManager.getCredentials( passKeyOption: passKeyLoginOption //only for ios, true only when we want to show the passkey popup on keyboard otherwise false conditionalUI: false, ); -
Check if the response is successful:
bool isPublicKeyBasedCredentials = credential.publicKeyCredential != null;
Visual Examples #
Upcoming Features #
- iOS Support for Apple Sign-In
- web Support
Contributing #
Contributions are welcome! Please see the Contributing Guidelines for more details.
If you find this package useful, please:
- Star it on GitHub
- Tweet about it
- Mention it in your blog posts
For bug reports, feature requests, or questions, please open an issue on GitHub.


