compact_color_picker 1.0.1  compact_color_picker: ^1.0.1 copied to clipboard
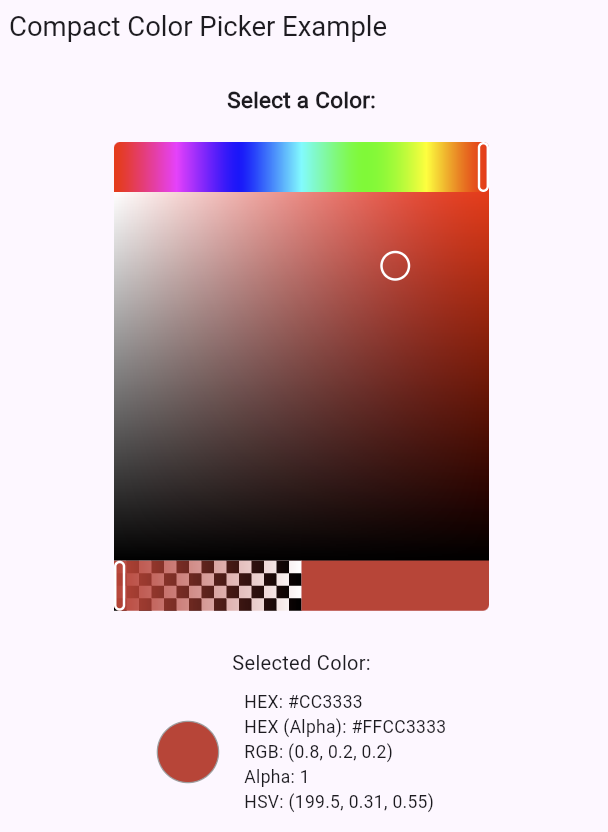
A simple & clean color picker widget for Flutter. Designed to be compact (mobile-first) yet powerful, suitable for all platforms! It provides a user-friendly interface for selecting colors via Hue, Sa [...]
🦜 Compact Color Picker #

A simple & clean color picker widget for Flutter. Designed to be compact (mobile-first) yet powerful, suitable for all platforms! It provides a user-friendly interface for selecting colors via Hue, Saturation, Lightness, and Opacity controls.
Inspired by modern color selection tools, it aims to fit seamlessly into various UI layouts without taking up excessive space.
Features:
- Compact design ideal for mobile and desktop layouts.
- Hue, Saturation, Lightness, and Opacity sliders.
- Interactive preview bubble shows the color directly under the user's touch point during selection.
- Optional Hex code display.
- Provides selected color via a standard
Colorobject callback. - Includes utility extensions for easy conversion to Hex strings (
#RRGGBB,#AARRGGBB). - Customizable initial color.
- Rounded corner styling options.
🧑🎨️ Getting Started #
-
Add Dependency: Add this to your package's
pubspec.yamlfile:dependencies: compact_color_picker: ^[latest_version] # Replace with the latest version -
Install: Run
flutter pub getin your terminal. -
Import: Import the package in your Dart code:
import 'package:compact_color_picker/compact_color_picker.dart';
🎨 Usage #
Use the ColorPicker widget in your Flutter application. Provide an optional initialColor and an onColorChanged callback to receive updates.
import 'package:compact_color_picker/compact_color_picker.dart';
import 'package:flutter/material.dart';

class MyColorSelector extends StatefulWidget {
  const MyColorSelector({super.key});

  @override
  State<MyColorSelector> createState() => _MyColorSelectorState();
}

class _MyColorSelectorState extends State<MyColorSelector> {
  Color _currentColor = Colors.blue; // Or use the default: Color(0xFFF3C50B)

  void _handleColorChanged(Color color) {
    setState(() {
      _currentColor = color;
      // You can now use the color object or its hex representation
      print('Selected Color: $color');
      print('Selected Hex: ${_currentColor.toHexHash()}');
      print('Selected Hex with Alpha: ${_currentColor.toHexHashAlpha()}');
    });
  }

  @override
  Widget build(BuildContext context) {
    return Column(
      mainAxisSize: MainAxisSize.min,
      children: [
        Text(
          'Select Color:',
          style: Theme.of(context).textTheme.titleLarge,
        ),
        const SizedBox(height: 16),
        SizedBox(
          width: 300, // Adjust size as needed
          height: 375, // Maintain ~4:5 aspect ratio for square palette
          child: ColorPicker(
            initialColor: _currentColor,
            onColorChanged: _handleColorChanged,
            showHexCode: true, // Optionally display the hex code
          ),
        ),
        const SizedBox(height: 16),
        Text('Current Hex: ${_currentColor.toHexHashAlpha()}'),
        Container(
          width: 50,
          height: 50,
          color: _currentColor,
        ),
      ],
    );
  }
}
🌈 Accessing Color Values #
The onColorChanged callback provides the selected color as a standard Flutter Color object. You can easily access various formats:
- RGB (0-255): Directly access
color.red,color.green,color.blue. - Alpha (0-255): Directly access
color.alpha. - HEX Strings: Use the included extension methods:
color.toHex(): ReturnsRRGGBBstring.color.toHexHash(): Returns#RRGGBBstring.color.toHexAlpha(): ReturnsAARRGGBBstring.color.toHexHashAlpha(): Returns#AARRGGBBstring.
- HSV: Convert using
HSVColor.fromColor(color)and access.hue,.saturation,.value. - HSL: Convert using
HSLColor.fromColor(color)and access.hue,.saturation,.lightness.
Example:
void _handleColorChanged(Color color) {
  // RGB
  int r = color.red;
  int g = color.green;
  int b = color.blue;
  print('RGB: ($r, $g, $b)');

  // HEX
  print('Hex: ${color.toHexHash()}');

  // HSV
  HSVColor hsv = HSVColor.fromColor(color);
  print('HSV: (${hsv.hue.toStringAsFixed(1)}, ${hsv.saturation.toStringAsFixed(2)}, ${hsv.value.toStringAsFixed(2)})');
}
You can also easily convert between Color, HSVColor, and HSLColor using Flutter's built-in methods: (This part seems redundant now, removing)
💖 Credit #
Thanks to SuperDeclarative for his tutorial on painting accurate color spectrums!
🌱 Contributing #
Contributions are welcome! Please feel free to submit issues, pull requests, or suggestions to improve the package.
- Fork the repository.
- Create your feature branch (
git checkout -b feature/AmazingFeature). - Commit your changes (
git commit -m 'Add some AmazingFeature'). - Push to the branch (
git push origin feature/AmazingFeature). - Open a Pull Request.
👔 License #
Distributed under the MIT License. See LICENSE for more information.
Metadata
Documentation
Publisher
Weekly Downloads
Metadata
A simple & clean color picker widget for Flutter. Designed to be compact (mobile-first) yet powerful, suitable for all platforms! It provides a user-friendly interface for selecting colors via Hue, Saturation, Lightness, and Opacity controls.
Repository (GitHub)
View/report issues
License
![]() MIT (license)
MIT (license)