bitalino 2.0.1  bitalino: ^2.0.1 copied to clipboard
A Flutter plugin that integrates the communication with BITalino devices.
BITalino #

Open source Flutter plugin that integrates the communication with BITalino devices. Made by Afonso Raposo.
See the an example app here.
Tested with BITalino Core BT (MCU+BT+PWR) and BITalino Core BLE/BT.

Currently supporting: #
This plugin uses the available native APIs available at https://bitalino.com/en/development/apis.
| Plaftorm | Supported | Native Repository | Date |
|---|---|---|---|
| Android | ✅ | revolution-android-api | Jul 16, 2020 |
| IOS | ✅ | BITalinoBLE-iOS | Jun 22, 2016 |
Installation #
Add this plugin to the pubspec.yaml file:
dependencies:
  flutter:
    sdk: flutter
  bitalino: ^1.1.1 // add bitalino plugin
Android #
On Android, you must set the minSdkVersion to 18 (or higher) in your android/app/build.gradle file.
minSdkVersion 18
IOS #
On IOS, you have to add the following lines to the bottom of the /ios/Runner/Info.plist file:
<key>NSBluetoothAlwaysUsageDescription</key>
<string>This application needs access to bluetooth to communicate with BITalino device</string>

<key>NSBluetoothPeripheralUsageDescription</key>
<string>This application needs access to BLE to communicate with BITalino device</string>
Examples #
Initialize controller #
Android #
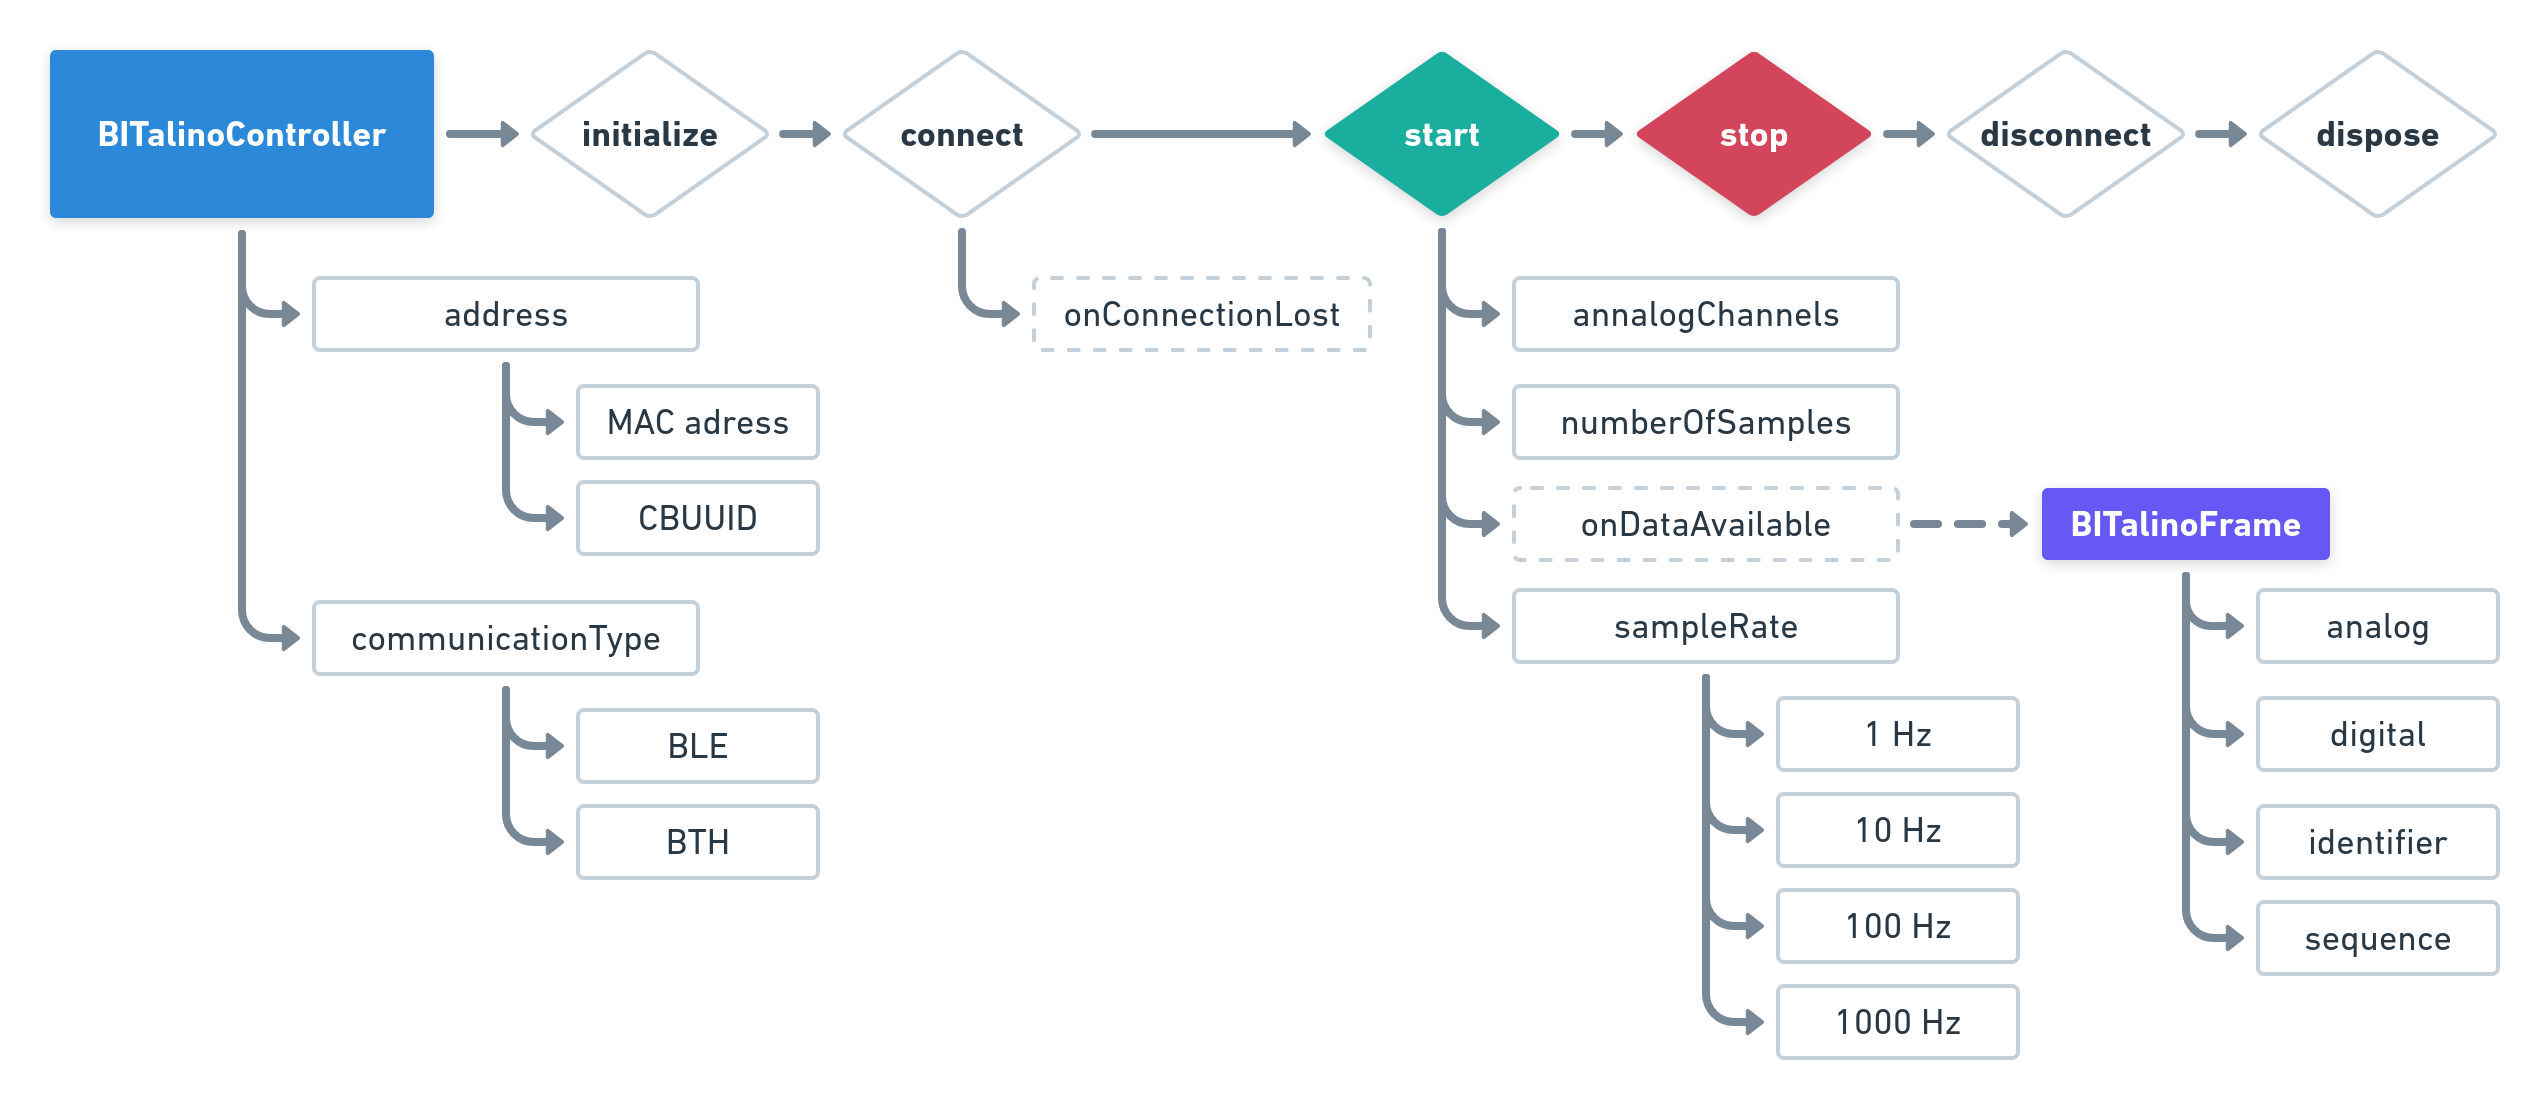
On Android, the user must provide the device MAC address and can choose between BTH or BLE for communication protocols. If available, BTH is advised.
BITalinoController bitalinoController = BITalinoController(
  "20:16:07:18:17:02",
  CommunicationType.BTH,
);

try {
  await bitalinoController.initialize();
} on PlatformException catch (Exception) {
  print("Initialization failed: ${Exception.message}");
}
IOS #
On IOS, the user must provide the device UUID and can only use BLE regarding communication protocol.
The UUID can be found with this application: Bluetooth Smart Scanner .
On IOS, there is no frame identifier.
BITalinoController bitalinoController = BITalinoController(
  "03A1C0AB-018F-5B39-9567-471DDE5B0322",
  CommunicationType.BLE,
);

try {
  await bitalinoController.initialize(

  );
} on PlatformException catch (Exception) {
  print("Initialization failed: ${Exception.message}");
}
Connect to device #
Connect to a device by providing its address.
await bitalinoController.connect(
  onConnectionLost: () {
    print("Connection lost");
  },
)
Start acquisition #
Start acquiring analog channels: A0, A2, A4, and A5, with a Sampling Rate of 10Hz.
onDataAvailable is called everytime the application receives data during recording.
bool success = await bitalinoController.start(
  [0, 2, 4, 5],
  Frequency.HZ10,
  onDataAvailable: (BITalinoFrame frame) {
      print(frame.sequence);    // [int]
      print(frame.analog);      // [List<int>]
      print(frame.digital);     // [List<int>]
    },),
);
During acquisiton, the onDataAvailable callback is called.
Stop acquisition #
bool success = await bitalinoController.stop();
Get the device state #
Android #
BITalinoState state = await bitalinoController.state();
print(state.identifier);        // [String]
print(state.battery);           // [int]
print(state.batteryThreshold);  // [int]
print(state.analog);            // [List<int>]
print(state.digital);           // [List<int>]
IOS #
This method is not available for IOS.
Disconnect from device #
bool success = await bitalinoController.disconnect();
Dispose controller #
When you're done using the controller, dispose it.
bool success = await bitalinoController.dispose();
More #
You can find all the information regarding this plugin on the API reference page.
Future #
If you have any suggestion or problem, let me know and I'll try to improve or fix it. Also, feel free to contribute to this project! :)
License #
GNU General Public License v3.0, see the LICENSE.md file for details.