awesome_notifications 0.7.0-beta.4  awesome_notifications: ^0.7.0-beta.4 copied to clipboard
A complete solution to create Local Notifications and Push Notifications (Media Notifications, Big Picture, Big text, etc), through Firebase or another services, using Flutter.
Awesome Notifications - Flutter #

![]()
![]()


Features #
- Create Local Notifications on Android, iOS and Web using Flutter.
- Easy to integrate with Push notification's service as Firebase Messaging or any another one;
- Easy to use and highly customizable.
- Add images, sounds, emoticons, buttons and different layouts on your notifications.
- Notifications could be created at any moment (on Foreground, Background or even when the application is terminated/killed).
- High trustworthy on receive notifications in any Application lifecycle.
- Notifications are received on Flutter level code when they are created, displayed, dismissed or even tapped by the user.
- Notifications could be scheduled repeatedly or not, with seconds precision.
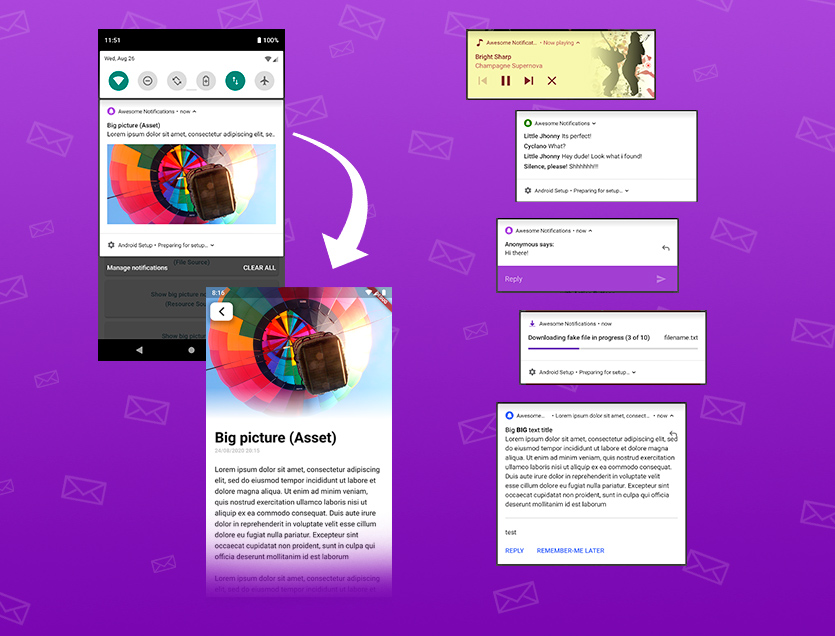
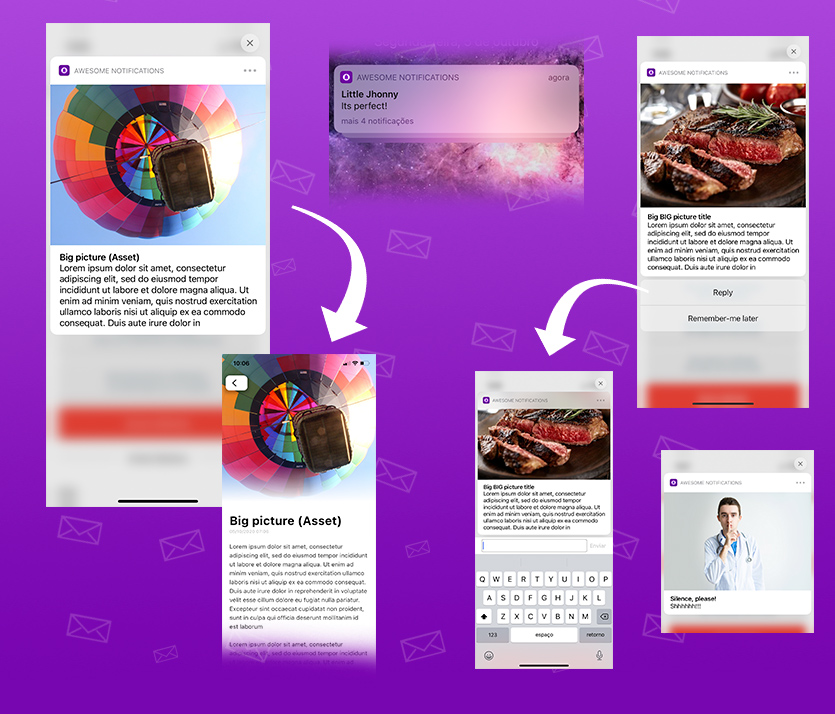
Some android notification examples:
Some iOS notification examples (work in progress):
Notification Types Available #
- Basic notification
- Big picture notification
- Media notification
- Big Text notification
- Inbox notification
- Messaging notification
- Messaging Group notification
- Notifications with action buttons
- Grouped notifications
- Progress bar notifications
All notifications could be created locally or via Firebase services, with all the features.
ATTENTION - PLUGIN UNDER CONSTRUCTION #


Working progress percentages of awesome notifications plugin
Next steps #
- Include Web support
- Finish the companion plugin to enable Firebase Cloud Message with all the awesome features available.
- Add an option to choose if a notification action should bring the app to foreground or not. (accomplished)
- Include support for another push notification services (Wonderpush, One Signal, IBM, AWS, Azure, etc)
- Replicate Android layouts for iOS
- Custom layouts for notifications
Main Philosophy #
Considering all the many different devices available, with different hardware and software resources, this plugin ALWAYS shows the notification, trying to use the maximum resources available. If the resource is not available, the notification ignores that specific resource, but shows the rest of notification anyway.
Example: If the device has LED colored lights, use it. Otherwise, ignore the lights, but shows the notification with all another resources available. In last case, shows at least the most basic notification.
Also, the Notification Channels follows the same rule. If there is no channel segregation of notifications, use the channel configuration as only defaults configuration. If the device has channels, use it as expected to be.
And all notifications sent while the app was killed are registered and delivered as soon as possible to the Application, after the plugin initialization, respecting the delivery order.
This way, your Application will receive all notifications at Flutter level code.
Breaking changes for version 0.7.0 #
- Now it's possible to receive action events without bring the app to foreground. Check our action type's topic to know more.
- All streams (createdStream, displayedStream, actionStream and dismissedStream) was replaced by
global static methods. You must replace your old stream methods by static and global methods, in other words, they must bestatic Future<void>and useasync/await.
(To use context and redirect the user to another page inside static methods, please use flutter navigatorKey or another third party library, such as GetX. Check our "how to do" guide below to know more). - Now all the notification events are delivered only after the first setListeners being called.
- The ButtonType property name was changed to ActionType.
- The action type
InputFieldwas deprecated. Now you just need to set the propertyrequireInputTextto true to achieve the same, but now it works combined with all another action types. - The support for
firebase_messagingplugin is now deprecated, but all other firebase plugins still being supported. You need use the Awesome's FCM companion plugin to achieve all firebase messaging features, without violate the platform rules. This is the only way to fully integrated with awesome notifications, running all in native level.
Discord Chat Server #
To stay tuned with new updates and get our community support, please subscribe into our Discord Chat Server: https://discord.gg/MP3sEXPTnx
Initial Requirements #
Bellow are the obligatory requirements that your app must meet to use awesome_notifications:
Android #
Is required the minimum android SDK to 21 (Android 5.0 Lollipop) and Java compile SDK Version to 31 (Android 12.0 S). You can change the minSdkVersion to 21 and the compileSdkVersion to 31, inside the file build.gradle in "android/app" folder.
Also, to turn your app fully compatible with Android 12 (SDK 31), you need to add the attribute android:exported="true" to any <activity>, <activity-alias>, <service>, or <receiver> components that have <intent-filter> declared inside in the app’s AndroidManifest.xml file, and thats turns valid for every other flutter packages that you're using.
<manifest xmlns:android="http://schemas.android.com/apk/res/android"
    package="com.example.myapp">
   <application>
        ...
        <activity
            android:name=".MainActivity"
            ...
            android:exported="true">
                ...
        </activity>
        ...
    </application>
</manifest>
iOS #
Is required the minimum iOS version to 10. You can change the minimum app version through xCode, Project Runner (clicking on the app icon) > Info > Deployment Target and changing the option "ios minimum deployment target" to 10.0
How to show Local Notifications #
- Add awesome_notifications as a dependency in your
pubspec.yamlfile.
awesome_notifications: any # Any attribute updates automatically your source to the last version
- import the plugin package to your dart code
import 'package:awesome_notifications/awesome_notifications.dart';
- Initialize the plugin on main.dart, before MaterialApp widget (preferentially inside main() method), with at least one native icon and one channel
AwesomeNotifications().initialize(
  // set the icon to null if you want to use the default app icon
  'resource://drawable/res_app_icon',
  [
    NotificationChannel(
        channelGroupKey: 'basic_channel_group',
        channelKey: 'basic_channel',
        channelName: 'Basic notifications',
        channelDescription: 'Notification channel for basic tests',
        defaultColor: Color(0xFF9D50DD),
        ledColor: Colors.white)
  ],
  // Channel groups are only visual and are not required
  channelGroups: [
    NotificationChannelGroup(
        channelGroupKey: 'basic_channel_group',
        channelGroupName: 'Basic group')
  ],
  debug: true
);
- Inside the MaterialApp widget, create your named routes and set your global navigator key. Also, inside initState, initialize your static listeners methods to capture notification's actions. OBS 1: With the navigator key, you can redirect pages and get context even inside static classes. OBS 2: Only after setListeners being called, the notification events starts to be delivered.
class MyApp extends StatefulWidget {

  static final GlobalKey<NavigatorState> navigatorKey = GlobalKey<NavigatorState>();

  static const String name = 'Awesome Notifications - Example App';
  static const Color mainColor = Colors.deepPurple;

  @override
  _MyAppState createState() => _MyAppState();
}

class _MyAppState extends State<MyApp> {

  @override
  void initState() {

    // Only after at least the action method is set, the notification events are delivered
    AwesomeNotifications().setListeners(
        onActionReceivedMethod:         NotificationController.onActionReceivedMethod,
        onNotificationCreatedMethod:    NotificationController.onNotificationCreatedMethod,
        onNotificationDisplayedMethod:  NotificationController.onNotificationDisplayedMethod,
        onDismissActionReceivedMethod:  NotificationController.onDismissActionReceivedMethod
    );

    super.initState();
  }

  // This widget is the root of your application.
  @override
  Widget build(BuildContext context) {
    return MaterialApp(

      // The navigator key is necessary to allow to navigate through static methods
      navigatorKey: MyApp.navigatorKey,

      title: MyApp.name,
      color: MyApp.mainColor,

      initialRoute: '/',
      onGenerateRoute: (settings) {
        switch (settings.name) {
          case '/':
            return MaterialPageRoute(builder: (context) =>
                MyHomePage(title: MyApp.name)
            );

          case '/notification-page':
            return MaterialPageRoute(builder: (context) {
              final ReceivedAction receivedAction = settings
                  .arguments as ReceivedAction;
              return MyNotificationPage(receivedAction: receivedAction);
            });

          default:
            assert(false, 'Page ${settings.name} not found');
            return null;
        }
      },

      theme: ThemeData(
          primarySwatch: Colors.deepPurple
      ),
    );
  }
}
OBS: Note that the example below is not a valid static or global method. You can retrieve the current context from the NavigatorKey instance, declared on MaterialApp widget, at any time.
    AwesomeNotifications().setListeners(
        onActionReceivedMethod: (ReceivedAction receivedAction){
            NotificationController.onActionReceivedMethod(context, receivedAction);
        },
        onNotificationCreatedMethod: (ReceivedNotification receivedNotification){
            NotificationController.onNotificationCreatedMethod(context, receivedNotification);
        },
        onNotificationDisplayedMethod: (ReceivedNotification receivedNotification){
            NotificationController.onNotificationDisplayedMethod(context, receivedNotification);
        },
        onDismissActionReceivedMethod: (ReceivedAction receivedAction){
            NotificationController.onDismissActionReceivedMethod(context, receivedAction);
        },
    );
- Create in any place or class, the static methods to capture the respective notification events
class NotificationController {

  /// Use this method to detect when a new notification or a schedule is created
  static Future <void> onNotificationCreatedMethod(ReceivedNotification receivedNotification) async {
    // Your code goes here
  }

  /// Use this method to detect every time that a new notification is displayed
  static Future <void> onNotificationDisplayedMethod(ReceivedNotification receivedNotification) async {
    // Your code goes here
  }

  /// Use this method to detect if the user dismissed a notification
  static Future <void> onDismissActionReceivedMethod(ReceivedAction receivedAction) async {
    // Your code goes here
  }

  /// Use this method to detect when the user taps on a notification or action button
  static Future <void> onActionReceivedMethod(ReceivedAction receivedAction) async {
    // Your code goes here

    // Navigate into pages, avoiding to open the notification details page over another details page already opened
    MyApp.navigatorKey.currentState?.pushNamedAndRemoveUntil('/notification-page',
            (route) => (route.settings.name != '/notification-page') || route.isFirst,
        arguments: receivedAction);
  }
}
- Request the user authorization to send local and push notifications (Remember to show a dialog alert to the user before call this request)
AwesomeNotifications().isNotificationAllowed().then((isAllowed) {
  if (!isAllowed) {
    // This is just a basic example. For real apps, you must show some
    // friendly dialog box before call the request method.
    // This is very important to not harm the user experience
    AwesomeNotifications().requestPermissionToSendNotifications();
  }
});
- In any place of your app, create a new notification
AwesomeNotifications().createNotification(
  content: NotificationContent(
      id: 10,
      channelKey: 'basic_channel',
      title: 'Simple Notification',
      body: 'Simple body',
      actionType: ActionType.Default
  )
);
THATS IT! CONGRATZ MY FRIEND!!!
Extra iOS Setup for Background Actions #
On iOS, to use any plugin inside background actions, you will need to manually register each plugin you want. Otherwise, you will face the MissingPluginException exception.
To avoid this, you need to add the following lines to the didFinishLaunchingWithOptions method in your iOS project's AppDelegate.m/AppDelegate.swift file:
import Flutter
import awesome_notifications
import shared_preferences_ios
//import all_other_plugins_that_i_need

override func application(
    _ application: UIApplication,
    didFinishLaunchingWithOptions launchOptions: [UIApplication.LaunchOptionsKey: Any]?
  ) -> Bool {
      GeneratedPluginRegistrant.register(with: self)

      // This function registers the desired plugins to be used within a notification background action
      SwiftAwesomeNotificationsPlugin.setPluginRegistrantCallback { registry in
          SwiftAwesomeNotificationsPlugin.register(
            with: registry.registrar(forPlugin: "io.flutter.plugins.awesomenotifications.AwesomeNotificationsPlugin")!)
          FLTSharedPreferencesPlugin.register(
            with: registry.registrar(forPlugin: "io.flutter.plugins.sharedpreferences.SharedPreferencesPlugin")!)
      }

      return super.application(application, didFinishLaunchingWithOptions: launchOptions)
  }
And you can check how to correctly call each plugin opening the file GeneratedPluginRegistrant.m
Video Tutorial #
Check out this incredible tutorial made by Ashley Novik, from ResoCoder team. This tutorial cover the most common features available for Awesome Notifications.
Example Apps #
With the examples bellow, you can check all the features and how to use the Awesome Notifications in your app.
https://github.com/rafaelsetragni/awesome_notifications
Complete example with all the features available
To run the examples, follow the steps bellow:
- Install GitHub software in your local machine. I strongly recommend to use GitHub Desktop.
- Go to one of the GitHub repositories
- Clone the project to your local machine
- Open the project with Android Studio or any other IDE
- Sync the project dependencies running
flutter pub get - On iOS, run
pod installto sync the native dependencies - Debug the application with a real device or emulator
Awesome Notification's Flowchart #
Notifications are received by local code or Push service using native code, so the messages will appears immediately or at schedule time, independent of your application state.

Flutter Streams #
The Flutter code will be called as soon as possible using Dart Streams.
createdStream: Fires when a notification is created displayedStream: Fires when a notification is displayed on system status bar actionStream: Fires when a notification is tapped by the user dismissedStream: Fires when a notification is dismissed by the user
| Platform | App in Foreground | App in Background | App Terminated (Killed) |
|---|---|---|---|
| Android | Fires all streams immediately after occurs | Fires all streams immediately after occurs | Fires createdStream, displayedStream and dismissedStream after the plugin initializes on Foreground, but fires actionStream immediately after occurs |
| iOS | Fires all streams immediately after occurs | Fires createdStream, displayedStream and dismissedStream after the app returns to Foreground, but fires actionStream immediately after occurs |
Fires createdStream, displayedStream and dismissedStream after the plugin initializes on Foreground, but fires actionStream immediately after occurs |
Permissions #
Permissions give transparency to the user of what you pretend to do with your app while its in use. To show any notification on device, you must obtain the user consent and keep in mind that this consent can be revoke at any time, in any platform. On Android, the basic permissions are always conceived to any new installed app, but for iOS, even the basic permission must be requested to the user.
The permissions can be defined in 3 types:
- Normal permissions: Are permissions not considered dangerous and do not require the explicit user consent to be enabled.
- Execution permissions: Are permissions considered more sensible to the user and you must obtain his explicit consent to use.
- Special/Dangerous permissions: Are permissions that can harm the user experience or his privacy and you must obtain his explicit consent and, depending of what platform are you running, you must obtain permission from the manufacture itself to use it.
As a good pratice, consider always to check if the permissions that you're desiring are conceived before create any new notification, independent of platform. To check if the permissions needs the explicity user consent, call the method shouldShowRationaleToRequest. The list of permissions that needs a rationale to the user can be different between platforms and O.S. versions. And if you app does not require extremely the permission to execute what you need, consider to not request the user permission and respect his will.
Notification's Permissions: #
-
Alert: Alerts are notifications with high priority that pops up on the user screen. Notifications with normal priority only shows the icon on status bar.
-
Sound: Sound allows the ability to play sounds for new displayed notifications. The notification sounds are limited to a few seconds and if you pretend to play a sound for more time, you must consider to play a background sound to do it simultaneously with the notification.
-
Badge: Badge is the ability to display a badge alert over the app icon to alert the user about updates. The badges can be displayed on numbers or small dots, depending of platform or what the user defined in the device settings. Both Android and iOS can show numbers on badge, depending of its version and distribution.
-
Light: The ability to display colorful small lights, blanking on the device while the screen is off to alert the user about updates. Only a few Android devices have this feature.
-
Vibration: The ability to vibrate the device to alert the user about updates.
-
FullScreenIntent: The ability to show the notifications on pop up even if the user is using another app.
-
PreciseAlarms: Precise alarms allows the scheduled notifications to be displayed at the expected time. This permission can be revoke by special device modes, such as battery save mode, etc. Some manufactures can disable this feature if they decide that your app is consumpting many computational resources and decressing the baterry life (and without changing the permission status for your app). So, you must take in consideration that some schedules can be delayed or even not being displayed, depending of what platform are you running. You can increase the chances to display the notification at correct time, enable this permission and setting the correct notification category, but you never gonna have 100% sure about it.
-
CriticalAlert: Critical alerts is a special permission that allows to play sounds and vibrate for new notifications displayed, even if the device is in Do Not Disturb / Silent mode. For iOS, you must request Apple a authorization to your app use it.
-
OverrideDnD: Override DnD allows the notification to decrease the Do Not Disturb / Silent mode level enable to display critical alerts for Alarm and Call notifications. For Android, you must require the user consent to use it. For iOS, this permission is always enabled with CriticalAlert.
-
Provisional: (Only has effect on iOS) The ability to display notifications temporarily without the user consent.
-
Car: The ability to display notifications while the device is in car mode.
OBS: If none permission is requested through requestPermissionToSendNotifications method, the standard permissions requested are Alert, Badge, Sound, Vibrate and Light.
Notification's Permission Level #
A permission can be segregated in 3 different levels:

- Device level: The permissions set at the global device configuration are applicable at any app installed on device, such as disable/enable all notifications, battery save mode / low power mode and silent / do not disturb mode.
- Application level: The permissions set at the global app configurations are applicable to any notification in any channel.
- Channel level: The permissions set on the channel has effect only for notifications displayed through that specific channel.
Full example code #
Bellow there is a full example of how to check if the desired permission is enable and how to request it showing a dialog with a rationale if necessary (this example was took from our example app):
  static Future<List<NotificationPermission>> requestUserPermissions(
      BuildContext context,{
      // if you only intends to request the permissions until app level, set the channelKey value to null
      required String? channelKey,
      required List<NotificationPermission> permissionList}
    ) async {

    // Check if the basic permission was conceived by the user
    if(!await requestBasicPermissionToSendNotifications(context))
      return [];

    // Check which of the permissions you need are allowed at this time
    List<NotificationPermission> permissionsAllowed = await AwesomeNotifications().checkPermissionList(
        channelKey: channelKey,
        permissions: permissionList
    );

    // If all permissions are allowed, there is nothing to do
    if(permissionsAllowed.length == permissionList.length)
      return permissionsAllowed;

    // Refresh the permission list with only the disallowed permissions
    List<NotificationPermission> permissionsNeeded =
      permissionList.toSet().difference(permissionsAllowed.toSet()).toList();

    // Check if some of the permissions needed request user's intervention to be enabled
    List<NotificationPermission> lockedPermissions = await AwesomeNotifications().shouldShowRationaleToRequest(
        channelKey: channelKey,
        permissions: permissionsNeeded
    );

    // If there is no permissions depending on user's intervention, so request it directly
    if(lockedPermissions.isEmpty){

      // Request the permission through native resources.
      await AwesomeNotifications().requestPermissionToSendNotifications(
          channelKey: channelKey,
          permissions: permissionsNeeded
      );

      // After the user come back, check if the permissions has successfully enabled
      permissionsAllowed = await AwesomeNotifications().checkPermissionList(
          channelKey: channelKey,
          permissions: permissionsNeeded
      );
    }
    else {
      // If you need to show a rationale to educate the user to conceived the permission, show it
      await showDialog(
          context: context,
          builder: (context) => AlertDialog(
            backgroundColor: Color(0xfffbfbfb),
            title: Text('Awesome Notifications needs your permission',
              textAlign: TextAlign.center,
              maxLines: 2,
              style: TextStyle(fontSize: 22, fontWeight: FontWeight.w600),
            ),
            content: Column(
              mainAxisSize: MainAxisSize.min,
              children: [
                Image.asset(
                  'assets/images/animated-clock.gif',
                  height: MediaQuery.of(context).size.height * 0.3,
                  fit: BoxFit.fitWidth,
                ),
                Text(
                  'To proceed, you need to enable the permissions above'+
                      (channelKey?.isEmpty ?? true ? '' : ' on channel $channelKey')+':',
                  maxLines: 2,
                  textAlign: TextAlign.center,
                ),
                SizedBox(height: 5),
                Text(
                  lockedPermissions.join(', ').replaceAll('NotificationPermission.', ''),
                  maxLines: 2,
                  textAlign: TextAlign.center,
                  style: TextStyle(fontSize: 14, fontWeight: FontWeight.w600),
                ),
              ],
            ),
            actions: [
              TextButton(
                  onPressed: (){ Navigator.pop(context); },
                  child: Text(
                    'Deny',
                    style: TextStyle(color: Colors.red, fontSize: 18),
                  )
              ),
              TextButton(
                onPressed: () async {

                  // Request the permission through native resources. Only one page redirection is done at this point.
                  await AwesomeNotifications().requestPermissionToSendNotifications(
                      channelKey: channelKey,
                      permissions: lockedPermissions
                  );

                  // After the user come back, check if the permissions has successfully enabled
                  permissionsAllowed = await AwesomeNotifications().checkPermissionList(
                      channelKey: channelKey,
                      permissions: lockedPermissions
                  );

                  Navigator.pop(context);
                },
                child: Text(
                  'Allow',
                  style: TextStyle(color: Colors.deepPurple, fontSize: 18, fontWeight: FontWeight.bold),
                ),
              ),
            ],
          )
      );
    }

    // Return the updated list of allowed permissions
    return permissionsAllowed;
  }
Notification's Category #
The notification category is a group of predefined categories that best describe the nature of the notification and may be used by some systems for ranking, delay or filter the notifications. Its highly recommended to correctly categorize your notifications.
- Alarm: Alarm or timer.
- Call: incoming call (voice or video) or similar synchronous communication request
- Email: asynchronous bulk message (email).
- Error: error in background operation or authentication status.
- Event: calendar event.
- LocalSharing: temporarily sharing location.
- Message: incoming direct message (SMS, instant message, etc.).
- MissedCall: incoming call (voice or video) or similar synchronous communication request
- Navigation: map turn-by-turn navigation.
- Progress: progress of a long-running background operation.
- Promo: promotion or advertisement.
- Recommendation: a specific, timely recommendation for a single thing. For example, a news app might want to recommend a news story it believes the user will want to read next.
- Reminder: user-scheduled reminder.
- Service: indication of running background service.
- Social: social network or sharing update.
- Status: ongoing information about device or contextual status.
- StopWatch: running stopwatch.
- Transport: media transport control for playback.
- Workout: tracking a user's workout.
Notification's Action Types #
The notification action type defines how awesome notifications should handle the user actions. OBS: For silent types, its necessary to hold the execution with await keyword, to prevent the isolates to shutdown itself before all work is done.
- Default: Is the default action type, forcing the app to goes foreground.
- SilentAction: Do not forces the app to go foreground, but runs on main thread, accept visual elements and can be interrupt if main app gets terminated.
- SilentBackgroundAction: Do not forces the app to go foreground and runs on background, not accepting any visual elements. The execution is done on background thread.
- KeepOnTop: Fires the respective action without close the notification status bar and don't bring the app to foreground.
- DisabledAction: When pressed, the notification just close itself on the tray, without fires any action event.
- DismissAction: Behaves as the same way as a user dismissing action, dismissing the respective notification and firing the dismissMethod. Ignores autoDismissible property.
- InputField: (Deprecated) When the button is pressed, it opens a dialog shortcut to send an text response.
Notification Structures #
Notification Layout Types #
To show any images on notification, at any place, you need to include the respective source prefix before the path.
Layouts can be defined using 4 prefix types:
- Default: The default notification layout. Also, is the layout chosen in case of any failure found on other layouts
- BigPicture: Shows a big picture and/or a small image attached to the notification.
- BigText: Shows more than 2 lines of text.
- Inbox: Lists messages or items separated by lines
- ProgressBar: Shows an progress bar, such as download progress bar
- Messaging: Shows each notification as an chat conversation with one person
- Messaging Group: Shows each notification as an chat conversation with more than one person (Groups)
- MediaPlayer: Shows an media controller with action buttons, that allows the user to send commands without brings the application to foreground.
Media Source Types #
To show any images on notification, at any place, you need to include the respective source prefix before the path.
Images can be defined using 4 prefix types:
- Asset: images access through Flutter asset method. Example: asset://path/to/image-asset.png
- Network: images access through internet connection. Example: http(s)://url.com/to/image-asset.png
- File: images access through files stored on device. Example: file://path/to/image-asset.png
- Resource: images access through drawable native resources. On Android, those files are stored inside [project]/android/app/src/main/drawable folder. Example: resource://drawable/res_image-asset.png
OBS: Unfortunately, icons and sounds can be only resource media types.
OBS 2: To protect your native resources on Android against minification, please include the prefix "res_" in your resource file names. The use of the tag shrinkResources false inside build.gradle or the command flutter build apk --no-shrink is not recommended.
To know more about it, please visit Shrink, obfuscate, and optimize your app
Notification Importance (Android's channel) #
Defines the notification's importance level and how it should be displayed to the user. The possible importance levels are the following:
- Max: Makes a sound and appears as a heads-up notification.
- Higher: shows everywhere, makes noise and peeks. May use full screen intents.
- Default: shows everywhere, makes noise, but does not visually intrude.
- Low: Shows in the shade, and potentially in the status bar (see shouldHideSilentStatusBarIcons()), but is not audibly intrusive.
- Min: only shows in the shade, below the fold.
- None: disable the respective channel.
OBS: Unfortunately, the channel's importance can only be defined on first time. After that, it cannot be changed.
Notification Action Button Types #
Notifications action buttons could be classified in 4 types:
- Default: after user taps, the notification bar is closed and an action event is fired.
- InputField: after user taps, a input text field is displayed to capture input by the user.
- DisabledAction: after user taps, the notification bar is closed, but the respective action event is not fired.
- KeepOnTop: after user taps, the notification bar is not closed, but an action event is fired.
| Android | App in Foreground | App in Background | App Terminated (Killed) |
|---|---|---|---|
| Default | keeps the app in foreground | brings the app to foreground | brings the app to foreground |
| InputField | keeps the app in foreground | brings the app to foreground | brings the app to foreground |
| DisabledAction | keeps the app in foreground | keeps the app in background | keeps the app terminated |
| KeepOnTop | keeps the app in foreground | keeps the app in background | keeps the app terminated |
If the app is terminated (killed):
- Default: Wake up the app.
- InputField: Wake up the app.
- DisabledAction: Does not Wake up the app.
- KeepOnTop: Does not Wake up the app.
Scheduling a Notification #
Schedules could be created from a UTC or local time zone, and specifying a time interval or setting a calendar filter. Notifications could be scheduled even remotely.
Attention: for iOS, is not possible to define the correct displayedDate, because is not possible to run exactly at same time with the notification schedules when it arrives in the user status bar.
To send notifications schedules, you need to instantiate one of the classes bellow in the notification property 'schedule':
- NotificationCalendar: Creates a notification scheduled to be displayed when the set date components matches the current date. If a time component is set to null, so any value is considered valid to produce the next valid date. Only one value is allowed by each component.
- NotificationInterval: Creates a notification scheduled to be displayed at each interval time, starting from the next valid interval.
- NotificationAndroidCrontab: Creates a notification scheduled to be displayed based on a list of precise dates or a crontab rule, with seconds precision. To know more about how to create a valid crontab rule, take a look at this article.
Also, all of then could be configured using:
- timeZone: describe which time zone that schedule is based (valid examples: America/Sao_Paulo, America/Los_Angeles, GMT+01:00, Europe/London, UTC)
- allowWhileIdle: Determines if notification will send, even when the device is in critical situation, such as low battery.
- repeats: Determines if the schedule should be repeat after be displayed. If there is no more valid date compatible with the schedule rules, the notification is automatically canceled.
For time zones, please note that:
- Dates with UTC time zones are triggered at the same time in all parts of the planet and are not affected by daylight rules.
- Dates with local time zones, defined such "GMT-07: 00", are not affected by daylight rules.
- Dates with local time zones, defined such "Europe / Lisbon", are affected by daylight rules, especially when scheduled based on a calendar filter.
Here are some practical examples of how to create a notification scheduled:
  String localTimeZone = await AwesomeNotifications().getLocalTimeZoneIdentifier();
  String utcTimeZone = await AwesomeNotifications().getLocalTimeZoneIdentifier();

  await AwesomeNotifications().createNotification(
      content: NotificationContent(
          id: id,
          channelKey: 'scheduled',
          title: 'Notification at every single minute',
          body:
              'This notification was schedule to repeat at every single minute.',
          notificationLayout: NotificationLayout.BigPicture,
          bigPicture: 'asset://assets/images/melted-clock.png'),
      schedule: NotificationInterval(interval: 60, timeZone: localTimeZone, repeats: true));
await AwesomeNotifications().createNotification(
  content: NotificationContent(
      id: id,
      channelKey: 'scheduled',
      title: 'wait 5 seconds to show',
      body: 'now is 5 seconds later',
      wakeUpScreen: true,
      category: NotificationCategory.Alarm,
  ),
  schedule: NotificationInterval(
      interval: 5,
      timeZone: localTimeZone,
      preciseAlarm: true,
      timezone: await AwesomeNotifications().getLocalTimeZoneIdentifier()
  );
  await AwesomeNotifications().createNotification(
      content: NotificationContent(
          id: id,
          channelKey: 'scheduled',
          title: 'Notification at exactly every single minute',
          body: 'This notification was schedule to repeat at every single minute at clock.',
          notificationLayout: NotificationLayout.BigPicture,
          bigPicture: 'asset://assets/images/melted-clock.png'),
      schedule: NotificationCalendar(second: 0, timeZone: localTimeZone, repeats: true));
 await AwesomeNotifications().createNotification(
  content: NotificationContent(
    id: id,
    channelKey: 'scheduled',
    title: 'Just in time!',
    body: 'This notification was schedule to shows at ' +
        (Utils.DateUtils.parseDateToString(scheduleTime.toLocal()) ?? '?') +
        ' $timeZoneIdentifier (' +
        (Utils.DateUtils.parseDateToString(scheduleTime.toUtc()) ?? '?') +
        ' utc)',
    wakeUpScreen: true,
    category: NotificationCategory.Reminder,
    notificationLayout: NotificationLayout.BigPicture,
    bigPicture: 'asset://assets/images/delivery.jpeg',
    payload: {'uuid': 'uuid-test'},
    autoDismissible: false,
  ),
  schedule: NotificationCalendar.fromDate(date: scheduleTime));
Schedule Precision #
It's important to keep in mind that some Android distributions could ignore or delay the schedule execution, if their algorithms judge it necessary to save the battery life, etc, and this intervention is even more common for repeating schedules. Im most cases this behavior is recommended, since as a battery-hungry app can denigrate the app and the manufacturer's image. Therefore, you need to consider this fact in your business logic.
But, for some cases where the schedules precision is a MUST requirement, you can use some features to ensure the execution in the correct time:
- Set the notification's category to a critical category, such as Alarm, Reminder or Call.
- Set the
preciseAlarmproperty to true. For Android versions greater or equal than 12, you need to explicitly request the user consent to enable this feature. You can request the permission withrequestPermissionToSendNotificationsor take the user to the permission page callingshowAlarmPage. - Set
criticalAlertschannel property and notification content property to true. This feature allows you to show notification and play sounds even when the device is on silent / Do not Disturb mode. Because of it, this feature is considered highly sensitive and you must request Apple a special authorization to use it. On Android, for versions greater or equal than 11, you need to explicitly request the user consent to enable this feature. You can request the permission withrequestPermissionToSendNotifications.
To enable precise alarms, you need to add the SCHEDULE_EXACT_ALARM permission into your AndroidManifest.xml file, inside the Android/app/src/main/ folder
<manifest xmlns:android="http://schemas.android.com/apk/res/android"
   package="com.example">
   <uses-permission android:name="android.permission.SCHEDULE_EXACT_ALARM"/>
   <application>
       ...
   </application>
</manifest>
To enable critical alerts, you need to add the ACCESS_NOTIFICATION_POLICY permission into your AndroidManifest.xml file, inside the Android/app/src/main/ folder
<manifest xmlns:android="http://schemas.android.com/apk/res/android"
   package="com.example">
   <uses-permission android:name="android.permission.ACCESS_NOTIFICATION_POLICY"/>
   <application>
       ...
   </application>
</manifest>
For iOS, you must submit a request authorization to Apple to enable it, as described in this post.
OBS: Critical alerts still in development and should not be used in production mode.
Old schedule Cron rules (For versions older than 0.0.6) #
Due to the way that background task and notification schedules works on iOS, wasn't possible yet to enable officially all the old Cron features on iOS while the app is in Background and even when the app is terminated (Killed).
Thanks to this, the complex schedules based on cron tab rules are only available on Android by the class NotificationAndroidCrontab.
A support ticket was opened for Apple in order to resolve this issue, but they don't even care about. You can follow the progress of the process here.
Emojis (Emoticons) #
To send emojis in your local notifications, concatenate the class Emoji with your text.
For push notifications, copy the emoji (unicode text) from http://www.unicode.org/emoji/charts/full-emoji-list.html and send it or use the format \u{1f6f8}.
OBS: not all emojis work with all platforms. Please, test the specific emoji before using it in production.
  await AwesomeNotifications().createNotification(
      content: NotificationContent(
          id: id,
          channelKey: 'basic_channel',
          title: 'Emojis are awesome too! '+ Emojis.smille_face_with_tongue + Emojis.smille_rolling_on_the_floor_laughing + Emojis.emotion_red_heart,
          body: 'Simple body with a bunch of Emojis! ${Emojis.transport_police_car} ${Emojis.animals_dog} ${Emojis.flag_UnitedStates} ${Emojis.person_baby}',
          bigPicture: 'https://tecnoblog.net/wp-content/uploads/2019/09/emoji.jpg',
          notificationLayout: NotificationLayout.BigPicture,
  ));
Wake Up Screen Notifications #
To send notifications that wake up the device screen even when it is locked, you can set the wakeUpScreen property to true.
To enable this property on Android, you need to add the WAKE_LOCK permission and the properties android:showWhenLocked and android:turnScreenOn into your AndroidManifest.xml file, inside the Android/app/src/main/ folder, as described bellow:
<manifest xmlns:android="http://schemas.android.com/apk/res/android"
   package="com.example">

   <uses-permission android:name="android.permission.WAKE_LOCK" />

   <application
        android:name="io.flutter.app.FlutterApplication"
        android:icon="@mipmap/ic_launcher"
        android:label="Awesome Notifications for Flutter">
        <activity
            android:name=".MainActivity"
            android:configChanges="orientation|keyboardHidden|keyboard|screenSize|smallestScreenSize|locale|layoutDirection|fontScale|screenLayout|density|uiMode"
            android:hardwareAccelerated="true"
            android:launchMode="singleTop"
            android:theme="@style/LaunchTheme"
            android:showWhenLocked="true"
            android:turnScreenOn="true"
            android:windowSoftInputMode="adjustResize">
            ...
        </activity>
            ...
   </application>
</manifest>
Full Screen Intent Notifications (only for Android) #
To send notifications in full screen mode, even when it is locked, you can set the fullScreenIntent property to true.
To enable this property, you need to add the property android:showOnLockScreen="true" and the USE_FULL_SCREEN_INTENT permission to your AndroidManifest.xml file, inside the Android/app/src/main/ folder
<manifest xmlns:android="http://schemas.android.com/apk/res/android"
   package="com.example">
   <uses-permission android:name="android.permission.USE_FULL_SCREEN_INTENT" />
   <application>
       ...
       <activity
            android:name=".MainActivity"
            android:showOnLockScreen="true">
           ...
       </activity>
       ...
   </application>
</manifest>
On Android, for versions greater or equal than 11, you need to explicitly request the user consent to enable this feature. You can request the permission with requestPermissionToSendNotifications.
Notification channels #
Notification channels are means by which notifications are send, defining the characteristics that will be common among all notifications on that same channel. A notification can be created, deleted and updated at any time in the application, however it is required that at least one exists during the initialization of this plugin. If a notification is created using a invalid channel key, the notification is discarded. After a notification being created, especially for Android Oreo devices and above, most of his definitions cannot be updated any more. To update all channel's definitions, it is necessary to use the ´forceUpdate´ option, which has the negative effect of automatically closing all active notifications on that channel.
Its possible to organize visualy the channel's in you app channel page using NotificationChannelGroup in the AwesomeNotifications().initialize method and the property channelGroupKey in the respective channels.
The channel group name can be updated at any time, but an channel only can be defined into a group when is created.
Main methods to manipulate a notification channel:
- AwesomeNotifications().setChannel: Create or update a notification channel.
- AwesomeNotifications().removeChannel: Remove a notification channel, closing all current notifications on that same channel.
| Attribute | Required | Description | Type | Updatable without force mode | Value Limits | Default value |
|---|---|---|---|---|---|---|
| channelKey | YES | String key that identifies a channel where not | String | NOT AT ALL | channel must be enabled | basic_channel |
| channelName | YES | The title of the channel (is visible for the user on Android) | String | YES | unlimited | |
| channelDescription | YES | The channel description (is visible for the user on Android) | String | YES | unlimited | |
| channelShowBadge | NO | The notification should automatically increment the badge counter | bool | YES | true or false | false |
| importance | NO | The notification should automatically increment the badge counter | NotificationImportance | NO | Enumerator | Normal |
| playSound | NO | Determines if the notification should play sound | bool | NO | true or false | true |
| soundSource | NO | Specify a custom sound to be played (must be a native resource file) | String | NO | unlimited | |
| defaultRingtoneType | NO | Determines what default sound type should be played (only for Android) | DefaultRingtoneType | YES | Enumerator | Notification |
| enableVibration | NO | Activate / deactivate the vibration functionality | bool | NO | true or false | true |
| enableLights | NO | Determines that the LED lights should be on in notifications | bool | NO | true or false | true |
| ledColor | NO | Determines the LED lights color to be played on notifications | Color | NO | unlimited | Colors.white |
| ledOnMs | NO | Determines the time, in milliseconds, that the LED lights must be on | int | NO | 1 - 2.147.483.647 | |
| ledOffMs | NO | Determines the time, in milliseconds, that the LED lights must be off | int | NO | 1 - 2.147.483.647 | |
| groupKey | NO | Determines the common key used to group notifications in a compact form | String | NO | unlimited | |
| groupSort | NO | Determines the notifications sort order inside the grouping | GroupSort | NO | Enumerator | Desc |
| groupAlertBehavior | NO | Determines the alert type for notifications in same grouping | GroupAlertBehavior | NO | Enumerator | All |
| defaultPrivacy | NO | Determines the privacy level to be applied when the device is locked | NotificationPrivacy | NO | Enumerator | Private |
| icon | NO | Determines the notification small top icon on status bar | String | NO | unlimited | |
| defaultColor | NO | Determines the notification global color (only for Android) | Color | NO | unlimited | Color.black |
| locked | NO | Determines if the user cannot manually dismiss the notification | bool | NO | true or false | false |
| onlyAlertOnce | NO | Determines if the notification should alert once, when created | bool | NO | true or false | false |
Notification types, values and defaults #
NotificationContent ("content" in Push data) - (required) #
| Attribute | Required | Description | Type | Value Limits | Default value |
|---|---|---|---|---|---|
| id | YES | Number that identifies a unique notification | int | 1 - 2.147.483.647 | |
| channelKey | YES | String key that identifies a channel where not. will be displayed | String | channel must be enabled | basic_channel |
| title | NO | The title of notification | String | unlimited | |
| body | NO | The body content of notification | String | unlimited | |
| summary | NO | A summary to be displayed when the content is protected by privacy | String | unlimited | |
| category | NO | The notification category that best describes the nature of the notification for O.S. | Enumerator | NotificationCategory | |
| showWhen | NO | Hide/show the time elapsed since notification was displayed | bool | true or false | true |
| displayOnForeground | NO | Hide/show the notification if the app is in the Foreground (streams are preserved ) | bool | true or false | true |
| displayOnBackground | NO | Hide/show the notification if the app is in the Background (streams are preserved ). OBS: Only available for iOS with background special permissions | bool | true or false | true |
| icon | NO | Small icon to be displayed on the top of notification (Android only) | String | must be a resource image | |
| largeIcon | NO | Large icon displayed at right middle of compact notification | String | unlimited | |
| bigPicture | NO | Big image displayed on expanded notification | String | unlimited | |
| autoDismissible | NO | Notification should auto dismiss when gets tapped by the user (has no effect for reply actions on Android) | bool | true or false | true |
| color | NO | Notification text color | Color | 0x000000 to 0xFFFFFF | 0x000000 (Colors.black) |
| backgroundColor | NO | Notification background color | Color | 0x000000 to 0xFFFFFF | 0xFFFFFF (Colors.white) |
| payload | NO | Hidden payload content | Map<String, String> | Only String for values | null |
| notificationLayout | NO | Layout type of notification | Enumerator | NotificationLayout | Default |
| hideLargeIconOnExpand | NO | Hide/show the large icon when notification gets expanded | bool | true or false | false |
| locked | NO | Blocks the user to dismiss the notification | bool | true or false | false |
| progress | NO | Current value of progress bar (percentage). Null for indeterminate. | int | 0 - 100 | null |
| ticker | NO | Text to be displayed on top of the screen when a notification arrives | String | unlimited | |
| actionType (Only for Android) | NO | Notification action response type | Enumerator | ActionType | Default |
NotificationActionButton ("actionButtons" in Push data) - (optional) #
- Is necessary at least one *required attribute
| Attribute | Required | Description | Type | Value Limits | Default value |
|---|---|---|---|---|---|
| key | YES | Text key to identifies what action the user took when tapped the notification | String | unlimited | |
| label | *YES | Text to be displayed over the action button | String | unlimited | |
| icon | *YES | Icon to be displayed inside the button | String | must be a resource image | |
| color | NO | Label text color (only for Android) | Color | 0x000000 to 0xFFFFFF | |
| enabled | NO | On Android, deactivates the button. On iOS, the button disappear | bool | true or false | true |
| autoDismissible | NO | Notification should auto cancel when gets tapped by the user | bool | true or false | true |
| showInCompactView | NO | For MediaPlayer notifications on Android, sets the button as visible in compact view | bool | true or false | true |
| isDangerousOption | NO | Mark the button as a dangerous option, displaying the text in red | bool | true or false | false |
| actionType | NO | Notification action response type | Enumerator | ActionType | Default |
Schedules #
NotificationInterval ("schedule" in Push data) - (optional) #
| Attribute | Required | Description | Type | Value Limits / Format | Default value |
|---|---|---|---|---|---|
| interval | YES | Time interval between each notification (minimum of 60 sec case repeating) | Int (seconds) | Positive unlimited | |
| allowWhileIdle | NO | Displays the notification, even when the device is low battery | bool | true or false | false |
| repeats | NO | Defines if the notification should play only once or keeps repeating | bool | true or false | false |
| timeZone | NO | Time zone identifier (ISO 8601) | String | "America/Sao_Paulo", "GMT-08:00" or "UTC" | "UTC" |
NotificationCalendar ("schedule" in Push data) - (optional) #
- Is necessary at least one *required attribute
- If the calendar time condition is not defined, then any value is considered valid in the filtering process for the respective time component
| Attribute | Required | Description | Type | Value Limits / Format | Default value |
|---|---|---|---|---|---|
| era, | *YES | Schedule era condition | Integer | 0 - 99999 | |
| year, | *YES | Schedule year condition | Integer | 0 - 99999 | |
| month, | *YES | Schedule month condition | Integer | 1 - 12 | |
| day, | *YES | Schedule day condition | Integer | 1 - 31 | |
| hour, | *YES | Schedule hour condition | Integer | 0 - 23 | |
| minute, | *YES | Schedule minute condition | Integer | 0 - 59 | |
| second, | *YES | Schedule second condition | Integer | 0 - 59 | |
| weekday, | *YES | Schedule weekday condition | Integer | 1 - 7 | |
| weekOfMonth, | *YES | Schedule weekOfMonth condition | Integer | 1 - 6 | |
| weekOfYear, | *YES | Schedule weekOfYear condition | Integer | 1 - 53 | |
| allowWhileIdle | NO | Displays the notification, even when the device is low battery | bool | true or false | false |
| repeats | NO | Defines if the notification should play only once or keeps repeating | bool | true or false | false |
| timeZone | NO | Time zone identifier (ISO 8601) | String | "America/Sao_Paulo", "GMT-08:00" or "UTC" | "UTC" |
NotificationAndroidCrontab (Only for Android)("schedule" in Push data) - (optional) #
- Is necessary at least one *required attribute
- Cron expression must respect the format (with seconds precision) as described in this article
| Attribute | Required | Description | Type | Value Limits / Format | Default value |
|---|---|---|---|---|---|
| initialDateTime | NO | Initial limit date of valid dates (does not fire any notification) | String | YYYY-MM-DD hh:mm:ss | |
| expirationDateTime | NO | Final limit date of valid dates (does not fire any notification) | String | YYYY-MM-DD hh:mm:ss | |
| crontabExpression | *YES | Crontab rule to generate new valid dates (with seconds precision) | bool | true or false | false |
| preciseSchedules | *YES | List of precise valid dates to fire | bool | true or false | false |
| allowWhileIdle | NO | Displays the notification, even when the device is low battery | bool | true or false | false |
| repeats | NO | Defines if the notification should play only once or keeps repeating | bool | true or false | false |
| timeZone | NO | Time zone identifier (ISO 8601) | String | "America/Sao_Paulo", "GMT-08:00" or "UTC" | "UTC" |
Common Known Issues #
Issue: Targeting S+ (version 31 and above) requires that an explicit value for android:exported be defined when intent filters are present
Fix: You need to add the attribute android:exported="true" to any <activity>, <activity-alias>, <service>, or <receiver> components that have <intent-filter> declared inside in the app’s AndroidManifest.xml file, and thats turns valid for every other flutter packages that youre using.
<manifest xmlns:android="http://schemas.android.com/apk/res/android"
    package="com.example.myapp">
   <application
        android:label="myapp"
        android:icon="@mipmap/ic_launcher">
        ...
        <activity
            android:name=".MainActivity"
            ...
            android:exported="true">
                ...
        </activity>
        ...
    </application>
</manifest>
But you need to remember that your plugin local files can be modified or even erased by some flutter commands, such as "Pub clear cache". So, do not add the attribute exported manually. Instead, request this changes to your plugin repository instead and upgrate it in your pubspec.yaml to the last version.
To know more about it, please visit Android 12 - Safer component exporting
#
Issue: awesome_notifications is not working on release mode on Android with custom sound or icon.
Fix: You need to protect your Android resource files from being minimized and obfuscated. You can achieve this in two ways:
1 - Please include the prefix "res_" in your native resource file names. The use of the tag shrinkResources false inside build.gradle or the command flutter build apk --no-shrink is not recommended. To know more about it, please visit Shrink, obfuscate, and optimize your app
2 - Create a keep.xml file and add the following content:
<?xml version="1.0" encoding="utf-8"?>
<resources xmlns:tools="http://schemas.android.com/tools"
    tools:keep="@drawable/*,@raw/slow_spring_board" />
To know more about it, please visit Customize which resources to keep
#
Issue: While my app is in background mode or terminated, my push notifications are successfully sent by firebase_messaging, but nothing happens in my background messaging handle
Fix: The background message method of the firebase_messaging plug-in runs in the background mode (which falls under iOS background execution rules) that can suspend all of your background executions for an indefinite period of time, for various reasons. Unfortunately, this is a known behavior of iOS and there is nothing to do about it. 15 minutes of delay is the smaller period of time possible between each execution. So, consider that the background method of firebase_messaging may not be executed at all or even run entirely out of the expected time.
#
Issue: So, because myApp depends on both awesome_notifications and "OtherPackageName" from sdk, version solving failed. pub get failed
Fix: The awesome_notifications plugin must be limited to all other last plugin versions in the stable bracket, to be the most compatible as possible to any flutter application in production stage. Sometimes, one of our dependencies getting older and need to be updated. Please, open a issue with this error on our GitHub community, and we gonna update it as fast as possible. But, case necessary, you can manually upgrade those dependencies into your local files. Just change the pubspec.yaml inside your awesome_notifications local folder and you should be ready to go.
To see an example of how to solve it, please go to https://github.com/rafaelsetragni/awesome_notifications/issues/49
#
Issue: Invalid notification content
Fix: The notification sent via FCM services MUST respect the types of the respective Notification elements. Otherwise, your notification will be discarded as invalid one. Also, all the payload elements MUST be a String, as the same way as you do in Local Notifications using dart code.
To see more information about each type, please go to https://github.com/rafaelsetragni/awesome_notifications#notification-types-values-and-defaults
#
Issue: Undefined symbol: OBJC_CLASS$_FlutterStandardTypedData / OBJC_CLASS$_FlutterError / OBJC_CLASS$_FlutterMethodChannel
Fix: Please, remove the old target extensions and update your awesome_notification plugin to the last version available
Android Foreground Services #
This is an optional feature to enable you to start an Android foreground service with a notification from this plugin. Since it is optional it was moved to a second library you can import as follows:
import 'package:awesome_notifications/android_foreground_service.dart';
The foreground service permission is NOT automatically added by this plugin, and you only need to add it if you want to use Android foreground services.
In your AndroidManifest.xml inside the <manifest> tag add:
<uses-permission android:name="android.permission.FOREGROUND_SERVICE" />
Next, you have to add the <service> tag to your AndroidManifest.xml. Inside your <application> tag add
 <service android:name="me.carda.awesome_notifications.awesome_notifications_core.services.ForegroundService"
          android:enabled="true"
          android:exported="false"
          android:stopWithTask="true"
          android:foregroundServiceType=AllServiceTypesThatYouChosen
></service>
And finally, to create the notification as foreground service, use the method startForeground and set the notification category to Service:
    AndroidForegroundService.startAndroidForegroundService(
      foregroundStartMode: ForegroundStartMode.stick,
      foregroundServiceType: ForegroundServiceType.phoneCall,
      content: NotificationContent(
          id: 2341234,
          body: 'Service is running!',
          title: 'Android Foreground Service',
          channelKey: 'basic_channel',
          bigPicture: 'asset://assets/images/android-bg-worker.jpg',
          notificationLayout: NotificationLayout.BigPicture,
          category: NotificationCategory.Service
      ),
      actionButtons: [
        NotificationActionButton(
            key: 'SHOW_SERVICE_DETAILS',
            label: 'Show details'
        )
      ]
    );
While the android:name must exactly match this value, you can configure the other parameters as you like, although it is recommended to copy the values for android:enabled, android:exported and android:stopWithTask. Suitable values for foregroundServiceType can be found here.
IMPORTANT #
If the icon of the notification is not set or not valid, the notification will appear, but will look very strange. Make sure to always specify an valid icon. If you need help with this, take a look at the examples.
Foreground Services behaviour on platforms other than Android #
On any platform other then Android, all foreground service methods are no-ops (they do nothing when called), so you don't need to do a platform check before calling them.
Metadata
Publisher
Metadata
A complete solution to create Local Notifications and Push Notifications (Media Notifications, Big Picture, Big text, etc), through Firebase or another services, using Flutter.
Repository (GitHub)
View/report issues
License
![]() unknown (license)
unknown (license)