awesome_notifications 0.0.5  awesome_notifications: ^0.0.5 copied to clipboard
A complete solution to create Local Notifications and Push Notifications (Media Notifications, Big Picture, Big text, etc), through Firebase or another services, using Flutter.
Awesome Notifications - Flutter #

Features #
- Create Local Notifications on Android, iOS and Web using Flutter.
- Create Push notifications using services as Firebase or any another one, simultaneously;
- Easy to use and highly customizable.
- Add images, sounds, buttons and different layouts on your notifications.
- Notifications could be created at any moment (on Foreground, Background or even when the application is terminated/killed).
- High trustworthy on receive notifications in any Application lifecycle.
- High quality data analytics about when the notification was created, where it came from and when the user taps on it. Ideal for applying AB tests approaches, etc, increasing the users engagement.
- Notifications are received on Flutter level code when they are created, displayed, dismissed or even tapped by the user.
- Notifications could be scheduled repeatedly using a list or precise dates or even Cron rules, such linux does, with seconds precision.
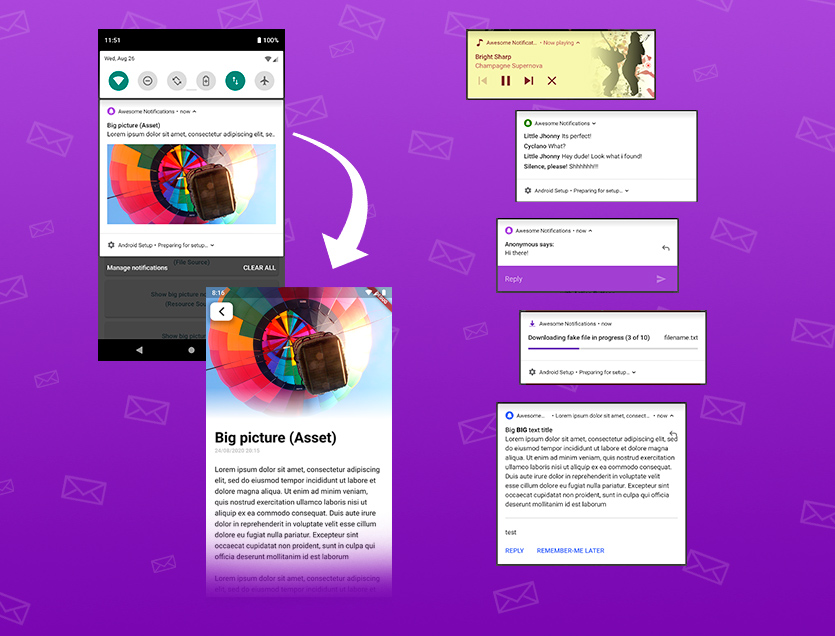
Some android notification examples:
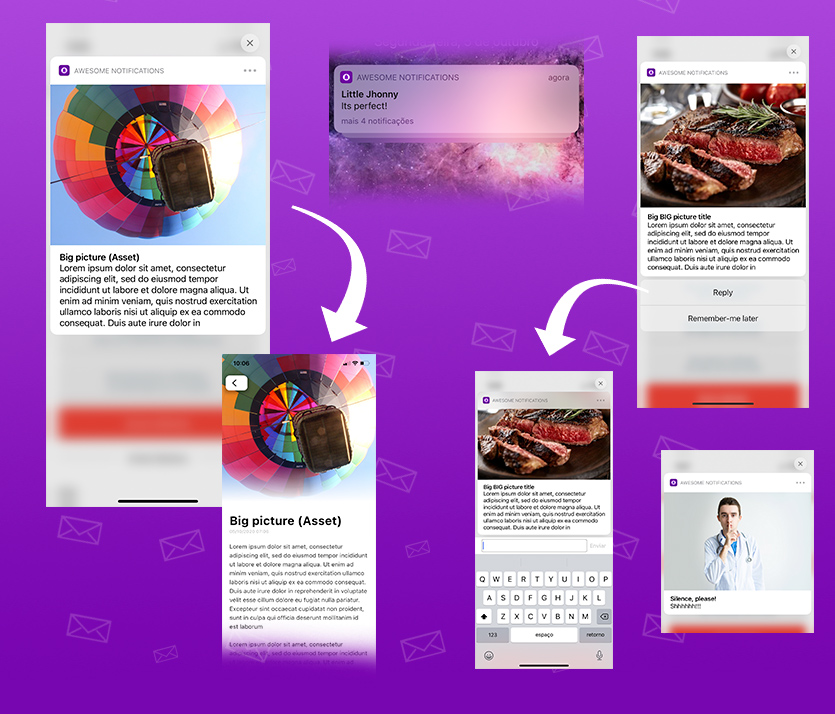
Some iOS notification examples (work in progress):
Notification Types Available #
- Basic notification
- Big picture notification
- Media notification
- Big Text notification
- Inbox notification
- Notifications with action buttons
- Grouped notifications
- Progress bar notifications
All notifications could be created locally or via Firebase services, with all the features.
ATENTION - PLUGIN UNDER CONSTRUCTION #
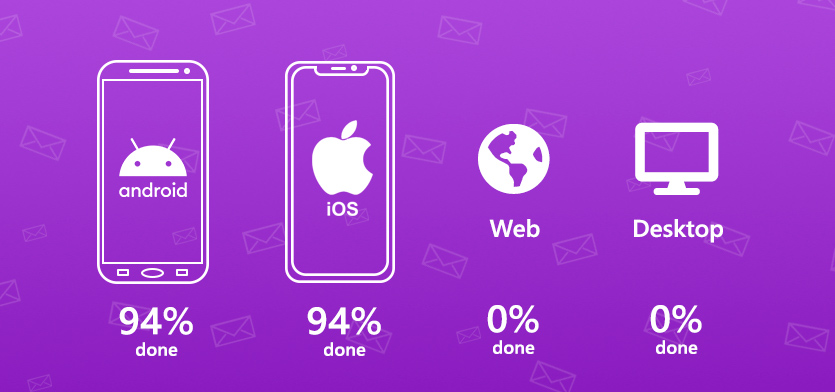
Working progress percentages of awesome notifications plugin
Next steps #
- Include Firebase Cloud Message support for iOS (Finished)
- Finish notifications layouts for iOS (In construction)
- Finish notifications schedules for iOS (In construction)
- Expiration date for notifications (not done yet due to iOS limitations) (https://github.com/rafaelsetragni/awesome_notifications/issues/7)
- Add an option to choose if a notification action should bring the app to foreground or not.
- Include Web support
- Include support for another push notification services (Wonderpush, One Signal, IBM, AWS, Azure, etc)
- Video layout for notifications
- Carousel layout for notifications
- Increase the tolerance in the json deserialization process, to accept different types and convert them to the expected.
Main Philosophy #
Considering all the many different devices available, with different hardware and software resources, this plugin ALWAYS shows the notification, trying to use the maximum resources available. If the resource is not available, the notification ignores that specific resource, but shows the rest of notification anyway.
Example: If the device has LED colored lights, use it. Otherwise, ignore the lights, but shows the notification with all another resources available. In last case, shows at least the most basic notification.
Also, the Notification Channels follows the same rule. If there is no channel segregation of notifications, use the channel configuration as only defaults configuration. If the device has channels, use it as expected to be.
And all notifications sent while the app was killed are registered and delivered as soon as possible to the Application, after the plugin initialization, respecting the delivery order.
This way, your Application will receive all notifications at Flutter level code.
How to show Local Notifications #
- Add awesome_notifications as a dependency in your pubspec.yaml file.
awesome_notifications: any # Any attribute updates automatically your source to the last version
- import the plugin package to your dart code
import 'package:awesome_notifications/awesome_notifications.dart';
- Initialize the plugin on main.dart, with at least one native icon and one channel
AwesomeNotifications().initialize(
    // set the icon to null if you want to use the default app icon
    'resource://drawable/res_app_icon',
    [
        NotificationChannel(
            channelKey: 'basic_channel',
            channelName: 'Basic notifications',
            channelDescription: 'Notification channel for basic tests',
            defaultColor: Color(0xFF9D50DD),
            ledColor: Colors.white
        )
    ]
);
- Request the user authorization to send local and push notifications (Remember to show a dialog alert to the user before call this request)
AwesomeNotifications().isNotificationAllowed().then((isAllowed) {
  if (!isAllowed) {
    // Insert here your friendly dialog box before call the request method
    // This is very important to not harm the user experience
    AwesomeNotifications().requestPermissionToSendNotifications();
  }
});
- On your main page, starts to listen the notification actions (to detect tap)
AwesomeNotifications().actionStream.listen(
    (receivedNotification){

        Navigator.of(context).pushName(context,
            '/NotificationPage',
            arguments: { id: receivedNotification.id } // your page params. I recommend to you to pass all *receivedNotification* object
        );

    }
);
- In any place of your app, create a new notification
AwesomeNotifications().createNotification(
  content: NotificationContent(
      id: 10,
      channelKey: 'basic_channel',
      title: 'Simple Notification',
      body: 'Simple body'
  )
);
THATS IT! CONGRATZ MY FRIEND!!!
Example Apps #
With the examples bellow, you can check all the features and how to use the Awesome Notifications in your app.
https://github.com/rafaelsetragni/awesome_notifications
Complete example with all the features available
https://github.com/bayuramadeza/Awesome-Notification-FCM
An simple but excellent app example of how to implement FCM with Awesome Notifications, created by bayuramadeza
To run the examples, follow the steps bellow:
- Install GitHub software in your local machine. I strongly recommend to use GitHub Desktop.
- Go to one of the GitHub repositories
- Clone the project to your local machine
- Open the project with Android Studio or any other IDE
- Sync the project dependencies running
flutter pub get - On iOS, run
pod installto sync the native dependencies - Debug the application with a real device or emulator
iOS Limitations #
Due to the way that background task and notification schedules works on iOS, wasn't possible yet to enable all the schedule features on iOS while the app is in Background and even when the app is terminated (Killed).
On Foreground, all notification schedules should work as expected. InitialDate parameter should work as expected at any circunstance.
A support ticket was opened for Apple in order to resolve this issue. You can follow the progress of the process here.
iOS Configuration #
To activate all the features on iOS, is necessary to include two target extensions to your project:
- Notification Content Extension: allows to use alternative layouts, such as Big text, Progress Bar and Inbox Messages.
- Notification Service Extension: allows to receive push notifications using all Awesome Notifications Features.
OBS: Is not necessary to include both extensions if you pretend to use just one of the features. Just include what you need.
Including Notification Target Extensions to your project #
1- Open your project directly on XCode, opening the file "/{path-to-your-project}/ios/Runner.xcworkspace"
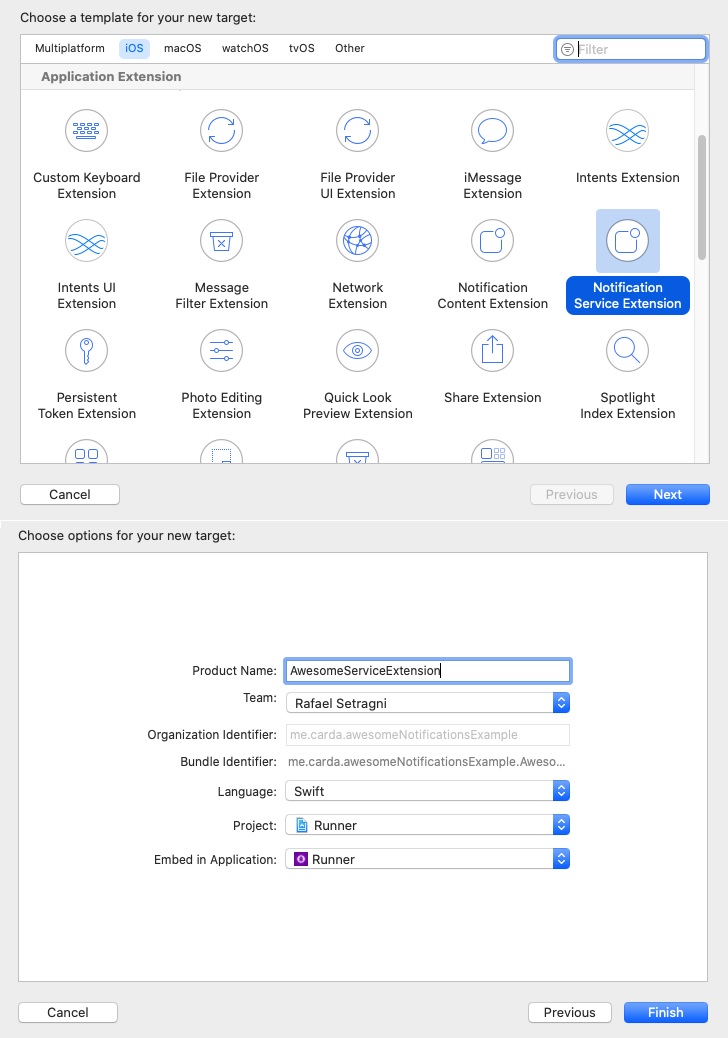
2- Create a new target for Notification Service Extension with File > New > Target and select Notification Service Extension. Name the extension as AwesomeServiceExtension.
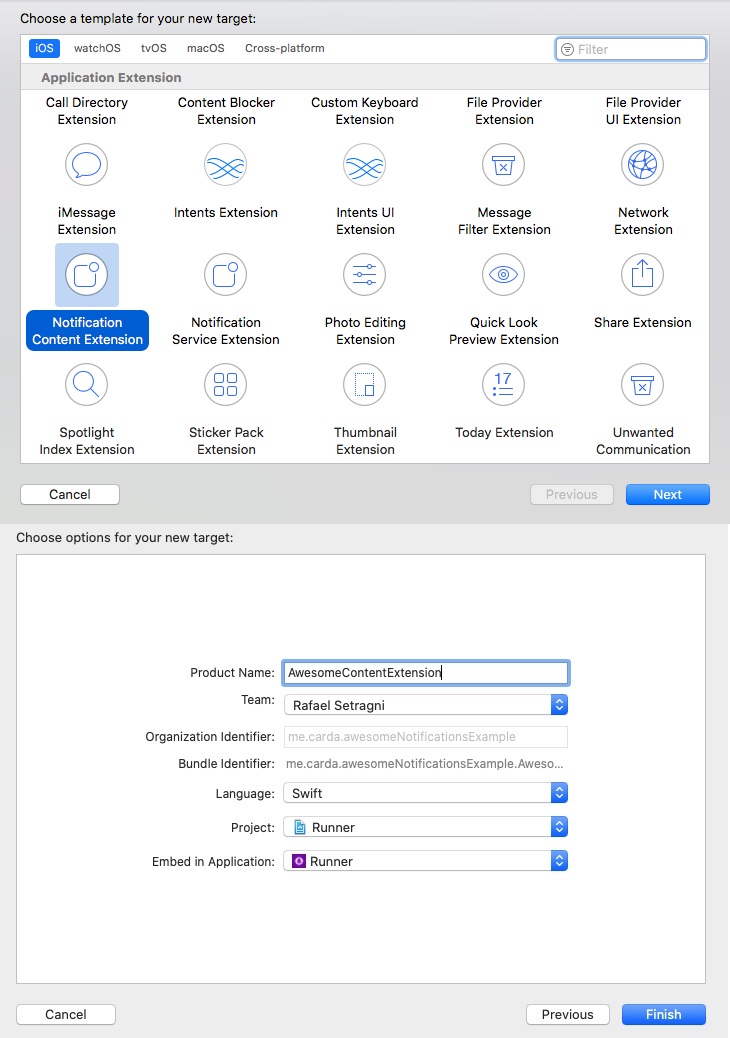
3- Create a new target for Notification Content Extension with File > New > Target and select Notification Content Extension. Name the extension as AwesomeContentExtension.
4- Edit your Podfile in XCode and insert the code bellow at the bottom of the file:
This step will compile the framework awesome_notifications to be used on your target extensions
post_install do |installer|
  installer.pods_project.targets.each do |target|
    flutter_additional_ios_build_settings(target)
  end
end

target 'AwesomeServiceExtension' do
  use_frameworks!
  use_modular_headers!

  pod 'awesome_notifications', :path => '.symlinks/plugins/awesome_notifications/ios'
end

target 'AwesomeContentExtension' do
  use_frameworks!
  use_modular_headers!

  pod 'awesome_notifications', :path => '.symlinks/plugins/awesome_notifications/ios'
end
5- Replace the file content in NotificationService.swift by the code bellow:
import awesome_notifications

@available(iOS 10.0, *)
class NotificationService: AwesomeServiceExtension {

}
6- Replace the file content in NotificationContent.swift by the code bellow:
import awesome_notifications

@available(iOS 10.0, *)
class NotificationViewController: AwesomeContentExtension {

}
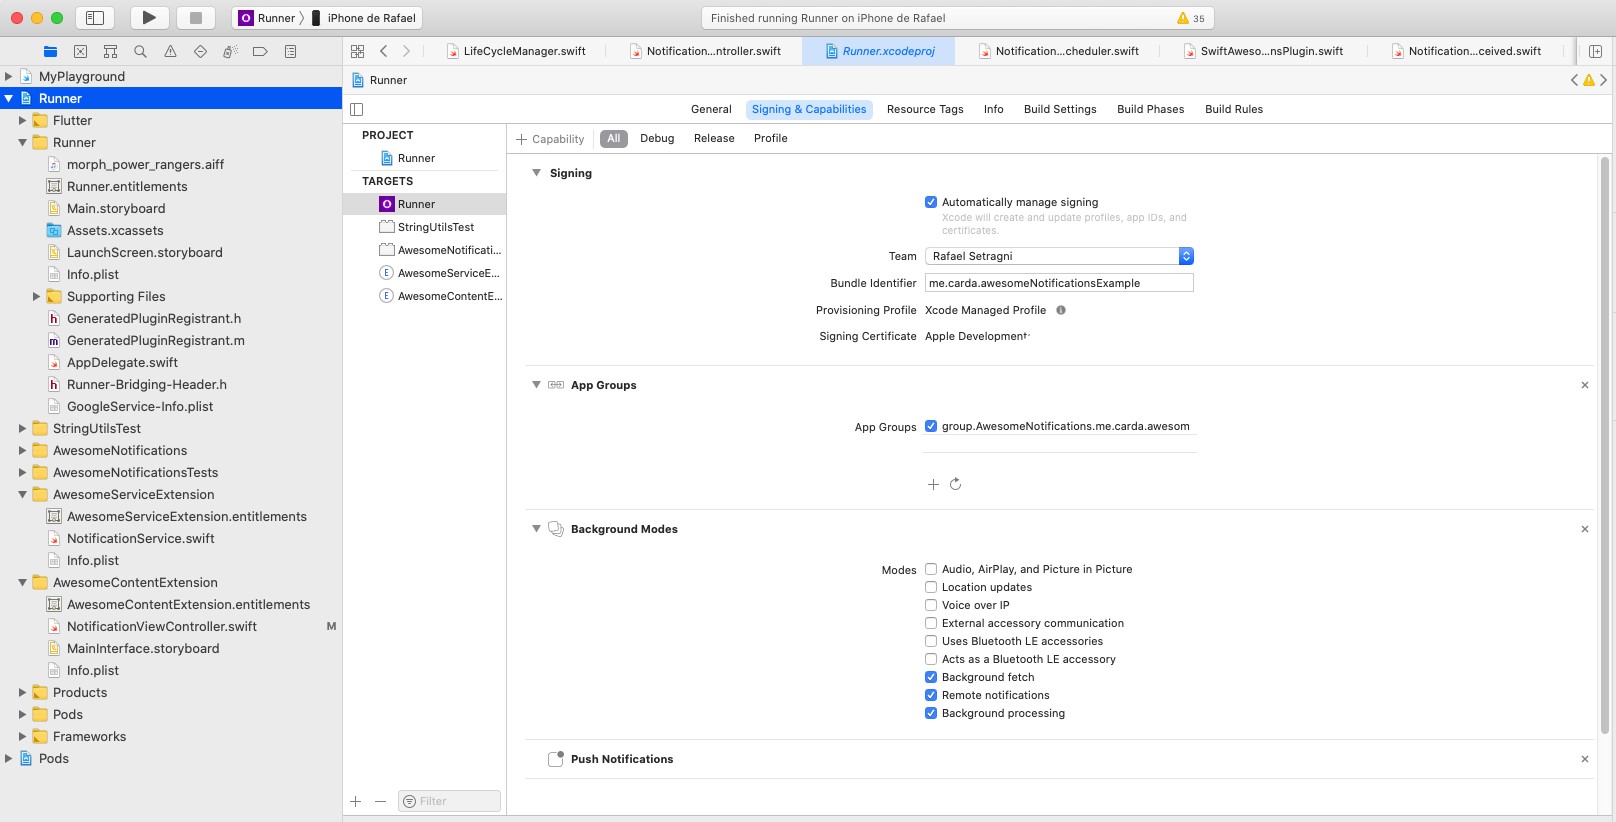
7- Opening your project file project.pbxproj with XCode, go to Runner > Signing & Capabilities and add App Groups, Push Notifications and Background Modes with Background fetch, Remote notifications and Background processing enabled.
8- For Runner, AwesomeServiceExtension and AwesomeContentExtension Targets, go to Signing & Capabilities > App Groups and add the group group.AwesomeNotifications.your.bundle.domain.appname
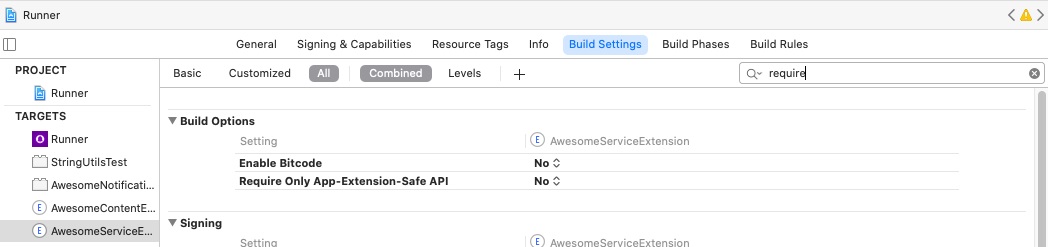
9- Go to Runner > Build Settings and certifies to disable Enable Bitcode and Require Only App-Extension-Safe API, setting it to 'NO' in both extensions.
10- Go to the terminal, navigate to "/{path-to-your-project}/ios" folder and run pod install to compile the dependencies.
ATTENTION: WORK IN PROGRESS FOR NOTIFICATION CONTENT EXTENSION
Using Firebase Services (Optional) #
To activate the Firebase Cloud Messaging service, please follow these steps:
Android #
First things first, to create your Firebase Cloud Message and send notifications even when your app is terminated (killed), go to the Firebase Console and create a new project.
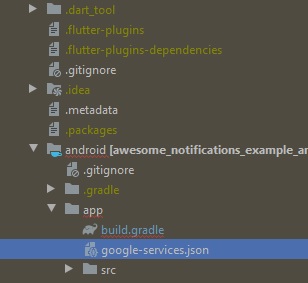
After that, go to "Cloud Messaging" option and add an "Android app", put the packge name of your project (certifies to put the correct one) to generate the file google-services.json.
Download the file and place it inside your [app]/android/app/ folder.
Add the classpath to the [project]/android/build.gradle file. (Firebase ones was already added by the plugin)
dependencies {
    classpath 'com.android.tools.build:gradle:3.5.0'
    // Add the google services classpath
    classpath 'com.google.gms:google-services:4.3.3'
}
Add the apply plugin to the [project]/android/app/build.gradle file.
// ADD THIS AT THE BOTTOM
apply plugin: 'com.google.gms.google-services'
dependencies {
    classpath 'com.android.tools.build:gradle:3.5.0'
    // Add the google services classpath
    classpath 'com.google.gms:google-services:4.3.3'
}
iOS #
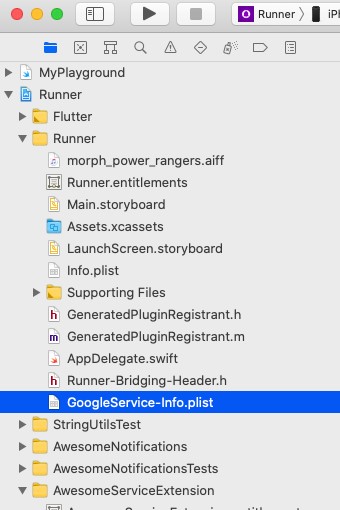
Go to "Cloud Messaging" option and add an "iOS app", put the packge name of your project (certifies to put the correct one) to generate the file GoogleService-info.plist.
Download the file and place it inside your [app]/ios/Runner/ folder using XCode. (Do not use Finder to copy and paste the file)
Firebase Token #
The firebase token is necessary to your sever send Push Notifications to the remote device. The token could eventually change and is created to every device installation on each application.
Every token created could be captured on Flutter by this plugin listen to tokenStream.
Notification Life Cycle #
Notifications are received by local code or Push service using native code, so the messages will appears immediately or at schedule time, independent of your application state.
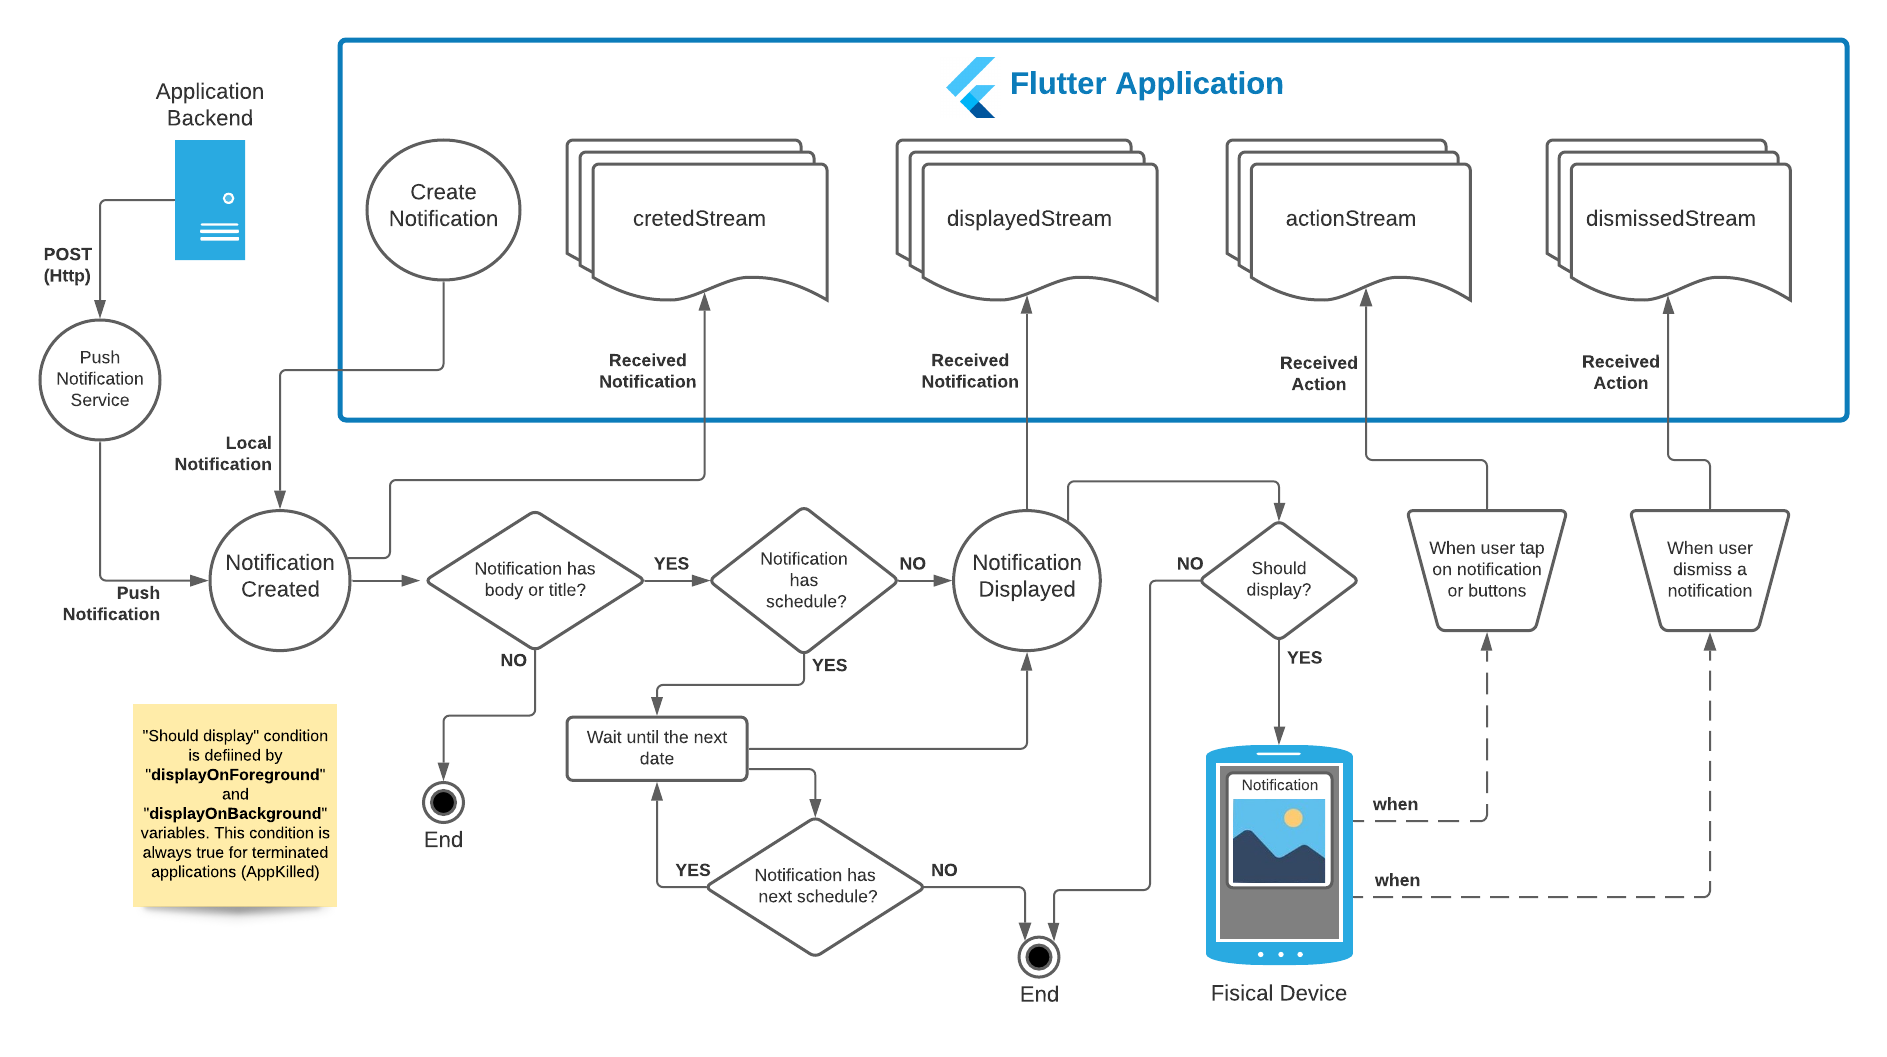
Flutter Streams #
The Flutter code will be called as soon as possible using Dart Streams.
createdStream: Fires when a notification is created displayedStream: Fires when a notification is displayed on system status bar actionStream: Fires when a notification is tapped by the user dismissedStream: Fires when a notification is dismissed by the user
| Platform | App in Foreground | App in Background | App Terminated (Killed) |
|---|---|---|---|
| Android | Fires all streams immediately after occurs | Fires all streams immediately after occurs | Fires createdStream, displayedStream and dismissedStream after the plugin initializes on Foreground, but fires actionStream immediately after occurs |
| iOS | Fires all streams immediately after occurs | Fires createdStream, displayedStream and dismissedStream after the app returns to Foreground, but fires actionStream immediately after occurs |
Fires createdStream, displayedStream and dismissedStream after the plugin initializes on Foreground, but fires actionStream immediately after occurs |
Notification Structures #
Notification Layout Types #
To show any images on notification, at any place, you need to include the respective source prefix before the path.
Layouts can be defined using 4 prefix types:
- Default: The default layout. Also is the layout used in case of any failure found on other ones
- BigPicture: Is the layout that shows a big picture and/or a small image.
- BigText: Is the layout that shows more than 2 lines of text.
- Inbox: Is the layout who lists messages or items separated by lines
- ProgressBar: Is the layout that shows a progress bar, such as download progress bar
- Messaging: (in construction)
- MediaPlayer: Is the layout that shows a media controller with action buttons, that allows the user to send commands without brings the application to foreground.
Media Source Types #
To show any images on notification, at any place, you need to include the respective source prefix before the path.
Images can be defined using 4 prefix types:
- Asset: images access through Flutter asset method. Example: asset://path/to/image-asset.png
- Network: images access through internet connection. Example: http(s)://url.com/to/image-asset.png
- File: images access through files stored on device. Example: file://path/to/image-asset.png
- Resource: images access through drawable native resources. On Android, those files are stored inside [project]/android/app/src/main/drawabe folder. Example: resource://drawable/res_image-asset.png
OBS: Unfortunately, icons and sounds can be only resource media types.
OBS 2: To protect your native resources on Android against minification, please include the prefix "res_" in your resource file names. The use of the tag shrinkResources false inside build.gradle or the command flutter build apk --no-shrink is not recommended.
To know more about it, please visit Shrink, obfuscate, and optimize your app
Notification Action Button Types #
Notifications action buttons could be classified in 4 types:
- Default: after user taps, the notification bar is closed and an action event is fired.
- InputField: after user taps, a input text field is displayed to capture input by the user.
- DisabledAction: after user taps, the notification bar is closed, but the respective action event is not fired.
- KeepOnTop: after user taps, the notification bar is not closed, but an action event is fired.
| Android | App in Foreground | App in Background | App Terminated (Killed) |
|---|---|---|---|
| Default | keeps the app in foreground | brings the app to foreground | brings the app to foreground |
| InputField | keeps the app in foreground | brings the app to foreground | brings the app to foreground |
| DisabledAction | keeps the app in foreground | keeps the app in background | keeps the app terminated |
| KeepOnTop | keeps the app in foreground | keeps the app in background | keeps the app terminated |
If the app is terminated (killed):
- Default: Wake up the app.
- InputField: Wake up the app.
- DisabledAction: Does not Wake up the app.
- KeepOnTop: Does not Wake up the app.
Scheduling a notification #
Notifications could be scheduled as you wish using two main options:
- initialDate: (YYYY-MM-DD hh:mm:ss) The initial date that schedule should be called by first time. This option has the highest priority among other options.
- crontabSchedule: Crontab expression as repetition rule (with seconds precision), as described in this article
- allowWhileIdle: Determines if notification will send, even when the device is in critical situation, such as low battery.
- preciseSchedule: List of precise dates to schedule a notification multiple times. This option has the lowest priority among other options.
OBS: All dates are set to use UTC timezone.
How to send Push Notifications using Firebase Cloud Messaging (FCM) #
To send a notification using Awesome Notifications and FCM Services, you need to send a POST request to the address https://fcm.googleapis.com/fcm/send. Due to limitations on Android and iOS, you should send a empty notification field and use only the data field to send your data, as bellow:
OBS: actionButtons and schedule are optional
OBS 2: you should not implement any native code to use FCM with Awesome Notifications. All of then was already implemented inside the plugin.
{
    "to" : "[YOUR APP TOKEN]",
    "mutable_content" : true,
    "notification": {
        "title": " "
    },
    "data" : {
        "content": {
            "id": 100,
            "channelKey": "big_picture",
            "title": "Huston!\nThe eagle has landed!",
            "body": "A small step for a man, but a giant leap to Flutter's community!",
            "notificationLayout": "BigPicture",
            "largeIcon": "https://avidabloga.files.wordpress.com/2012/08/emmemc3b3riadeneilarmstrong3.jpg",
            "bigPicture": "https://www.dw.com/image/49519617_303.jpg",
            "showWhen": true,
            "autoCancel": true,
            "privacy": "Private"
        },
        "actionButtons": [
            {
                "key": "REPLY",
                "label": "Reply",
                "autoCancel": true,
                "buttonType":  "InputField",
            },
            {
                "key": "ARCHIVE",
                "label": "Archive",
                "autoCancel": true
            }
        ],
        "schedule": {
            "initialDateTime": "2020-08-30 11:00:00",
            "crontabSchedule": "5 38 20 ? * MON-FRI *",
            "allowWhileIdle": true,
            "preciseSchedules": []
        }
    }
}
You can download a example of how to send Push Notifications through FCM using "Postman" here
Error: "Invalid notification content" #
The notification sent via FCM services MUST respect the types of the respective Notification elements. Otherwise, your notification will be discarded as invalid one. Also, all the payload elements MUST be a String, as the same way as you do in Local Notifications using dart code.
Notification types, values and defaults #
NotificationContent ("content" in Push data) - (required) #
| Attribute | Required | Description | Type | Value Limits | Default value |
|---|---|---|---|---|---|
| id | YES | Number that identifies a unique notification | int | 1 - 2.147.483.647 | -1 |
| channelKey | YES | String key that identifies a channel where not. will be displayed | String | channel must be enabled | basic_channel |
| title | NO | The title of notification | String | unlimited | |
| body | NO | The body content of notification | String | unlimited | |
| summary | NO | A summary to be displayed when the content is protected by privacy | String | unlimited | |
| showWhen | NO | Hide/show the time elapsed since notification was displayed | bool | true or false | true |
| largeIcon | NO | Large icon displayed at right middle of compact notification | String | unlimited | |
| bigPicture | NO | Big image displayed on expanded notification | String | unlimited | |
| autoCancel | NO | Notification should auto cancel when gets tapped by the user | bool | true or false | true |
| color | NO | Notification text color | Color | 0x00000000 to 0xFFFFFFFF | 0xFF000000 (Colors.black) |
| backgroundColor | NO | Notification background color | Color | 0x00000000 to 0xFFFFFFFF | 0xFFFFFFFF (Colors.white) |
| payload | NO | Hidden payload content | Map<String, String> | Only String for values | null |
| notificationLayout | NO | Layout type of notification | Enumerator | NotificationLayout | Default |
| hideLargeIconOnExpand | NO | Hide/show the large icon when notification gets expanded | bool | true or false | false |
| locked | NO | Blocks the user to dismiss the notification | bool | true or false | false |
| progress | NO | Current value of progress bar (percentage). Null for indeterminate. | int | 0 - 100 | null |
| ticker | NO | Text to be displayed on top of the screen when a notification arrives | String | unlimited |
NotificationActionButton ("actionButtons" in Push data) - (optional) #
- Is necessary at least one *required attribute
| Attribute | Required | Description | Type | Value Limits | Default value |
|---|---|---|---|---|---|
| key | YES | Text key to identifies what action the user took when tapped the notification | String | unlimited | |
| label | *YES | Text to be displayed over the action button | String | unlimited | |
| icon | *YES | Icon to be displayed inside the button | String | must be a resource image | |
| enabled | NO | On Android, deactivates the button. On iOS, the button disappear | bool | true or false | true |
| autoCancel | NO | Notification should auto cancel when gets tapped by the user | bool | true or false | true |
| buttonType | NO | Button action response type | Enumerator | ActionButtonType | Default |
NotificationScheduleModel ("schedule" in Push data) - (optional) #
- Is necessary at least one *required attribute
- Cron expression must respect the format (with seconds precision) as described in this article
| Attribute | Required | Description | Type | Value Limits | Default value |
|---|---|---|---|---|---|
| initialDateTime | *YES | Mandatory initial notification fire date | String (YYYY-mm-dd HH:mi:ss) | UTC valid date | |
| crontabSchedule | *YES | Repetition cron rule expression | Cron expression | valid cron expression | |
| allowWhileIdle | NO | Displays the notification, even when the device is low battery | bool | true or false | false |
| preciseSchedule | *YES | List of precise notification fire dates | List | UTC valid dates |
Metadata
Publisher
Metadata
A complete solution to create Local Notifications and Push Notifications (Media Notifications, Big Picture, Big text, etc), through Firebase or another services, using Flutter.
Repository (GitHub)
View/report issues
License
![]() unknown (license)
unknown (license)