Pal - Flutter onboarding and messages plugin
- Create guide tours for new users
- Ask questions and get feedbacks from your users
- Inform about what’s new in your update
- Improve your onboardings and app experience using analytics

📱 How it works ?
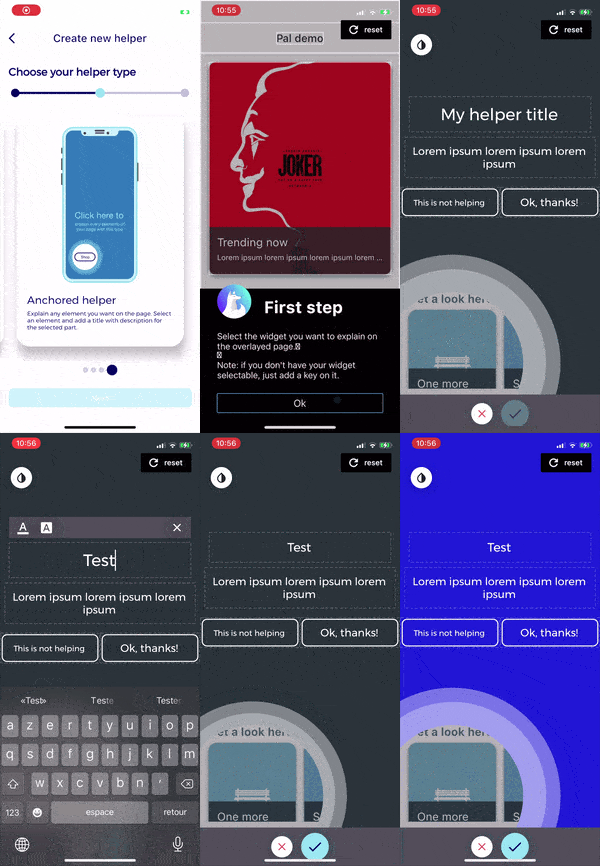
No code editor for all your app screens directly in your app
- Go to a screen where you want to add helper.
- Select your helper type.
- Select and customize your theme.
Pal is splitted in two modes
- Editor, create & manage helpers.
- Client, all created helpers are displayed here.
Editor mode flow
- Navigate to the screen you want to show your helper.
- Choose how it should trigger (on first visit, on new update...)
- Create the helper you want with all texts, colors, fonts...
- Publish!
Client mode flow
- Fetch all onboarding on application start.
- Trigger an onboarding each time we detect anything that you configured for.
- Don't show an helper again if user has already seen it.
That's it !
🚀 Getting started
- Create an administration account here.
- Create a new project in your dashboard.
- Get your token & save it for later.

Install on your flutter application now
- Add Pal dependency
dependencies:
  ...
  pal: ^latest_version
- Import Pal in the
main.dart
import 'package:palplugin/palplugin.dart';
- Wrap your app with Pal
void main() => runApp(MyApp());

class MyApp extends StatelessWidget {
  final _navigatorKey = GlobalKey<NavigatorState>();

  @override
  Widget build(BuildContext context) {
    return Pal(
      editorModeEnabled: true,
      appToken: 'REPLACE_WITH_YOUR_APP_TOKEN',
      // --------------------
      // YOUR APP IS HERE
      childApp: MaterialApp(
        navigatorKey: _navigatorKey,
        navigatorObservers: [PalNavigatorObserver.instance()],
        home: YourApp(),
      ),
      // --------------------
    );
  }
}
For GetX users:
class GetXMyApp extends StatelessWidget {
  @override
  Widget build(BuildContext context) {
    return Pal.fromAppBuilder(
      navigatorKey: navigatorKey,
      editorModeEnabled: false,
      appToken: 'MY_APP_TOKEN_HERE',
      childAppBuilder: (context) => GetMaterialApp(
        navigatorKey: navigatorKey,
        title: 'Pal Plugin Demo',
        navigatorObservers: [PalNavigatorObserver.instance()],
        onGenerateRoute: routes,
      ),
    );
  }
}
🔥 Configure Events
You can manually specify events within your code so we can use them to let you configure hints with editor.
Push a page
(If you use named route, you don't need to use this as we recognize automatically new pages)
PalEvents.instance().pushPage(String routeName, {Map<String, String> arguments});
🎥 Youtube Videos
✨ Parameters
| Param | Type | Description | Required | Default |
|---|---|---|---|---|
| childApp | Widget |
your application. | ✅ | |
| navigatorKey | GlobalKey<NavigatorState> |
a reference to the navigator key of your application | childApp.navigatorKey |
|
| navigatorObserver | PalNavigatorObserver |
used to manage state of current page | childApp.navigatorObservers first entry |
|
| editorModeEnabled | bool |
enable or Disable the editor mode | true |
|
| textDirection | TextDirection |
text direction of your application | TextDirection.ltr |
|
| appToken | String |
the app token created from the admin | ✅ |
🙋♂️🙋♀️ Questions
Why I'm getting an error PageCreationException: EMPTY_ROUTE_PROVIDED when creating a new helper?
When you push a new route, you always need to give it an unique name if you use .push(....).
We recommend you to use .pushNamed(...) method (by using it, Pal know automatically the route name without specified it). But if you prefer using .push(...) instead, you have to create RouteSettings like this:
Navigator.push(
  context,
  MaterialPageRoute(
    settings: RouteSettings(
      name: 'page1', // <- Type here an unique route name
    )),
    builder: (context) => YourNewPage(),
);
Why don't I see all my items as selectable when I create an anchored helper?
To detect any widget and get it back in your application we needs you to add a key on every widget you want to be selectable. For exemple to detect a container :
...
Container(
  key: ValueKey("myContainerKey"),
  ...
)
📣 Author

Initiated and sponsored by Apparence.io.


