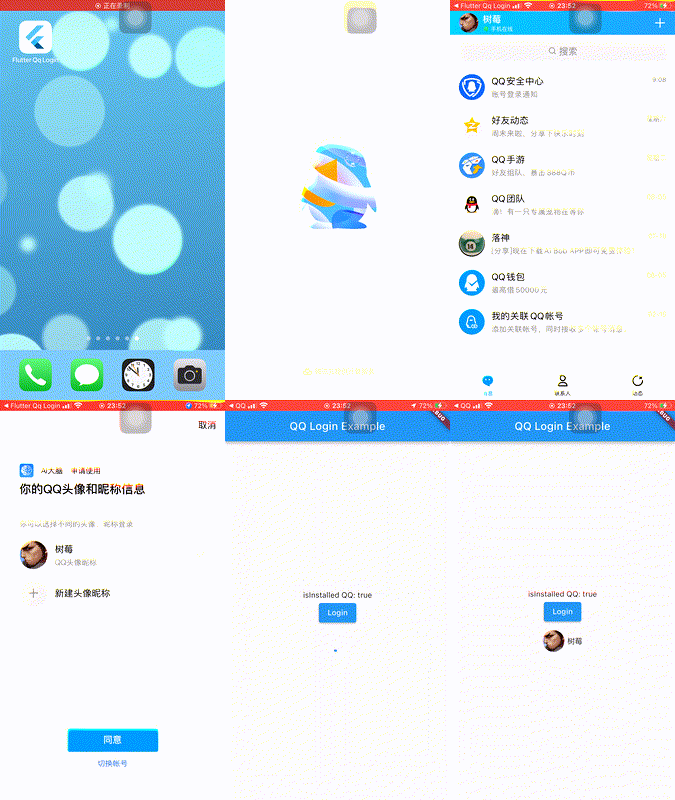
flutter_qq_login
Flutter QQ Login Plugin
| Android | iOS | |
|---|---|---|
| Support | SDK 19+ | 11.0+ |


Features
This plugin has integrated the function of QQ login:
- Determine whether the QQ APP has been installed
isQQInstalled() - The data obtained after successful login, including
OpenId,AccessTokenand other important data - Get user information
getUserInfo()
Getting Started
Before using this plugin, it is strongly recommended to read the official documentation in detail
Usage
import 'package:flutter_qq_login/flutter_qq_login.dart';

// Create FlutterQqLogin
final flutterQqLogin = FlutterQqLogin();

// Initialization, please fill in the APP application ID created by QQ Internet
flutterQqLogin.init(appId: "Your APPID");

// Determine whether the QQ application is currently installed
bool isInstalled = await flutterQqLogin.isInstalled();

// Call up QQ login, return OpenId, AccessToken and other important data after successful login
Map<String, dynamic> qqInfo = await flutterQqLogin.login();

// Get user information
Map<String, dynamic> userInfo = await flutterQqLogin.getUserInfo(qqInfo['access_token'], qqInfo['openid']);
Interface login() status code description
- Normally, the interface will at least return the
retproperty:0authorization login successful, and there must be important data such asaccessTokenat this time-1authorization login failed, unable to obtainaccessTokenand other important data-2cancel login authorization (that is, after jumping to QQ, click cancel and then jump back)-3network exception
Configure Android version
Configure android/app/build.gradle
android {
    ...

    defaultConfig {
        ...
        minSdkVersion 19
        ...
    }

}
Configure android/app/src/main/AndroidManifest.xml
<manifest xmlns:android="http://schemas.android.com/apk/res/android">
	<!-- new content start -->
	<uses-permission android:name="android.permission.INTERNET" />
	<uses-permission android:name="android.permission.ACCESS_NETWORK_STATE" />
	<!-- new content end -->
	<application>
		...
		<!-- new content start -->
		<activity
            android:name="com.tencent.tauth.AuthActivity"
            android:noHistory="true"
            android:launchMode="singleTask"
            android:exported="true">
            <intent-filter>
                <action android:name="android.intent.action.VIEW" />
                <category android:name="android.intent.category.DEFAULT" />
                <category android:name="android.intent.category.BROWSABLE" />
                <data android:scheme="Your APPID" />
            </intent-filter>
        </activity>
        <activity
            android:name="com.tencent.connect.common.AssistActivity"
            android:configChanges="orientation|keyboardHidden"
            android:screenOrientation="behind"
            android:theme="@android:style/Theme.Translucent.NoTitleBar" />
		<!-- new content end -->
		...
	</application>
	<!-- new content start -->
	<queries>
		<package android:name="com.tencent.mobileqq" />
	</queries>
	<!-- new content end -->
</manifest>
Configure iOS version
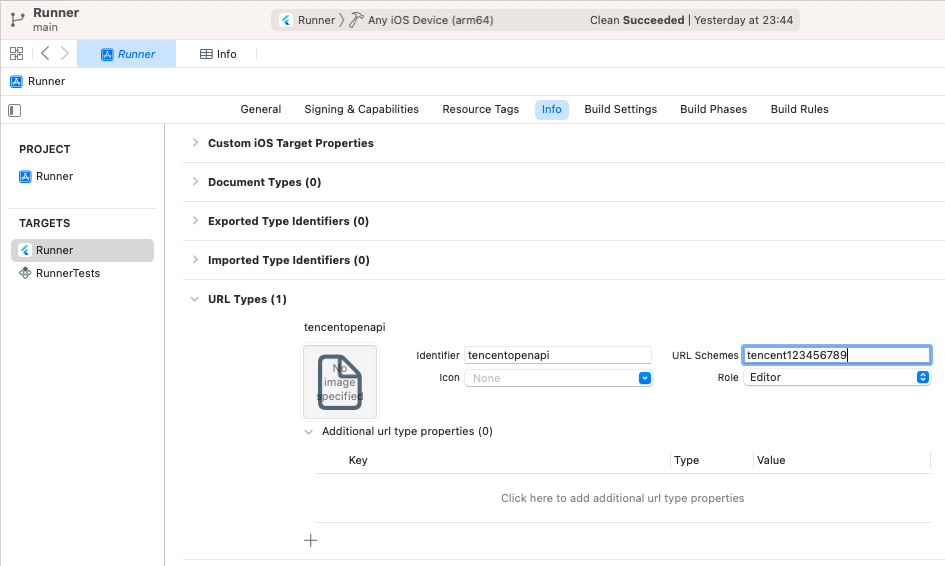
Configure URL Types
- Use
xcodeto open your iOS projectRunner.xcworkspace - In the
infoconfiguration tab underURL Types, add a new entryidentifierfills intencentopenapiURL Schemesfill intencent123456789, where123456789is yourAPPID- As shown below:

Configure LSApplicationQueriesSchemes
-
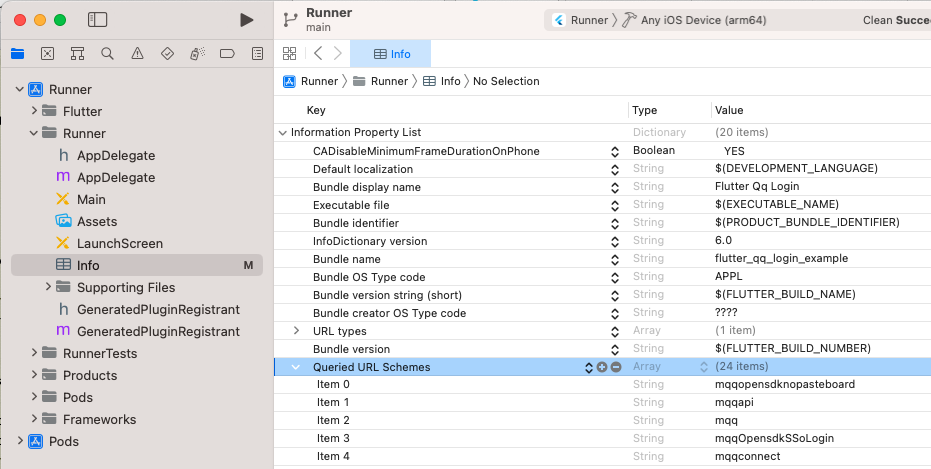
Method 1, configure
infoinxcode- Open
infoconfiguration, add aLSApplicationQueriesSchemes, namelyQueried URL Schemes - Add these items:
- mqqopensdknopasteboard
- mqqapi
- mqq
- mqqOpensdkSSoLogin
- mqqconnect
- mqqopensdkdataline
- mqqopensdkgrouptribeshare
- mqqopensdkfriend
- mqqopensdkapi
- mqqopensdkapiV2
- mqqopensdkapiV3
- mqzoneopensdk
- wtloginmqq
- wtloginmqq2
- mqqwpa
- mqzone
- mqzonev2
- mqzoneshare
- wtloginqzone
- mqzonewx
- mqzoneopensdkapiV2
- mqzoneopensdkapi19
- mqzoneopensdkapi
- mqzoneopensdk
- As shown below:

- Open
-
Method 2, modify
Info.plistdirectly- Use
Android Studioto openios/Runner/Info.plistunder the project project - Add the following configuration under the
dictnode (refer to the configuration format in the file):
- Use
<key>LSApplicationQueriesSchemes</key>
<array>
	<string>mqqopensdknopasteboard</string>
	<string>mqqapi</string>
	<string>mqq</string>
	<string>mqqOpensdkSSoLogin</string>
	<string>mqqconnect</string>
	<string>mqqopensdkdataline</string>
	<string>mqqopensdkgrouptribeshare</string>
	<string>mqqopensdkfriend</string>
	<string>mqqopensdkapi</string>
	<string>mqqopensdkapiV2</string>
	<string>mqqopensdkapiV3</string>
	<string>mqzoneopensdk</string>
	<string>wtloginmqq</string>
	<string>wtloginmqq2</string>
	<string>mqqwpa</string>
	<string>mqzone</string>
	<string>mqzonev2</string>
	<string>mqzoneshare</string>
	<string>wtloginqzone</string>
	<string>mqzonewx</string>
	<string>mqzoneopensdkapiV2</string>
	<string>mqzoneopensdkapi19</string>
	<string>mqzoneopensdkapi</string>
	<string>mqzoneopensdk</string>
</array>
Donate
Buy the writer a cup of coffee


LICENSE
BSD 3-Clause License

Copyright 2017 German Saprykin
All rights reserved.

Redistribution and use in source and binary forms, with or without
modification, are permitted provided that the following conditions are met:

* Redistributions of source code must retain the above copyright notice, this
  list of conditions and the following disclaimer.

* Redistributions in binary form must reproduce the above copyright notice,
  this list of conditions and the following disclaimer in the documentation
  and/or other materials provided with the distribution.

* Neither the name of the copyright holder nor the names of its
  contributors may be used to endorse or promote products derived from
  this software without specific prior written permission.

THIS SOFTWARE IS PROVIDED BY THE COPYRIGHT HOLDERS AND CONTRIBUTORS "AS IS"
AND ANY EXPRESS OR IMPLIED WARRANTIES, INCLUDING, BUT NOT LIMITED TO, THE
IMPLIED WARRANTIES OF MERCHANTABILITY AND FITNESS FOR A PARTICULAR PURPOSE ARE
DISCLAIMED. IN NO EVENT SHALL THE COPYRIGHT HOLDER OR CONTRIBUTORS BE LIABLE
FOR ANY DIRECT, INDIRECT, INCIDENTAL, SPECIAL, EXEMPLARY, OR CONSEQUENTIAL
DAMAGES (INCLUDING, BUT NOT LIMITED TO, PROCUREMENT OF SUBSTITUTE GOODS OR
SERVICES; LOSS OF USE, DATA, OR PROFITS; OR BUSINESS INTERRUPTION) HOWEVER
CAUSED AND ON ANY THEORY OF LIABILITY, WHETHER IN CONTRACT, STRICT LIABILITY,
OR TORT (INCLUDING NEGLIGENCE OR OTHERWISE) ARISING IN ANY WAY OUT OF THE USE
OF THIS SOFTWARE, EVEN IF ADVISED OF THE POSSIBILITY OF SUCH DAMAGE.