Dynatrace Flutter Plugin
The Dynatrace Flutter plugin adds the Dynatrace OneAgent for Android and iOS to your Flutter app and provides an API to use manual instrumentation for Flutter/Dart data capturing.
Requirements
- Flutter Version >= 3.10.0
- Dart Version >= 3.0.0
- Gradle: >= 7.x
- Android API Level >= 21
- Java >= 11
- iOS SDK >= 12
Agent Versions
These agent versions are configured in this plugin:
- Android Agent: 8.325.1.1007
- iOS Agent: 8.325.1.1012
Important Notes
After installing the Dynatrace Flutter plugin via the quick setup section, please follow the manual instrumentation API section as this implementation will be required to capture actions based on Flutter layer, i.e. widgets like buttons or gestures/user input.
For information on what is automatically captured in the native Android/iOS layer of your application, please see our native layer section.
New with version 3.x
- Supported Web Request Framework: Dart's http package
- See DynatraceHttpClient for more information.
- Removal of auto-instrumented http requests via the
dart:iolibrary- See our Migration Guide.
Quick Setup
Startup
Advanced topics
- Native layer
- Manual instrumentation
- Create Custom Action
- Create Custom Sub Action
- Report Values and Errors
- DynatraceHttpClient
- Request & Response size calculation
- Manual Web Request Monitoring
- URL exclusion list
- Identify a User
- Capture Zone Errors using startWithoutWidget
- Crash Reporting
- Report Crashes from Isolates
- User Privacy Options
- Report GPS Position
- Business events capturing
- Platform independent reporting
- New RUM experience preview
- Webrequest behavior
- Navigation Observer
- go_router
- Customize Configuration
- Configuration structure
- Maven Central in top-level gradle file
- Migration Guide
- Instrumentation Overhead
Troubleshooting
Quick Setup
1. Install the plugin
Inside the app folder execute:
flutter pub add dynatrace_flutter_plugin
After adding the dependency, resolve any dependencies if it hasn't happened automatically.
- From the terminal, run
flutter pub get. - From Android Studio/IntelliJ, click Packages get in the action ribbon at the top of
pubspec.yaml. - From VS Code, click Get Packages located to the right of the action ribbon at the top of
pubspec.yaml.
2. Set up dynatrace.config.yaml
- Create a mobile app in Dynatrace and open Mobile app settings. Go to Flutter configuration and download the configuration
dynatrace.config.yaml. Store it in the root folder of your application. - Run
dart run dynatrace_flutter_pluginin the root of your Flutter project. This configures both Android and iOS projects with settings fromdynatrace.config.yaml.- If you want to see more logging or customize some paths via custom arguments while executing the command.
💡 Note: You need to execute this script every time you change something in your
dynatrace.config.yamlto apply the config to the Android and iOS projects.
Data collection
By default, the user opt-in mode is activated in the configuration. This means that OneAgent only sends a limited number of actions until you change the privacy mode.
3. Start the Flutter plugin
There are two start options to run our Flutter plugin. The Flutter plugin starts only when you directly call it via start() or startWithoutWidget().
start({Configuration configuration}) takes an optional configuration object to customize the behavior of the plugin. This configuration parameter can only be used for manual startup. You can provide values such as beaconUrl or applicationId at runtime. runApp() is called internally.
startWithoutWidget({Configuration configuration}) is similar to start({Configuration configuration}). The two differences are that it does not call runApp() internally (that is controlled by you) and zoned errors will not be captured automatically. However, uncaught errors will be captured by default. You should see the following in your application:
void main() => runApp(MyApp());
Replace it with one of the following statements:
Option 1:
import 'package:dynatrace_flutter_plugin/dynatrace_flutter_plugin.dart';

void main() => Dynatrace().start(MyApp());
Option 2:
import 'package:dynatrace_flutter_plugin/dynatrace_flutter_plugin.dart';

void main() {
  Dynatrace().startWithoutWidget();
  runApp(MyApp());
}
4. Build and run your app
Before running your app, please see important notes relating to capturing Flutter/Dart user actions.
Call flutter run and the application starts including Dynatrace OneAgent.
Startup
Plugin startup
The startup of the plugin is triggered via the start(Widget _topLevelWidget, {Configuration? configuration}) method. Without the start-up call, the plugin doesn't send data that is coming from the Flutter app part. The optional configuration parameters should only be used when doing a manual startup. The available options which are offered by the Configuration constructor are listed in the following table:
Configuration(
  reportCrash: true,
  logLevel: LogLevel.Info,
  beaconUrl,
  applicationId,
  certificateValidation: true;
  userOptIn: false;
)
| Property name | Type | Default | Description |
|---|---|---|---|
| reportCrash | bool | true | Reports automatically Dart and Flutter crashes. |
| logLevel | LogLevel | LogLevel.Info | Allows you to choose between LogLevel.Info and LogLevel.Debug. Debug returns more logs. This is especially important when something is not functioning correctly. |
| beaconUrl | String | (Required) Identifies your environment within Dynatrace. This property is mandatory for manual startup. OneAgent issues an error when the key isn't present. | |
| applicationId | String | (Required) Identifies your mobile app. This property is mandatory for manual startup. OneAgent issues an error when the key isn't present. | |
| certificateValidation | bool | true | Allows the use of self-signed certificates. By default, it is set to true. When set to false, OneAgent accepts self-signed certificates that are not signed by a root-CA. This configuration key doesn't impact mobile app connections. It's only used for OneAgent communication, but doesn't overrule the host-name validation. |
| userOptIn | bool | false | Activates the privacy mode when set to true. User consent must be queried and set. The privacy settings for user privacy options can be changed via OneAgent SDK for Mobile as described under Data privacy. The default value is false. |
Note: The values used for the parameters are their default value.
⚠️ Attention: Please use those parameters only when doing a manual startup. If you want to do an automated startup, please configure the properties via the auto startup configuration. You will find a list which explains all the counterparts for the available options here.
An example could look like the following:
import 'package:dynatrace_flutter_plugin/dynatrace_flutter_plugin.dart';

void main() => Dynatrace().start(MyApp(), Configuration: Configuration(logLevel: LogLevel.Debug));
Manual OneAgent Startup
If automated startup via dynatrace.config.yaml isn't possible or desired, you can manually start the Dynatrace OneAgent and configure values like beaconUrl and applicationId at runtime.
⚠️ Important: Automated startup captures early lifecycle events, such as the application start. Manual startup occurs later, meaning those early events (including app start) will be missed until the agent is initialized.
Steps for Manual Startup
- Disable automated startup in
dynatrace.config.yaml:
android:
  config:
    "dynatrace {
      configurations {
        defaultConfig {
          autoStart.enabled false
        }
      }
    }"

ios:
  config:
    "<key>DTXAutoStart</key>
    <false/>"
- Start the agent manually with at least
beaconUrlandapplicationId:
import 'package:dynatrace_flutter_plugin/dynatrace_flutter_plugin.dart';

void main() => Dynatrace().start(MyApp(), configuration: Configuration(beaconUrl: "..", applicationId: ".."));
Any values not explicitly set in the Configuration object will fall back to those defined in dynatrace.config.yaml, or to default values if not present there.
💡 Note: If you don’t disable automated startup, the manual configuration will be ignored—even if you call start() with a configuration manually.
Advanced topics
Native layer
When using a native view like an Activity (Android) or View Controller (iOS) with native elements/controls, the Android/iOS agent that is running via the flutter plugin will capture these actions as they would in a native Android/iOS app out of the box. So if autoStart is set to true (default value), then you will likely see a Loading <AppName> action with the lifecycle events inside of the user action waterfall in the captured user session.
For more information on the the Android/iOS agents, please see our documentation section.
Manual instrumentation
To use the API of the Flutter plugin, add the following import at the top of your dart file:
import 'package:dynatrace_flutter_plugin/dynatrace_flutter_plugin.dart';
Create custom actions
To create a custom action named "MyButton tapped", use the following code:
DynatraceRootAction myAction = Dynatrace().enterAction("MyButton tapped");
//Perform the action and whatever else is needed.
myAction.leaveAction();
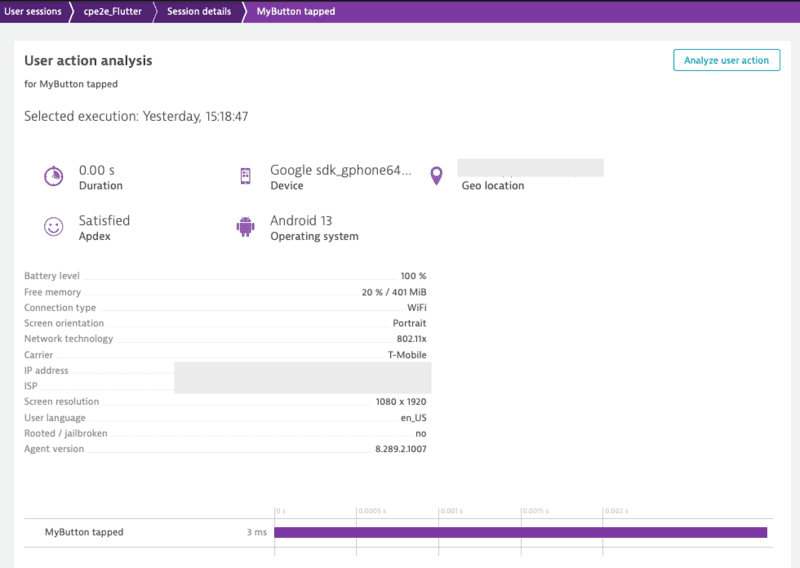
Note: leaveAction closes the action again. To report values for this action before closing, see Report values.
Create custom sub actions
You can create a single custom action and several sub-actions. MyButton Sub Action is automatically put under MyButton tapped. Only one sub-action level is allowed; you can't create a sub sub-action.
DynatraceRootAction myAction = Dynatrace().enterAction("MyButton tapped");
DynatraceAction mySubAction = myAction.enterAction("MyButton Sub Action");

//Perform the action and whatever else is needed.
mySubAction.leaveAction();
myAction.leaveAction();
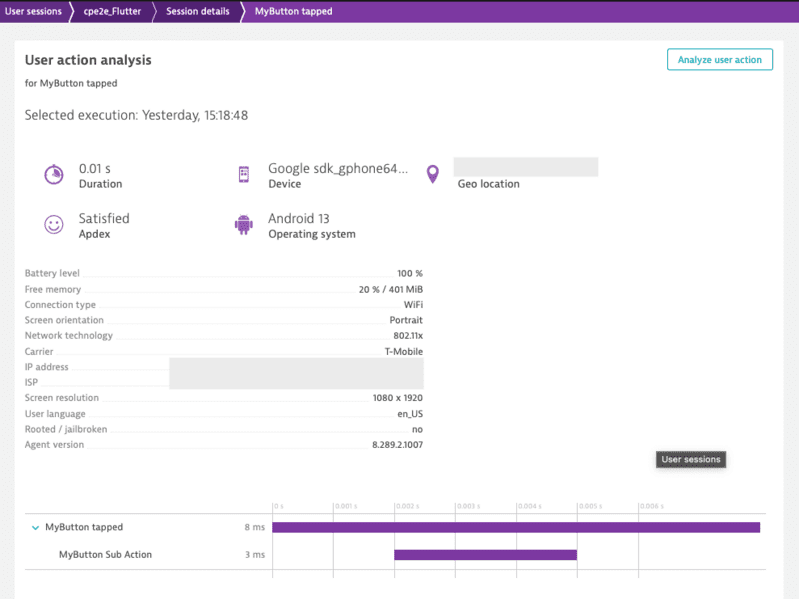
Report values
You can report certain values for any open action. If you want to report a value without action reference skip to the next section. The following API is available for DynatraceRootAction and DynatraceAction:
void reportError(String errorName, int errorCode, {Platform platform})
void reportErrorStacktrace(
      String errorName, String errorValue, String reason, String stacktrace,
      {Platform platform});
void reportEvent(String eventName, {Platform platform})
void reportStringValue(String valueName, String value, {Platform platform})
void reportIntValue(String valueName, int value, {Platform platform})
void reportDoubleValue(String valueName, double value, {Platform platform})
To report a string value, use the following code:
DynatraceRootAction myAction = Dynatrace().enterAction("MyButton tapped");
myAction.reportStringValue("ValueName", "ImportantValue");
myAction.leaveAction();
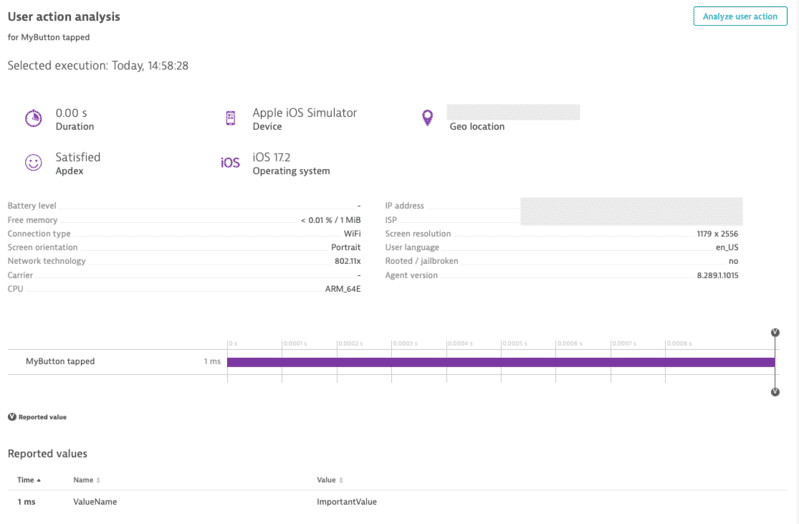
The {Platform platform} optional parameter is available for API calls. This parameter offers the possibility to report values only for a specific platform. For more information, see platform independent reporting.
Report values without action reference
This section shows an API that offers reporting of values directly with the main agent interface. Be aware that those methods are helper methods and are internally attaching the value to the latest opened action. If there is no open action, the value will not be reported.
void reportError(String errorName, int errorCode, {Platform platform})
void reportErrorStacktrace(
      String errorName, String errorValue, String reason, String stacktrace,
      {Platform platform});
void reportEvent(String eventName, {Platform platform})
void reportStringValue(String valueName, String value, {Platform platform})
void reportIntValue(String valueName, int value, {Platform platform})
void reportDoubleValue(String valueName, double value, {Platform platform})
To report a string value, use the following code:
Dynatrace().reportStringValue("ValueName", "ImportantValue");
The {Platform platform} optional parameter is available for API calls. This parameter offers the possibility to report values only for a specific platform. For more information, see platform independent reporting.
Using DynatraceHttpClient
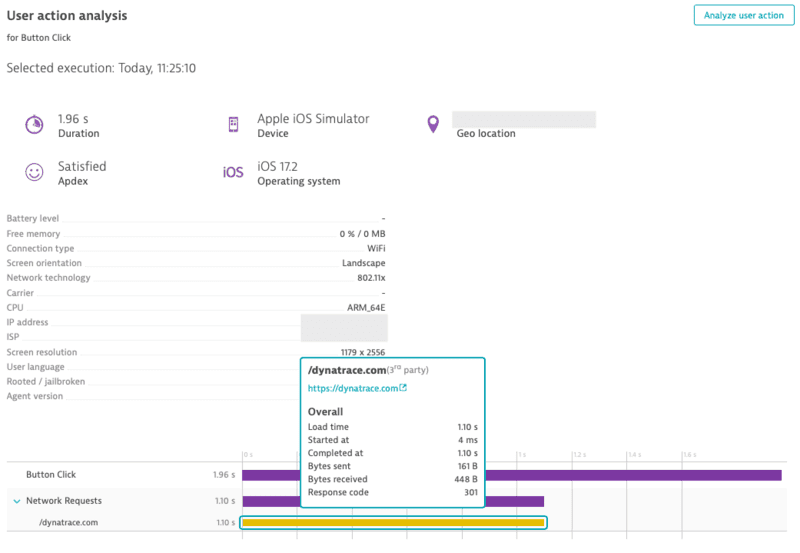
Our Flutter plugin provides a wrapper, DynatraceHttpClient, which can be used to automatically tag and time the web requests that are called. DynatraceHttpClient uses Dart's http package.
How to use our DynatraceHttpClient. The following initialization and usage of the DynatraceHttpClient will monitor the request to https://dynatrace.com.
import 'package:dynatrace_flutter_plugin/dynatrace_flutter_plugin.dart';

var client = Dynatrace().createHttpClient();
DynatraceRootAction webAction =
        Dynatrace().enterAction('Button Click');
try {
  await client.get(Uri.parse('https://dynatrace.com'));
} catch (error) {
  // insert error handling here
} finally {
  webAction.leaveAction();
  client.close();
}
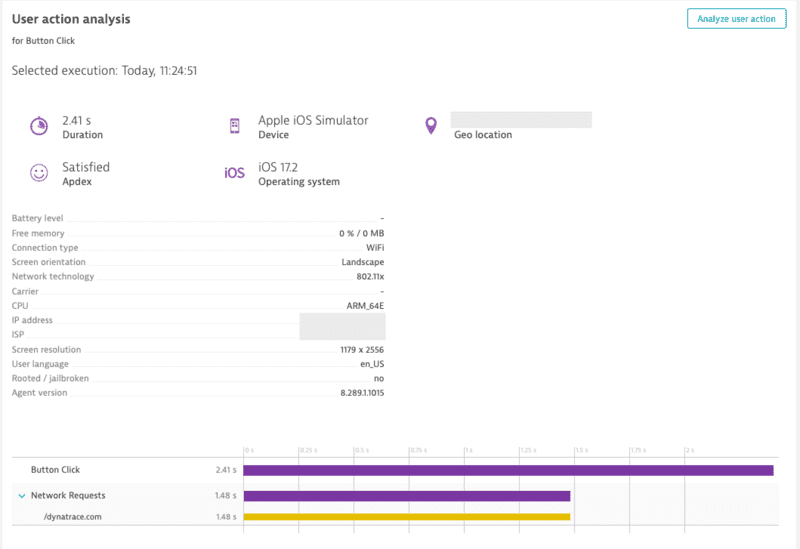
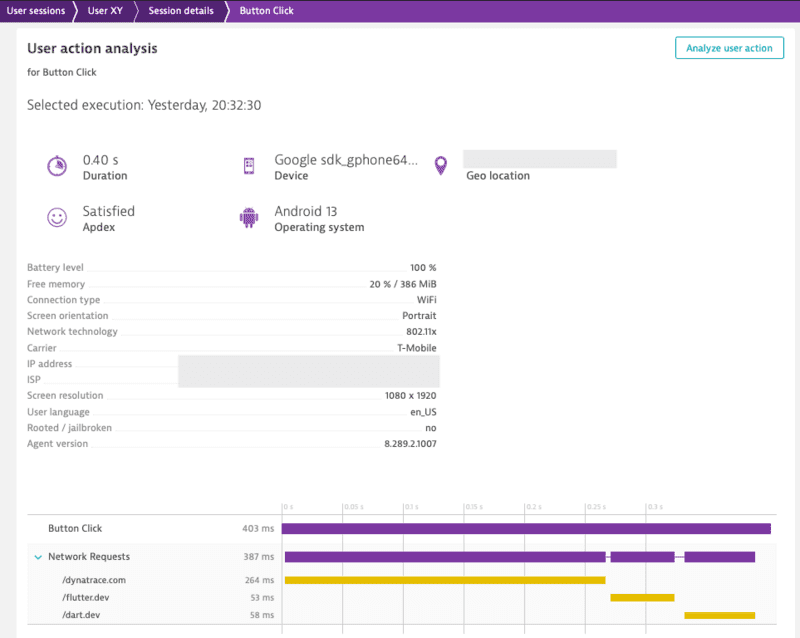
It is also possible to link web requests with a user action. DynatraceHttpClient will automatically link a web request to the current open user action. In the following example, the request to https://dynatrace.com, https://flutter.dev and https://dart.dev will be visible in waterfall analysis of the action Button Click.
var client = Dynatrace().createHttpClient();
DynatraceRootAction webAction =
        Dynatrace().enterAction('Button Click');

try {
  await client.get(Uri.parse('https://dynatrace.com'));
} catch (error) {
  // insert error handling here
}

try {
  await client.get(Uri.parse('https://flutter.dev'));
} catch (error) {
  // insert error handling here
}

try {
  await client.get(Uri.parse('https://dart.dev'));
} catch (error) {
  // insert error handling here
}

webAction.leaveAction();
client.close();
Use your own Client/IOClient/RetryClient from Dart's http package:
Client:
import 'package:dynatrace_flutter_plugin/dynatrace_flutter_plugin.dart';
import 'package:http/http.dart';

final myClient = Client();
var client = Dynatrace().createHttpClient(client: myClient);
DynatraceRootAction webAction =
        Dynatrace().enterAction('Button Click');
try {
  await client.post(Uri.parse('https://dynatrace.com'));
} catch (error) {
  // insert error handling here
} finally {
  webAction.leaveAction();
  client.close();
}
IOClient:
import 'package:dynatrace_flutter_plugin/dynatrace_flutter_plugin.dart';
import 'package:http/io_client.dart';

final ioClient = IOClient();
var client = Dynatrace().createHttpClient(client: ioClient);
DynatraceRootAction webAction =
        Dynatrace().enterAction('Button Click');
try {
  await client.head(Uri.parse('https://dynatrace.com'));
} catch (error) {
  // insert error handling here
} finally {
  webAction.leaveAction();
  client.close();
}
RetryClient:
import 'package:dynatrace_flutter_plugin/dynatrace_flutter_plugin.dart';
import 'package:http/retry.dart';

final retryClient = RetryClient(Client());
var client = Dynatrace().createHttpClient(client: retryClient);
DynatraceRootAction webAction =
        Dynatrace().enterAction('Button Click');
try {
  await client.read(Uri.parse('https://dynatrace.com'));
} catch (error) {
  // insert error handling here
} finally {
  webAction.leaveAction();
  client.close();
}
Request & Response size calculation
The web request instrumentation is by default reporting request and response bytes. This calculation has some limitations, therefore the createHttpClient function allows you to pass DynatraceHttpClientOptions. Per default, the HttpClient will append following headers:
- "Accept-Encoding": "gzip"
- "User-Agent": "Dart/X.X (dart:io)"
These headers are not visible at the request size calculation, but can be modified in the HttpClient (e.g request.headers.removeAll(HttpHeaders.acceptEncodingHeader)). If the header value will be overridden by a different value, our calculation will not be able to consider this as we expect the default header value. For example, if "Accept-Encoding" is removed, use DynatraceHttpClientOptions to get correct values for the request size calculation (see the example below). If headers are changed on request basis and a different "Accept-Encoding" value is appended directly, the calculation will consider this.
import 'package:dynatrace_flutter_plugin/dynatrace_flutter_plugin.dart';
import 'package:http/http.dart';

final myClient = Client();

Map<String, String> _myNewDefaultHeaders = {
  "User-Agent": "Dart/X.X (dart:io)"
};
DynatraceHttpClientOptions _options = DynatraceHttpClientOptions(_myNewDefaultHeaders, []);

var client = Dynatrace().createHttpClient(client: myClient, options: _options);
DynatraceRootAction webAction =
        Dynatrace().enterAction('Button Click');
try {
  await client.post(Uri.parse('https://dynatrace.com'));
} catch (error) {
  // insert error handling here
} finally {
  webAction.leaveAction();
  client.close();
}
Manual Web Request Monitoring
You can manually tag and time your web requests. With the API shown below, you are able to manually capture the web requests of another http framework or override the web request tag (x-dynatrace header value) and add the web request to a specific user action. If you are interested in a more automatic approach, please check out our Using DynatraceHttpClient section.
Note: You should not manually instrument and use our DynatraceHttpClientfor the same web requests. This behavior can lead to incorrect monitoring data.
How to manually instrument http requests:
// DynatraceRootAction and DynatraceAction
Future<WebRequestTiming> createWebRequestTiming(String url);
Future<String> getRequestTag(String url);
String getRequestTagHeader();

// WebRequestTiming
void startWebRequestTiming();
void stopWebRequestTiming(int responseCode, String? responseMessage);
void stopWebRequestTimingWithSize(int responseCode, String? responseMessage, int requestSize, int responseSize);
String getRequestTag();
String getRequestTagHeader();
Example using full manual instrumentation of a web request:
// From dart:io
HttpClient client = HttpClient();
// Create an action
DynatraceRootAction action =
        Dynatrace().enterAction("MyButton tapped - Web Action");

// Create a timing object
WebRequestTiming timing = await action.createWebRequestTiming(url);

final request = await client.getUrl(Uri.parse(url));

if(timing.getRequestTag() != ""){
  // Add headers to the request
  request.headers.set(timing.getRequestTagHeader(), timing.getRequestTag());

  // Start timing the web request
  timing.startWebRequestTiming();
  final response = await request.close();

  // Stop timing
  timing.stopWebRequestTiming(response.statusCode, response.reasonPhrase);
}

// Leave the action
action.leaveAction();
Overriding the web request tag (x-dynatrace header value) to add the web request to a specific user action:
// From dart:io
HttpClient client = HttpClient();
// Create an action
DynatraceRootAction action =
        Dynatrace().enterAction("MyButton tapped - Web Action");

final request = await client.getUrl(Uri.parse(url));

// Add headers to the request
request.headers.set(action.getRequestTagHeader(), await action.getRequestTag(url));

final response = await request.close();

// Leave the action
action.leaveAction();
URL exclusion list
You can set a list of URLs which need to be excluded from web request tracking:
DynatraceHttpClientOptions _options = DynatraceHttpClientOptions(_myNewDefaultHeaders, ['url-to-exclude.com']);
Identify a user
You can identify a user and tag the current session with a name by making the following call:
Dynatrace().identifyUser("User XY");

Capturing Zone Errors when using startWithoutWidget
When using the startWithoutWidget method to start the Dynatrace plugin, zone errors are not caught out of the box and need to be manually added. Here is an example of how you would set this up:
main() {
  runZonedGuarded<Future<void>>(() async {
    Dynatrace().startWithoutWidget();
    runApp(MyApp());
  }, Dynatrace().reportZoneStacktrace);
Crash reporting
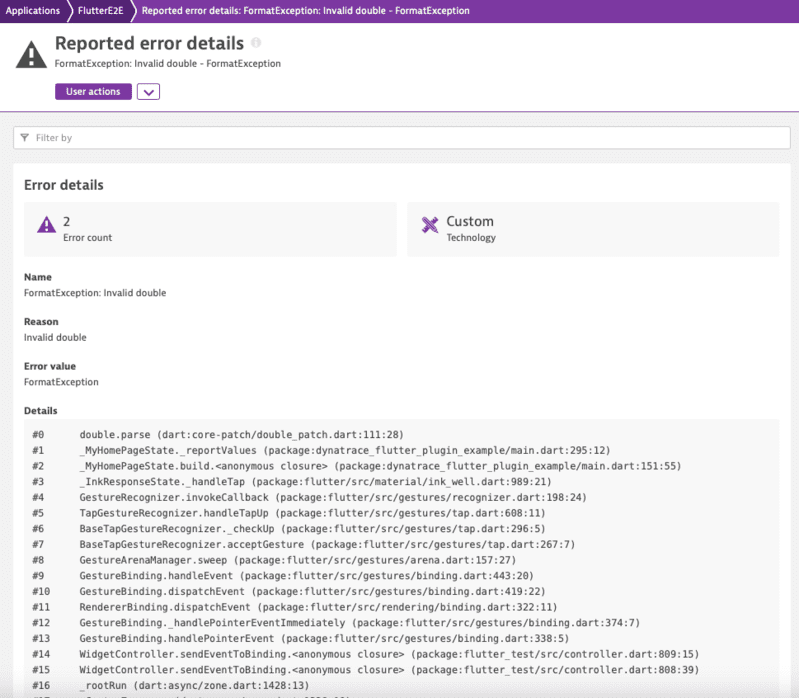
Crash reporting is enabled by default. Mobile OneAgent captures all unhandled exceptions and errors, and then, it immediately sends the error report to the server. To change this behavior via the API, enable user opt-in and set the user privacy options.
To report a crash manually, use the following API on a Dynatrace() instance:
Future<void> reportZoneStacktrace(dynamic error, StackTrace stacktrace);
Future<void> reportCrash(String errorName, String errorMessage, String stacktrace, {Platform platform});
Future<void> reportCrashWithException(String crashName, Exception exceptionObject, {String? reason, Platform? platform, StackTrace? stacktrace});
Examples for the parameters are:
try {
  Fail();
} catch (exception, stacktrace) {
  await reportZoneStacktrace(exception, stacktrace);
}
Report crashes from non main Isolates
Dart Isolates run independently, each with its own memory heap and event loop. To capture errors from a spawned isolate, an error listener must be set up on the spawning isolate's onError ReceivePort.
Isolate.spawn(
    doWork,
    null,
    onError: DynatraceIsolateErrorReceivePort().sendPort,
 );
There is also an extension function available to attach an error listener. But be aware, that errors happening before the listener was attached will not be reported!
final isolate = await Isolate.spawn(doWork, null);
isolate.addDynatraceErrorListener();
User Privacy Options
If you want to use the user privacy options you need to enable the user opt-in. By default, crash reporting is deactivated and the data-collection level is set to off, when enabling user opt-in mode. Based on your user's individual preferences, you can change the privacy settings when the app starts for the first time. Dynatrace doesn't provide a privacy dialog or any similar UI component. You must integrate the consent banner into your app. You must also allow your users to change their privacy settings in the future.
The API to get and set the current user privacy options looks like this:
Future<UserPrivacyOptions> getUserPrivacyOptions({Platform platform})
void applyUserPrivacyOptions(DataCollectionLevel dataCollectionLevel, bool crashReportingOptedIn, {Platform platform});
The privacy API methods allow you to dynamically change the data-collection level based on the individual preferences of your end users. crashReportingOptedIn enables or disables the crash reporting. dataCollectionLevel can be selected from three data-privacy levels:
enum DataCollectionLevel {
    Off,
    Performance,
    UserBehavior
}
- Off: Mobile OneAgent doesn't capture any monitoring data.
- Performance: Mobile OneAgent captures only anonymous performance data. Monitoring data that can be used to identify individual users, such as user tags and custom values, isn't captured.
- UserBehavior: Mobile OneAgent captures both performance and user data. In this mode, Mobile OneAgent recognizes and reports users who re-visit in future sessions.
A call to enable monitoring might look like the following:
Dynatrace().applyUserPrivacyOptions(UserPrivacyOptions(DataCollectionLevel.UserBehavior, true));
Report GPS location
You can report latitude and longitude and specify an optional platform. These coordinates will be used to have Dynatrace calculate the city that is closest to the reported GPS location.
To manually set the coordinates of the user:
void setGPSLocation(double latitude, double longitude, {Platform platform})
For automatic capturing of GPS coordinates please see the platform specific sections below:
Android:
If set to true, auto-instrumentation instruments your LocationListener classes and sends the captured location as metric to the server. The default value is false. To enable this feature to automatically capture location if your application gathers location based on LocationListener use the configuration shown here.
https://www.dynatrace.com/support/help/technology-support/operating-systems/android/legacy-documentation/customization/advanced-settings-for-android-auto-instrumentation/#expand-3762auto-instrumentation-properties
iOS:
Captures the location only if the app uses CLLocationManager and sends the captured location as a metric to the server. The OneAgent SDK for iOS doesn't perform GPS location capturing on its own; it only captures three fractional digits to protect the privacy of the end user. Set the value to false to disable location capturing. The default value is true.
https://www.dynatrace.com/support/help/technology-support/operating-systems/ios/customization/configuration-settings/#expand-3708configuration-keys
Note: When location monitoring is disabled or no location information is available, Dynatrace uses IP addresses to determine the location of the user. For more information, click here.
Business events capturing
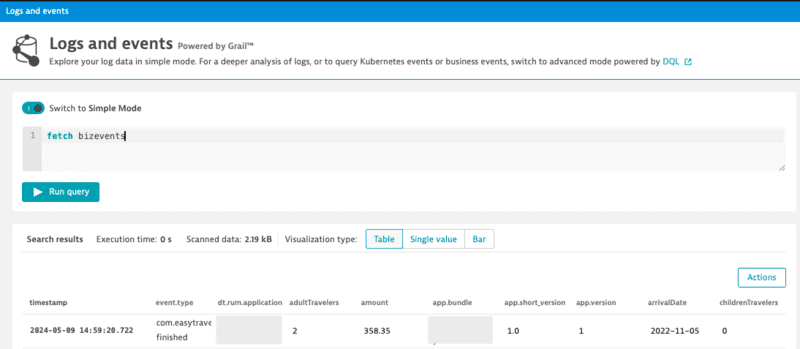
With sendBizEvent, you can report business events. These events are standalone events, as OneAgent sends them detached from user actions or user sessions.
For more information on business events, see dynatrace documentation.
Dynatrace().sendBizEvent("com.easytravel.funnel.booking-finished", {
  "event.name" : "Confirmed Booking",
  "screen": "booking-confirmation",
  "product": "Danube Anna Hotel",
  "amount": 358.35,
  "currency": "USD",
  "reviewScore": 4.8,
  "arrivalDate": "2022-11-05",
  "departureDate": "2022-11-15",
  "journeyDuration": 10,
  "adultTravelers": 2,
  "childrenTravelers": 0
});
Platform independent reporting
Each method has an additional optional parameter named platform of type Platform. Use this parameter to only trigger manual instrumentation for a specific OS. The available values are: Platform.iOS and Platform.Android. By default, it will work on any platform. Otherwise it is passed only to the relevant OS. For example:
- Passing to iOS only:
DynatraceAction myAction = Dynatrace().enterAction("MyButton tapped", Platform.iOS);
//Perform the action and whatever else is needed.
myAction.leaveAction("ios");
- Passing to Android only:
DynatraceAction myAction = Dynatrace().enterAction("MyButton tapped", Platform.Android);
//Perform the action and whatever else is needed.
myAction.leaveAction("android");
- Passing to both:
DynatraceAction myAction = Dynatrace().enterAction("MyButton tapped");
//Perform the action and whatever else is needed.
myAction.leaveAction();
New RUM experience preview
⚠️ Preview Feature: The New RUM Experience APIs are currently in preview and may be subject to changes. These APIs provide enhanced event tracking capabilities with the new Dynatrace RUM on Grail feature.
The New RUM Experience introduces a set of advanced APIs that allow you to send custom events, modify event data, and track views in your Flutter application. These APIs provide more granular control over the data captured by Dynatrace.
For more detailed information about the New RUM Experience, see the Dynatrace documentation.
Send Event
The sendEvent() method allows you to send custom events with arbitrary properties. This is useful for tracking specific user interactions or application state changes.
import 'package:dynatrace_flutter_plugin/dynatrace_flutter_plugin.dart';

// Send a custom event with properties
Dynatrace().sendEvent({
  "event_properties.button_clicked": "login_button",
  "event_properties.user_type": "premium",
  "event_properties.attempt_count": 3,
  "duration": 250
});
Field naming rules:
- Only properties prefixed with
event_properties.and thedurationproperty are allowed - Field names must contain only alphabetic characters, numbers, underscores, and dots
- Each dot must be followed by an alphabetic character
- Each underscore must be followed by an alphabetic character or number
- Values must be primitive types (String, int, double, bool)
- The
durationproperty is optional and defaults to0if not specified
Send Session Property Event
Session properties apply to all events within the current session. Use sendSessionPropertiesEvent() to set properties that should be available across the entire user session.
import 'package:dynatrace_flutter_plugin/dynatrace_flutter_plugin.dart';

// Set session-wide properties
Dynatrace().sendSessionPropertyEvent({
  "session_properties.user_tier": "premium",
  "session_properties.app_version": "2.1.0",
  "session_properties.feature_flag_enabled": true
});
Important notes:
- Session properties persist throughout the entire session
- If you send the same property multiple times, only one value will be kept (first or last)
- Use session properties for data that applies to the entire user session
- Field naming follows the same rules as events, but with
session_properties.prefix - The
durationproperty is optional and defaults to0if not specified
Event Modifier
Event modifiers allow you to intercept and modify events before they are sent to Dynatrace. This is useful for adding common properties, filtering sensitive data, or enriching events with additional context.
Creating an Event Modifier
import 'package:dynatrace_flutter_plugin/dynatrace_flutter_plugin.dart';

class MyEventModifier with EventModifier {
  @override
  Map<String, dynamic>? modifyEvent(Map<String, dynamic>? event) {
    if (event == null) return null;

    // Add common properties to all events
    event["event_properties.app_build"] = "1.2.3";
    event["event_properties.environment"] = "production";

    // Filter out sensitive data
    if (event.containsKey("event_properties.password")) {
      event.remove("event_properties.password");
    }

    // Return null to discard the event entirely
    if (event["event_properties.ignore"] == true) {
      return null;
    }

    return event;
  }
}
Using Event Modifiers
import 'package:dynatrace_flutter_plugin/dynatrace_flutter_plugin.dart';

final myModifier = MyEventModifier();

// Add the modifier
Dynatrace().addEventModifier(myModifier);

// Remove the modifier when no longer needed
Dynatrace().removeEventModifier(myModifier);
Important considerations:
- Modifiers are executed in the order they were added
- Returning
nullfrom a modifier discards the event and prevents subsequent modifiers from executing - Certain reserved fields and namespaces cannot be modified (see Dynatrace documentation for details)
- Modifiers should be efficient as they are called for every event
Send Exception Event
The sendExceptionEvent() method provides a structured way to report exceptions with additional context and custom properties.
import 'package:dynatrace_flutter_plugin/dynatrace_flutter_plugin.dart';

try {
  // Code that might throw an exception
  await riskyOperation();
} catch (exception, stacktrace) {
  Dynatrace().sendExceptionEvent(
    exception,
    stacktrace: stacktrace,
    fields: {
      "event_properties.operation_type": "data_sync",
      "event_properties.retry_count": 3,
      "event_properties.user_id": "user123"
    }
  );
}
Parameters:
throwable: The exception or error object (required)stacktrace: The stack trace (optional but recommended)fields: Additional custom properties following the same naming rules as other events
Send HTTP Request Event
The sendHttpRequestEvent() method allows you to manually report HTTP request events with detailed information about the request and response.
import 'package:dynatrace_flutter_plugin/dynatrace_flutter_plugin.dart';

final builder = HttpRequestEventBuilder(
  url: 'https://api.example.com/users',
  method: 'POST'
)
  ..setStatusCode(201)
  ..setRequestSize(1024)
  ..setResponseSize(2048)
  ..setDuration(Duration(milliseconds: 250))
  ..addCustomProperty("event_properties.api_version", "v2")
  ..addCustomProperty("event_properties.endpoint_type", "user_creation");

Dynatrace().sendHttpRequestEvent(builder);
Use cases:
- Manual instrumentation of HTTP libraries not supported by
DynatraceHttpClient - Adding custom context to HTTP requests
- Reporting synthetic or derived HTTP metrics
View Monitoring
The view monitoring APIs allow you to track different screens or views in your application, providing context for all events happening within those views.
Start View
Use startView() to begin monitoring a specific view or screen. When a view is started, all subsequent events will be associated with that view context.
import 'package:dynatrace_flutter_plugin/dynatrace_flutter_plugin.dart';

// Start monitoring a view
Dynatrace().startView("UserProfile");
Important considerations:
- Only one view can be active at a time. Starting a new view will automatically stop the previous one
- View names should be meaningful and consistent across your application
- Empty or null view names will be ignored
- All events captured after starting a view will include the view context
Stop View
Use stopView() to stop monitoring the current view. After stopping, events will no longer include view information.
import 'package:dynatrace_flutter_plugin/dynatrace_flutter_plugin.dart';

// Stop the current view monitoring
Dynatrace().stopView();
Webrequest behavior
Currently the Dynatrace Flutter plugin supports the default Dart HTTPClient:
await HttpClient()
  .getUrl(Uri.parse('http://TestUrl.com'))
  .then((request) => request.close())
  .then((response) => print("Request Done"));
This block is the standard implementation for a web request and doesn't need any further modification. It is tracked automatically. The following rules for action linking are applicable:
- Root Action available: When you open a manual
DynatraceRootActionbefore the request because the request is part of some user action, such as clicking a log-in button, the web request is linked to thisDynatraceRootAction. If there are severalDynatraceRootActionsactive, the request is linked to the newest one. - Root Action not available: When you trigger a request and don't have any open
DynatraceRootAction, the request is tagged without any action information. The only exception for this tagging is if there are Android or iOS native auto user actions available. In such a case, we take this one for linking. The amount of native auto user actions is rare for Flutter as they are only fired from native components. Therefore, the request usually stands on its own. It is linked to the session but as a root web request. It isn't directly visible in the user session view in the web UI but is associated and visible within the Network performance tile.
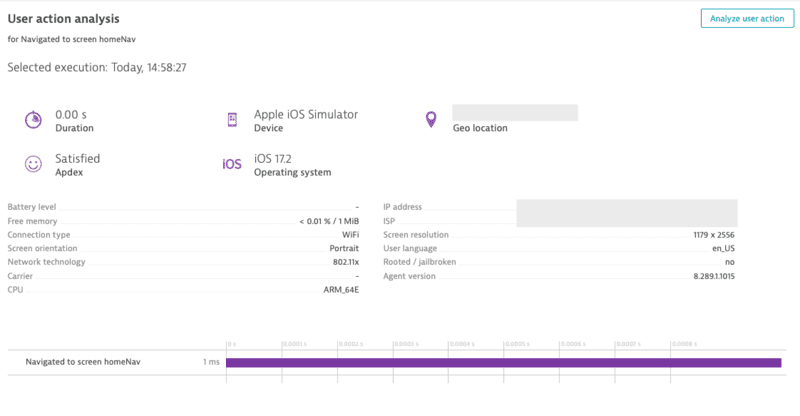
Navigation observer
To track navigations in your application, add DynatraceNavigationObserver to your MaterialApp:
MaterialApp(
  home: MyAppHome(),
  navigatorObservers: [
    DynatraceNavigationObserver(),
  ],
);
go_router
To track navigations in your application via go_router, add DynatraceNavigationObserver to your GoRouter observers:
import 'package:go_router/go_router.dart';

final _router = GoRouter(
  observers: [
    DynatraceNavigationObserver()
  ],
  routes: [
    GoRoute(
      ...
    )
  ],
);
Auto Config - Custom arguments
We provide you with a setup script which automatically adds and configures dynatrace to your android and ios projects.
This script needs to be executed during the initial setup and every time the dynatrace.config.yaml file changes.
Our scripts assume that the usual Flutter project structure is standard. The following arguments can be specified for our instrumentation script if the project structure is different.
--help: Show a help message--debug: Displays more log lines for the instrumentation script. Might be important if you have problems and want to get more information.--gradle=C:\MyFlutterAndroidProject\build.gradle: The location of the root build.gradle file. We assume that the other gradle file resides in\app\build.gradle. This adds OneAgent dependencies automatically for you and updates the configuration.--plist=C:\MyFlutterIOSProject\projectName\info.plist: Indicates the location of theinfo.plistfile. Theplistfile is used for updating the configuration for the OneAgent.--config=C:\SpecialFolderForDynatrace\dynatrace.config.yaml: Indicates that the config file isn't in the root folder of the Flutter project.--uninstall: Removes files and references of Dynatrace that were added by our plugin. This includes the removal of thedynatrace.config.yamlfile.
Example:
❯ dart run dynatrace_flutter_plugin --help
Usage: dart run dynatrace_flutter_plugin [options]

Options:
  --help                          Show this help message and exit.
  --debug                         Enable debug mode for detailed logging.
  --uninstall                     Uninstall the tool.
  --config="/path/to/dynatrace.config.yaml"
                                  Specify a custom path to the Dynatrace configuration file.
                                  Default: project/dynatrace.config.yaml
  --gradle="/custom/path/to/build.gradle(.kts)"
                                  Specify a custom path to the top level build.gradle or build.gradle.kts file of your android project.
                                  Default: Build file in project/android
  --plist="/custom/path/to/Info.plist"
                                  Specify a custom path to the Info.plist file.
                                  Default: project/ios/Runner/Info.plist

Examples:
  dart run dynatrace_flutter_plugin
  dart run dynatrace_flutter_plugin --uninstall
  dart run dynatrace_flutter_plugin --config="/path/to/dynatrace.config.yaml"
  dart run dynatrace_flutter_plugin --gradle="/custom/path/to/build.gradle.kts"
  dart run dynatrace_flutter_plugin --plist="/custom/path/to/Info.plist"
Structure of the dynatrace.config.yaml file
The configuration is structured in the following way:
android:
  // Configuration for Android auto instrumentation

ios:
  // Configuration for iOS auto instrumentation
Manual Startup Counterparts
Here is a list of all the counterparts for the options that can be used with a manual startup. Below the counterparts table you will find an example configuration block for both Android and iOS.
| Property Name | Default | Android | iOS |
|---|---|---|---|
| reportCrash | true | crashReporting | DTXCrashReportingEnabled |
| logLevel | LogLevel.Info | debug.agentLogging | DTXLogLevel |
| beaconUrl | null | autoStart.beaconUrl | DTXBeaconURL |
| applicationId | null | autoStart.applicationId | DTXApplicationId |
| certificateValidation | false | debug.certificateValidation | DTXAllowAnyCert |
| userOptIn | false | userOptIn | DTXUserOptIn |
Android Block
The Android block is a wrapper for the Android configuration. You can find it under Mobile app settings in the web UI. Copy the content into the following block:
android:
  config: "CONTENT_OF_ANDROID_CONFIG"
The content of the config block is directly copied to the gradle file. To know more about the possible configuration options, see the DSL documentation of our gradle plugin.
The following block shows similar properties that can be used with manual startup but are used in auto startup configuration:
android:
  config: "dynatrace {
      configurations {
        defaultConfig {
          autoStart{
            applicationId 'xxx'
            beaconUrl 'xxx'
          }
          userOptIn false
          crashReporting true
          debug.agentLogging true
          debug.certificateValidation true
          webRequests.enabled true
        }
      }
    }"
iOS Block
The iOS block is a wrapper for the iOS configuration. You can find it under Mobile app settings in the web UI. Copy the content into the following block:
ios:
  config: "CONTENT_OF_IOS_CONFIG"
};
The content of the config block is directly copied to the plist file, so you can use all the settings and properties listed in our official iOS Agent documentation.
The following block shows similar properties that can be used with manual startup but are used in auto startup configuration:
ios:
  config: "
    <key>DTXBeaconURL</key>
    <string>xxx</string>
    <key>DTXApplicationId</key>
    <string>xxx</string>
    <key>DTXLogLevel</key>
    <string>ALL</string>
    <key>DTXUserOptIn</key>
    <true/>
    <key>DTXCrashReportingEnabled</key>
    <true/>
    <key>DTXAllowAnyCert</key>
    <true/>
    <key>DTXInstrumentWebRequestTiming</key>
    <false/>"
};
Define build stages in dynatrace.config.yaml
If you have several stages like debug, QA, and production, use a different configuration to separate them and have each stage report into different applications in the web UI.
Android
In Android, you can enter all the information in the config file. So the following dynatrace {} block must be inserted into the android config variable in your dynatrace.config.yaml file.
android:
  config: "
    dynatrace {
      configurations {
        dev {
            variantFilter "Debug" // build type name is upper case because a product flavor is used
            // other variant-specific properties
        }
        demo {
            variantFilter "demo" // the first product flavor name is always lower case
            // other variant-specific properties
        }
        prod {
            variantFilter "Release" // build type name is upper case because a product flavor is used
            // other variant-specific properties
        }
      }
    }
  "
This results into the following:
> Task :app:printVariantAffiliation
Variant 'demoDebug' will use configuration 'dev'
Variant 'demoRelease' will use configuration 'demo'
Variant 'paidDebug' will use configuration 'dev'
Variant 'paidRelease' will use configuration 'prod'
In all these blocks, you can define your different application IDs. You can even use a different environment.
iOS
In iOS, you can define some variables in the dynatrace.config.yaml file. These variables must then be inserted into a prebuild script. The following properties must be inserted into the iOS config variable in your dynatrace.config.yaml file.
ios:
  config: "
  <key>DTXApplicationID</key>
  <string>${APPLICATION_ID}</string>
  <key>DTXBeaconURL</key>
  <string>Your Beacon URL</string>
  "
}
The ${APPLICATION_ID} variable must then be inserted with a prebuild script. For more information on this, read https://medium.com/@andersongusmao/xcode-targets-with-multiples-build-configuration-90a575ddc687.
User opt-in mode
Allows the user to opt in for monitoring. When enabled, specify the privacy settings. For more information, see the user privacy options section.
Android
android:
  config: "
    dynatrace {
      configurations {
        defaultConfig {
          autoStart{
            ...
          }
          userOptIn true
        }
      }
    }
  "
}
iOS
ios:
  config: "
  <key>DTXUserOptIn</key>
  <true/>
  "
}
Mobile OneAgent debug logs
If the instrumentation runs through and your application starts but you see no data, you must investigate and find out the reason the mobile agents are not sending any data. You can always open a support ticket, but we strongly recommend that you first collect logs.
The whole structure is visible, so you can see where the config belongs.
Android
Add the following configuration snippet to your other configuration in dynatrace.config.yaml and run dart run dynatrace_flutter_plugin in the root of your Flutter project:
android:
  config: "
    dynatrace {
      configurations {
        defaultConfig {
          autoStart{
            ...
          }
          debug.agentLogging true
        }
      }
    }
  "
}
iOS
Add the following configuration snippet to your other configuration in dynatrace.config.yaml and run dart run dynatrace_flutter_plugin in the root of your Flutter project:
ios:
  config: "
  <key>DTXLogLevel</key>
  <string>ALL</string>
  "
}
Maven Central in top-level gradle file
Because the Dynatrace Android agent now requires the MavenCentral repository, if either jcenter() or mavenCentral() is not added inside of ALL the repositories blocks via the top-level build.gradle, the build will fail.
Below is an example of what a basic top-level build.gradle file should look like after adding mavenCentral() to all repository blocks:
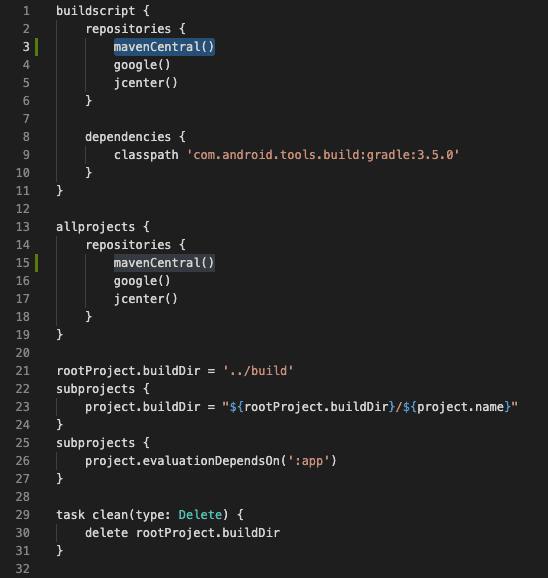
The location of the top-level build.gradle should be:
<rootOfProject>\android\build.gradle
Note:
JCenter has noted its sunset on May 1st. Though, JCenter is still syncing with Maven Central so having jcenter() in your build.gradle file without the use of mavenCentral() will retrieve the Dynatrace Android Gradle Plugin no problem.
Migration Guide
Differences of 2.x to 3.x
Required Changes:
- If you use
DataCollectionLevel.User, change it to =>DataCollectionLevel.UserBehavior - If you use the
Configurationobject in yourstartmethod, the optionalmonitorWebrequestproperty no longer exists and needs to be removed.
Http Instrumentation: If you are using the http instrumentation provided by our plugin, we now offer the following options:
- Use our DynatraceHttpClient which is a wrapper of Dart's http package.
- Manually instrument http requests from any http library/package.
Instrumentation Overhead
When using auto-instrumentation through our plugin, here are some examples of the size differences before and after instrumentation for release builds:
| Operating System | App template | Version | Size Before | Size After | Difference |
|---|---|---|---|---|---|
| Android | Skeleton | 3.19.2 | 7.1 MB | 7.2 MB | 0.1 MB |
| iOS | Skeleton | 3.19.2 | 16.8 MB | 21.1 MB | 4.3 MB |
Known issues
OneAgent SDK version X does not match Dynatrace Android Gradle plugin version X: You've probably upgraded the Flutter package. Calldart run dynatrace_flutter_pluginagain so that the dependencies in the gradle are updated.I'm not seeing any captured user actions for flutter widgets or flutter/dart gestures/user input: See important notes relating to flutter/dart user actions and manual instrumentation.- For Android, if you see an error like "Gradle sync failed: Could not find com.dynatrace.tools.android:gradle-plugin:8.225.1.1004.", please see the MavenCentral section for an example and more information.
Dynatrace documentation
The documentation for OneAgent for Android and iOS is available at the following locations:
- Android: https://www.dynatrace.com/support/help/setup-and-configuration/oneagent/android/
- iOS: https://www.dynatrace.com/support/help/setup-and-configuration/oneagent/ios/
Note: The Dynatrace Android Gradle plugin is hosted on Maven Central. JCenter has noted it's sunset on May 1st so Maven Central is the primary source of the Dynatrace Android Gradle plugin.
Report a bug or open a support case
For issues, open a support ticket at support.dynatrace.com and provide us with the following details:
- Logs from Mobile OneAgent
- Your
dynatrace.config.yamlfile
