Bootstrap's Flutter
Simple flutter widget from Bootstrap v5 component, including responsive grid layout based on bootstrap grid system
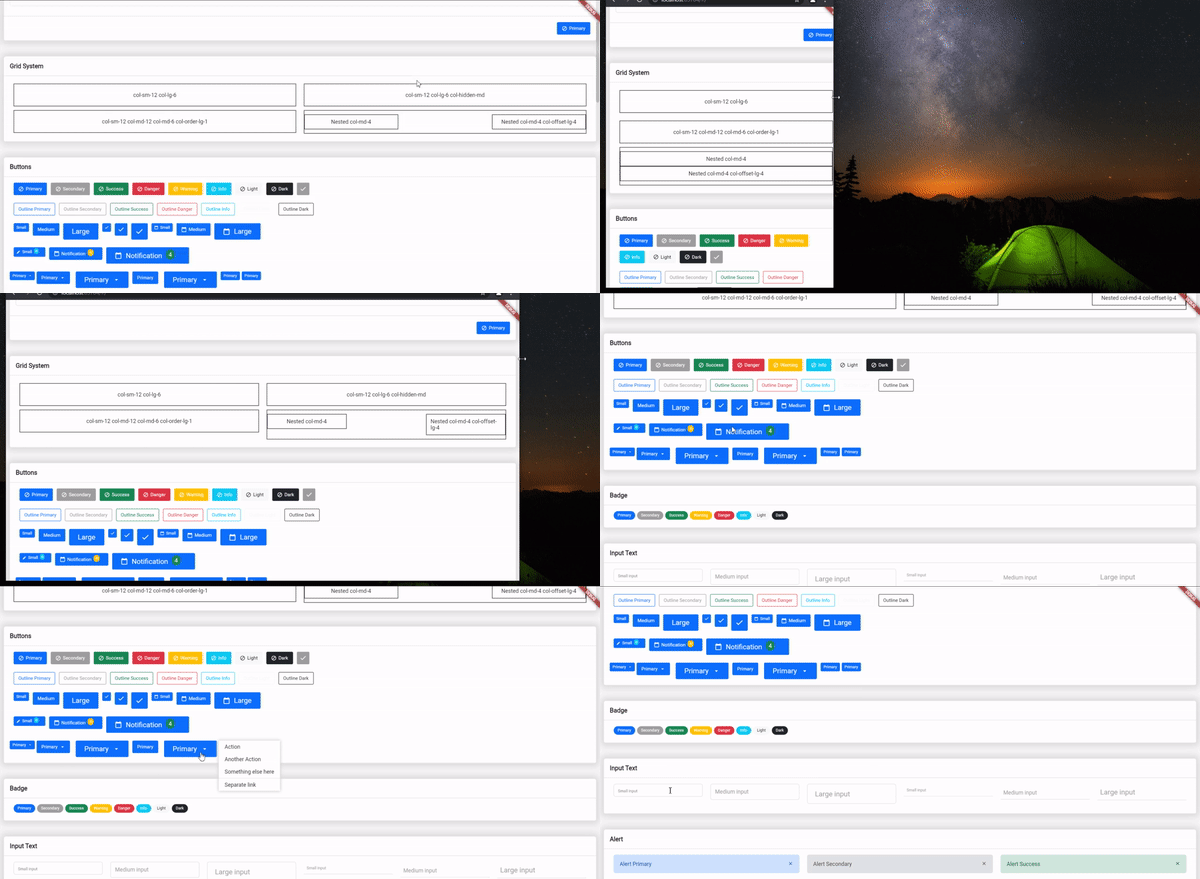
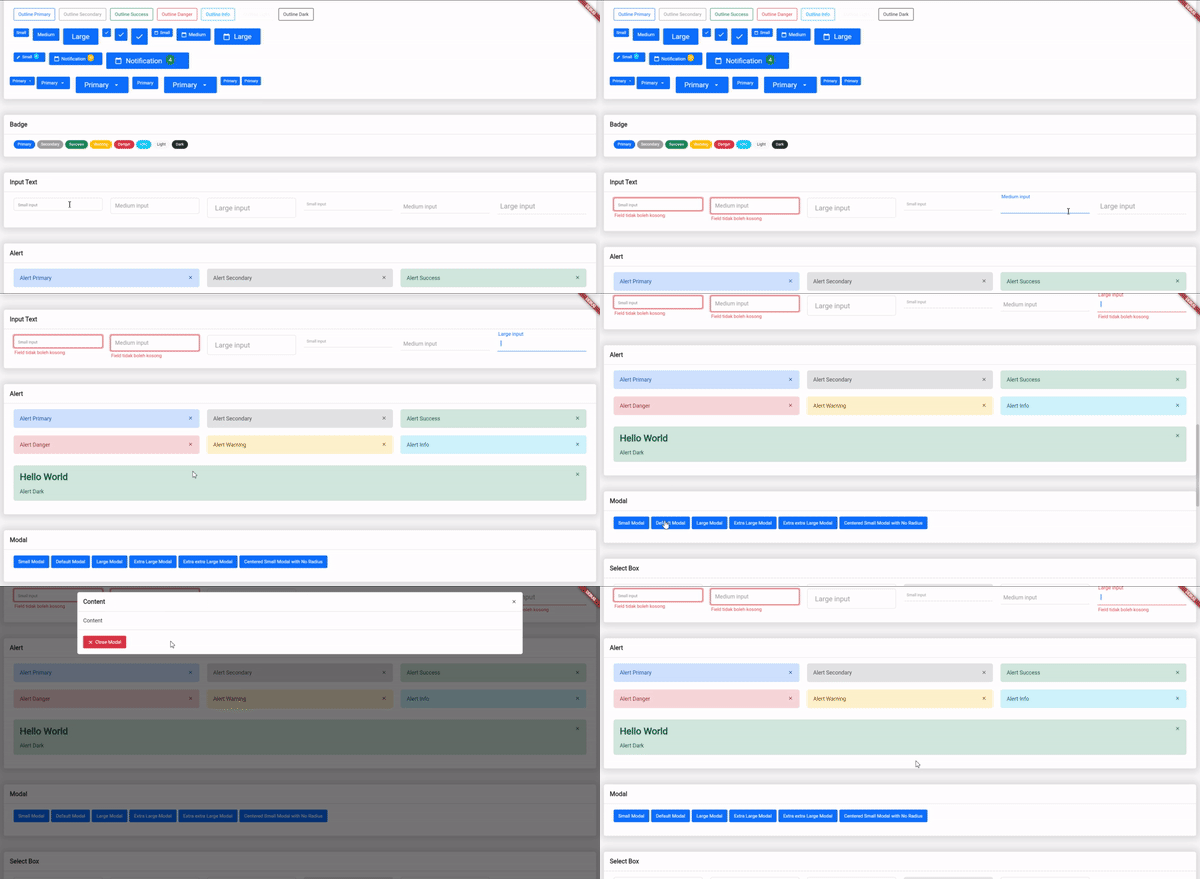
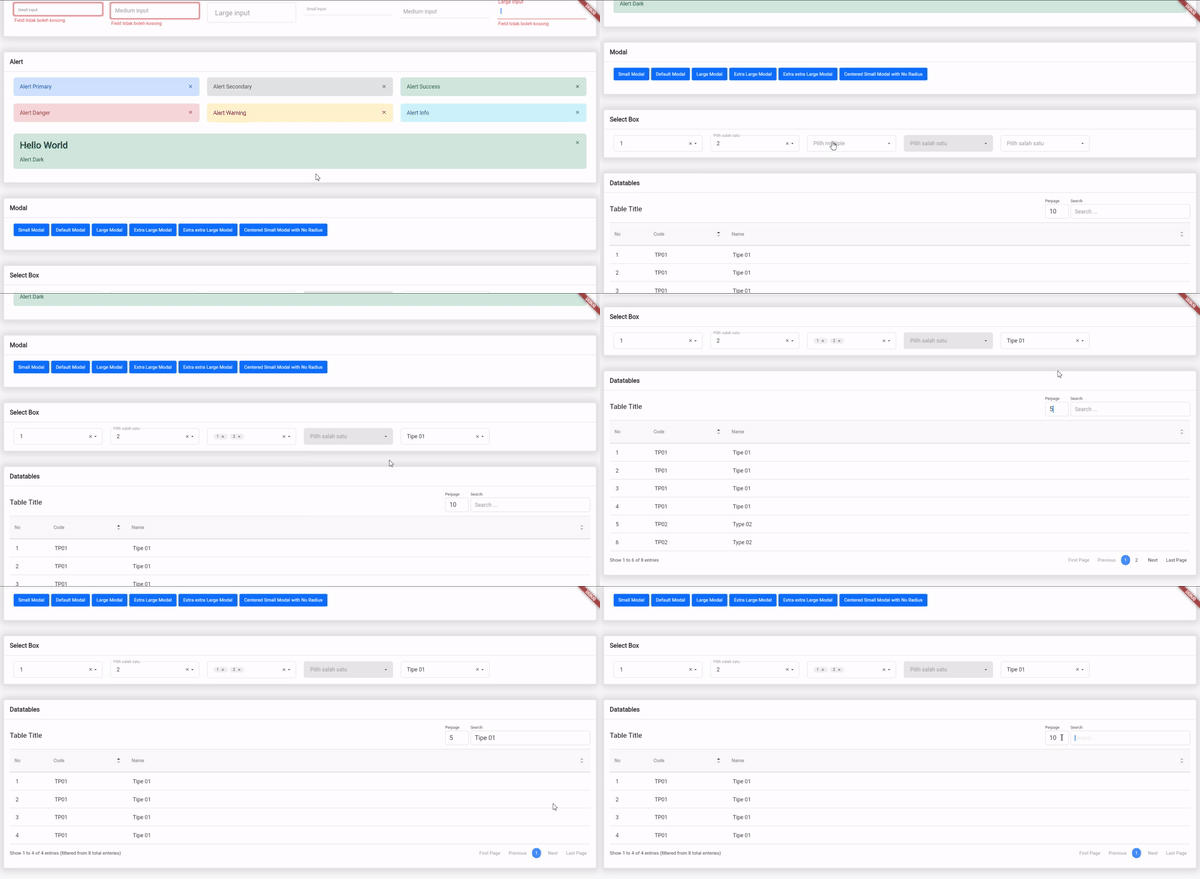
Avaiable Components
xContainerxBootstrap Flutter ButtonsxButton sizexButton with prefix or suffix iconxButton with badgexDropdown Buttons
xBootstrap Flutter ModalxModal size (small, medium, large, extra large, extra extra large)xAlignment for modal content
xBootstrap Flutter Input TextxonChange validator (only usingBsValidator)xError message with beautiful design
xBootstrap Flutter AlertxBootstrap Flutter CardxServerside Datatables (with datatables response)xSearchblexOrderablexPage LengthxPaginationxCustomize Style
xBootstrap Flutter SelectBox
Utilities
xGrid System (Bootstrap Flutter Responsive)xNestablexColumn orderingxCustom guttersxColumn offsetxResponsive hide and show
This plugin helps you to migrate from html based to dart in creating web interfaces. More specifically for those who are already able to use bootstrap
Getting Started
Add the dependency in pubspec.yaml:
dependencies:
  ...
  bs_flutter: any
Responsive Grid / Grid System
Example: example_grid.dart
Grid system is very important when you create some web application. Especially for create responsive layout. This plugin is help to solve it
To create responsive layout you must using widget BsRow and BsCol or if in bootstrap use class="row" and class="col-*"


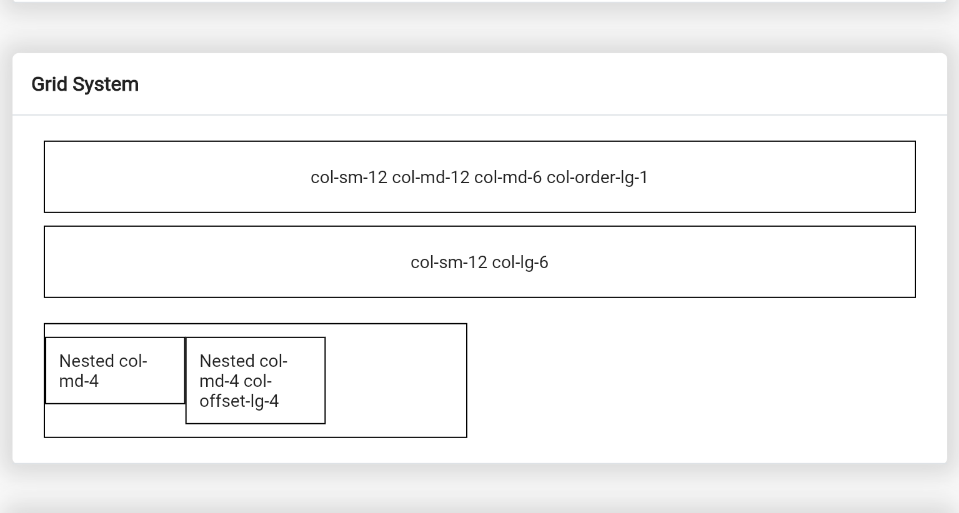
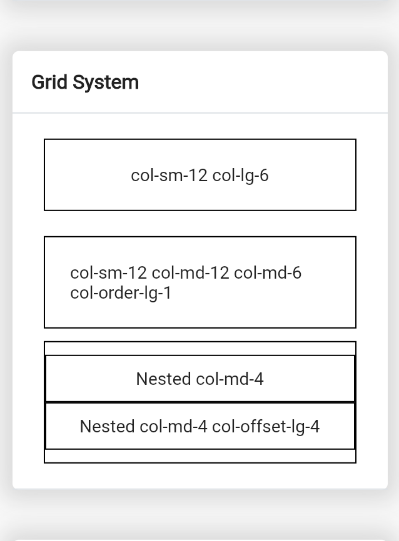
Create row container of grid system:
BsRow(
  gutter: EdgeInsets.only(left: 10.0, right: 10.0, top: 5.0, bottom: 5.0),
  children: <BsCol>[
    // ...
  ]
);
After that you can add column:
BsRow(
//...
    children: <BsCol>[
      BsCol(
        decoration: BoxDecoration(
          border: Border.all(color: Colors.black),
        ),
        padding: EdgeInsets.all(20.0),
        sizes: ColScreen(sm: Col.col_12, lg: Col.col_6),
        child: Center(child: Text('col-sm-12 col-lg-6')),
      ),
      BsCol(
        decoration: BoxDecoration(
          border: Border.all(color: Colors.black),
        ),
        visibility: BsVisibility.hiddenMd,
        padding: EdgeInsets.all(20.0),
        sizes: ColScreen(sm: Col.col_12, lg: Col.col_6),
        child: Center(child: Text('col-sm-12 col-lg-6 col-hidden-md')),
      ),
      BsCol(
        decoration: BoxDecoration(border: Border.all(color: Colors.black)),
        padding: EdgeInsets.all(20.0),
        sizes: ColScreen(sm: Col.col_12, md: Col.col_12, lg: Col.col_6),
        order: ColOrder(md: 1),
        child: Center(child: Text('col-sm-12 col-md-12 col-md-6 col-order-lg-1')),
      ),
      BsCol(
        decoration: BoxDecoration(border: Border.all(color: Colors.black)),
        padding: EdgeInsets.only(top: 10.0, bottom: 10.0),
        sizes: ColScreen(md: Col.col_6),
        child: BsRow(
          children: [
            BsCol(
              decoration: BoxDecoration(
                color: Colors.white,
                border: Border.all(color: Colors.black),
              ),
              padding: EdgeInsets.all(10.0),
              sizes: ColScreen(md: Col.col_4),
              child: Center(child: Text('Nested col-md-4')),
            ),
            BsCol(
              decoration: BoxDecoration(
                color: Colors.white,
                border: Border.all(color: Colors.black),
              ),
              padding: EdgeInsets.all(10.0),
              sizes: ColScreen(md: Col.col_4),
              offset: ColScreen(lg: Col.col_4),
              child: Center(child:Text('Nested col-md-4 col-offset-lg-4')),
            ),
          ],
        ),
      ),
    ]
// ...
)
Note
- Properties
sizesinBsColis has default valueCol.col_12or 100% of screen width - If need to ordering column use properties
orderwith valueBsScreen - If need to custom offset of column use properties
offetwith valueBsScreen BsVisibility.hiddenMdwill hide widget in max screen medium or < 768 px, above it will show
Bootstrap Flutter Buttons
Example: example_buttons.dart

We have 15 button style and 3 button size, but you can create custom size using BsButtonSize and custom style using BsButtonStyle
  static const BsButtonStyle primary = BsButtonStyle(
    color: Colors.white,
    borderColor: BsColor.primary,
    backgroundColor: BsColor.primary,
    borderRadius: BorderRadius.all(Radius.circular(3.0))
  );
  static const BsButtonSize btnIconSm = BsButtonSize(
    iconSize: 12.0,
    padding: EdgeInsets.only(left: 10.0, right: 10.0, top: 10.0, bottom: 10.0),
    minimumSize: Size(30.0, 30.0),
  );
To create some button use BsButton
// ...
  BsButton(
    margin: EdgeInsets.only(right: 10.0, bottom: 10.0),
    onPressed: () {},
    style: BsButtonStyle.primary,
    size: BsButtonSize.btnIconMd,
    prefixIcon: Icons.check,
  ),
// ...
You can create custom size using BsBadgeSize and custom style using BsBadgeStyle
  static const BsBadgeStyle primary = BsBadgeStyle(
    color: Colors.white,
    backgroundColor: BsColor.primary,
  );
  static const BsBadgeSize rounded = BsBadgeSize(
      margin: EdgeInsets.only(right: 5.0, bottom: 5.0),
      padding: EdgeInsets.only(left: 10.0, right: 10.0, top: 5.0, bottom: 5.0),
      fontSize: 10.0,
      borderRadius: BorderRadius.all(Radius.circular(100.0))
  );
To create badge use BsBadge, BsBadge is available use in BsButton
// ...
  BsBadge(
    style: BsBadgeStyle.primary,
    size: BsBadgeSize.rounded,
    child: Text('Primary'),
  ),
// ...
Default dropdown button

// ...
    BsDropdownButton(
      margin: EdgeInsets.only(right: 5.0),
      toggleMenu: (_) => BsButton(
        onPressed: () => _.toggle(),
        style: BsButtonStyle.primary,
        suffixIcon: Icons.arrow_drop_down,
        label: Text('Primary'),
      ),
      dropdownMenu: BsDropdownMenu(
        children: [
          BsDropdownHeader(child: Text('Dropdown Header')),
          BsDropdownItem(child: Text('Action')),
          BsDropdownItem(child: Text('Another Action')),
          BsDropdownItem(child: Text('Something else here')),
          BsDropdownItem(child: Text('Separate link')),
        ],
      ),
    )
// ...
To configure maximum/minimum width and height, you can use property dropdownMenuSize
the default of minimum height and width is 150
    BsDropdownButton(
      // ...
      dropdownMenuSize: BsDropdownMenuSize(
        minWidth: 150,
        maxWidth: 300,
        minHeight: 150,
        maxHeight: 300
      ),
      // ...
    )
If you want to create dropdown in left/right side of button, you can use property dropdownDirection
  BsDropdownButton(
    // ...
    dropdownDirection: Axis.horizontal,
    // ...
  ),
If you want to customize dropdown style, you can use property dropdownMenuStyle
  BsDropdownButton(
    // ...
    dropdownMenuStyle: BsDropdownMenuStyle(
      backgroundColor: Colors.red,
      boxShadow: [
        BoxShadow(
          color: Color(0xffd9d9d9),
          spreadRadius: 2.0,
          blurRadius: 5.0
        )
      ]
    ),
    // ...
  ),
You can also set dropdown item to active and disabled
If you want to customize active or disabled style, you can use property activeStyle, activeTextStyle, disabledStyle and disabledTextStyle
  BsDropdownButton(
    // ...
    dropdownMenu: BsDropdownMenu(
      children: [
        BsDropdownItem(
          child: Text('Action'),
          active: true,
          activeStyle: ButtonStyle(),
          activeTextStyle: TextStyle(),
        ),
        BsDropdownItem(
          child: Text('Another Action'),
          disabled: true,
          disabledStyle: ButtonStyle(),
          disabledTextStyle: TextStyle(),
        ),
        BsDropdownItem(child: Text('Something else here')),
        BsDropdownDivider(),
        BsDropdownItem(child: Text('Separate link')),
      ],
    )
  // ...
  ),
Bootstrap Flutter Input Text
Example: example_inputtext.dart

Small Input Text with Outline Border
// ...
  BsInput(
    size: BsInputSize.sm,
    hintText: 'Small input',
    controller: TextEditingController(),
    validators: [
      BsValidator.required
    ],
  ),
// ...
Small Input Text with Border Bottom
//...
  BsInput(
    style: BsInputStyle.outlineBottom,
    size: BsInputSize.outlineBottomSm,
    hintTextLabel: 'Small input',
    controller: TextEditingController(),
  ),
//...
BsValidator is custom validator, you can create yours validator using BsValidator
Example:
  static BsValidator get required => BsValidator(
    validator: (value) {
      String valueValidate = value.toString().trim();
      if(valueValidate.isEmpty) return "Field tidak boleh kosong";

      return null;
    },
  );
validator properties will call when form on validating
Bootstrap Flutter Alert
Example: example_alert.dart

Alert success
// ...
  BsAlert(
    closeButton: true,
    margin: EdgeInsets.only(bottom: 10.0),
    child: Text('Alert Primary'),
  ),
// ...
Alert with Heading
// ...
  BsAlert(
    closeButton: true,
    margin: EdgeInsets.only(bottom: 10.0),
    style: BsAlertStyle.success,
    heading: Text('Hello World'),
    child: Column(
      crossAxisAlignment: CrossAxisAlignment.start,
      children: [
        Text('Alert Dark'),
      ],
    ),
  )
// ...
You can create custom alert style using BsAlertStyle and alert color using BsAlertColor
  static const BsAlertColor primary = BsAlertColor(
    color: Color(0xff084298),
    backgroundColor: Color(0xffcfe2ff),
    borderColor: Color(0xffb6d4fe),
  );
  static const BsAlertStyle primary = BsAlertStyle(
    color: BsAlertColor.primary,
    borderRadius: BorderRadius.all(Radius.circular(5.0)),
  );
Bootstrap Flutter Modals
Example: example_modal.dart

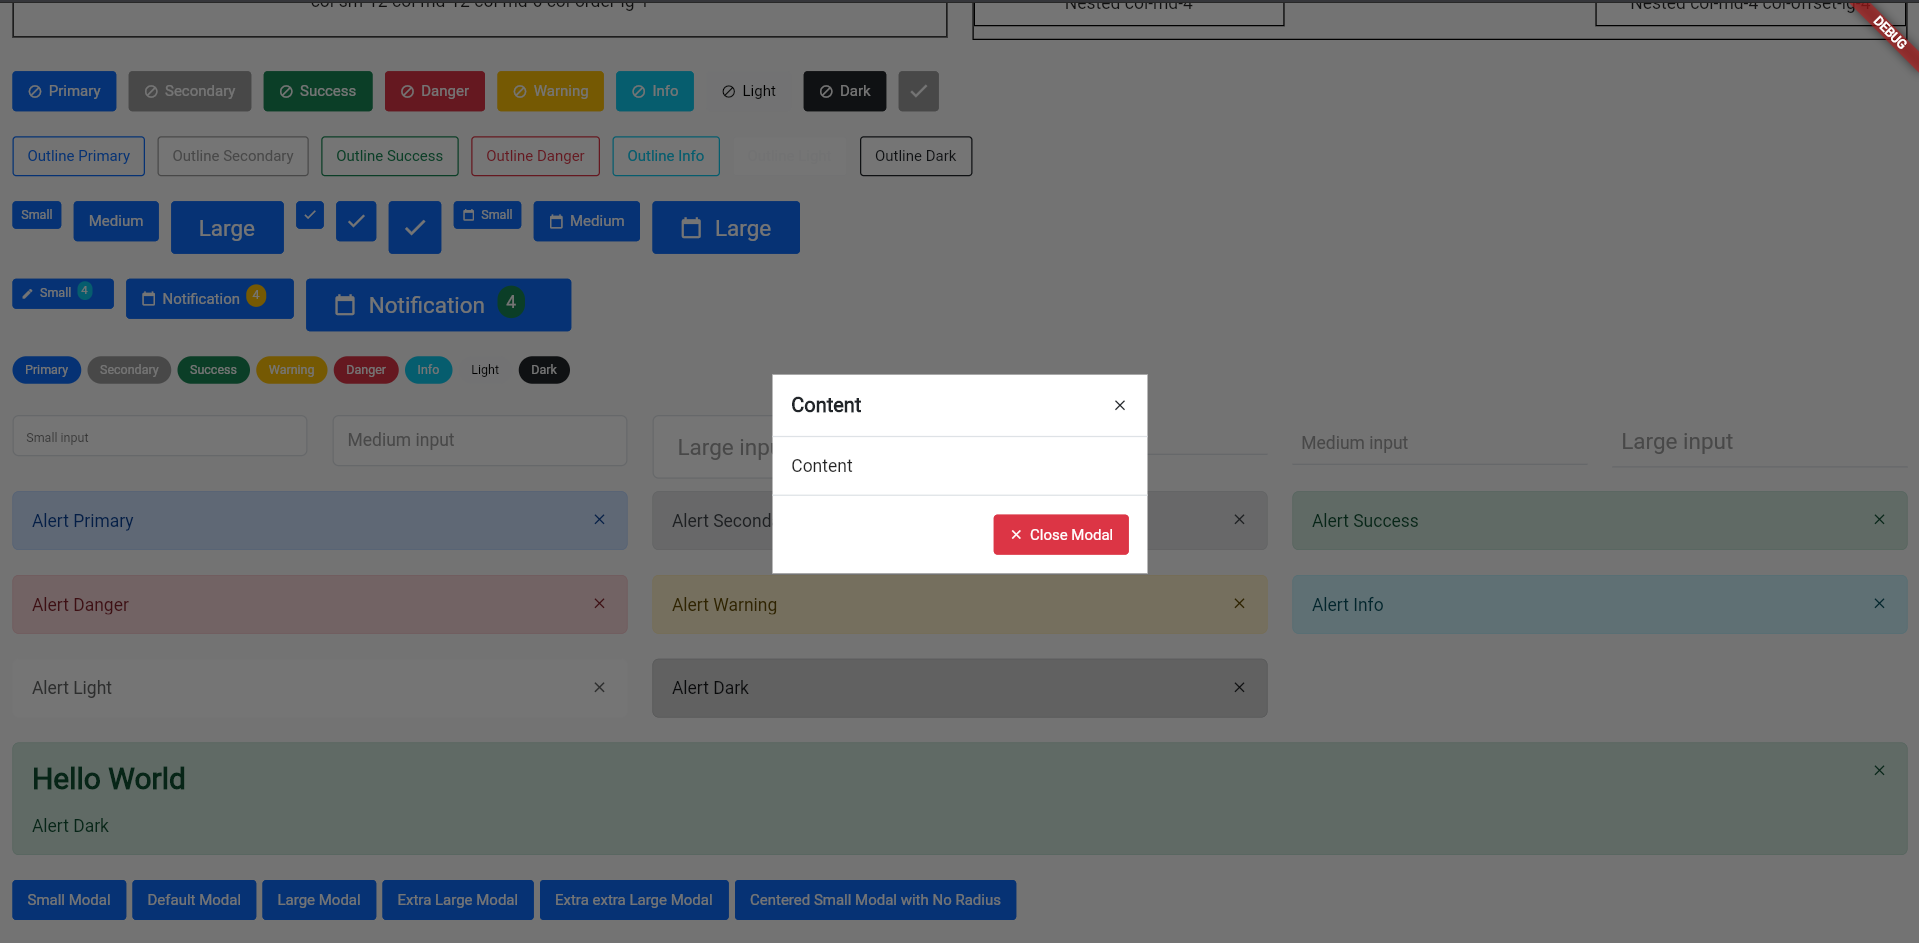
Modal will be show using showDialog, because BsModal is a Dialog widget
// ...
  BsButton(
    style: BsButtonStyle.primary,
    margin: EdgeInsets.only(right: 5.0, bottom: 10.0),
    label: Text('Centered Small Modal with No Radius'),
    onPressed: () => showDialog(context: context, builder: (context) => BsModal(
      context: context,
      dialog: BsModalDialog(
        size: BsModalSize.sm,
        crossAxisAlignment: crossAxisAlignment.center,
        child: BsModalContent(
          decoration: BoxDecoration(
            color: Colors.white,
          ),
          children: [
            BsModalContainer(title: Text('Content'), closeButton: true),
            BsModalContainer(
              child: Column(
                  children: [
                    Text('Content')
                  ]
              ),
            ),
            BsModalContainer(
              crossAxisAlignment: CrossAxisAlignment.end,
              actions: [
                BsButton(
                  style: BsButtonStyle.danger,
                  label: Text('Close Modal'),
                  prefixIcon: Icons.close,
                  onPressed: () {
                    Navigator.pop(context);
                  },
                )
              ],
            )
          ],
        ),
      ),
    )),
  )
// ...
Note
BsModalDialogis backdrop layoutBsModalContentis content from modalBsModalContaineris children fromBsModalContent- Change
sizeproperties to change modal size BsModalContainercan be use as modal-header, modal-body and modal-footer- To set
BsModalContentto centered, you can modifycrossAxisAlignmentonBsModalDialogproperties
Bootstrap Flutter Card
Example: example_card.dart

Create box card:
// ...
  BsCard(
    children: [
      BsCardContainer(title: Text('Box Card')),
      BsCardContainer(child: Container(
        child: Text('Box Card Content'),
      )),
      BsCardContainer(actions: [
        BsButton(
          onPressed: () {},
          style: BsButtonStyle.primary,
          prefixIcon: Icons.block,
          label: Text('Primary'),
        )
      ])
    ],
  )
// ...
Note
- To custom card style use
BsCardContainerStyleorBsCardStyle
Bootstrap Flutter Select Box
Example: example_selectbox.dart

To create a select box you need to import:
import 'package:bs_flutter_selectbox/bs_flutter_selectbox.dart';
After create controller:
// ...
  BsSelectBoxController _select1 = BsSelectBoxController(
    options: [
      BsSelectBoxOption(value: 1, text: Text('1')),
      BsSelectBoxOption(value: 2, text: Text('2')),
      BsSelectBoxOption(value: 3, text: Text('3')),
    ]
  );
// ...
After all is done copy the code below:
// ...
  BsSelectBox(
    hintText: 'Pilih salah satu',
    selectBoxController: _select1,
  ),
// ...

If you need to customize size and style, use properties style and size. And create your custom size with class BsSelectBoxSize or BsSelectBoxStyle to custom style
  static const BsSelectBoxSize customSize = BsSelectBoxSize(
    fontSize: 14.0,
    optionFontSize: 14.0,
    searchInputFontSize: 14.0,
    labelX: 15.0,
    labelY: 13.0,
    transitionLabelX: -15.0,
    transitionLabelY: 5.0,
    padding: EdgeInsets.only(left: 15.0, right: 15.0, top: 12.0, bottom: 12.0)
  );
  static const BsSelectBoxStyle outline = BsSelectBoxStyle(
    borderRadius: BorderRadius.all(Radius.circular(5.0))
  );
Note
labelXandlabelYis used to set label position if usinghintTextLabeltransitionLabelXandtransitionLabelYis used to set label position if usinghintTextLabelwhen have selected valueBsSelectBoxStylehave propertiesborderRadius,color,placeholderColor,selectedBackgroundColor,selectedColor,disabledBackgroundColor,backgroundColor,borderColor,fontSize,arrowIcon
Select box using hintTextLabel
// ...
  BsSelectBox(
    hintTextLabel: 'Pilih salah satu',
    selectBoxController: _select1,
  ),
// ...
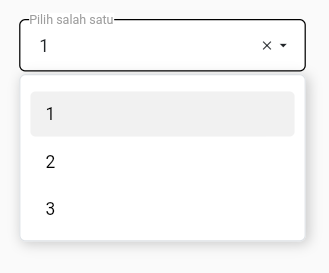
To create a select box with multiple allowed set multiple properties in BsSelectBoxController to true:
// ...
  BsSelectBoxController _select2 = BsSelectBoxController(
    multiple: true,
    options: [
      BsSelectBoxOption(value: 1, text: Text('1')),
      BsSelectBoxOption(value: 2, text: Text('2')),
      BsSelectBoxOption(value: 3, text: Text('3')),
      BsSelectBoxOption(value: 4, text: Text('4')),
      BsSelectBoxOption(value: 5, text: Text('5')),
      BsSelectBoxOption(value: 6, text: Text('6')),
    ]
  );
// ...
Note
- To get selected value use
getSelectedorgetSelectedAll - If you need returned string use
getSelectedAsString, it will be returned string value with,separator - To set selected value use
setSelectedorsetSelectedAll
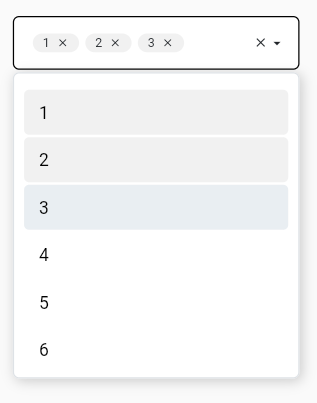
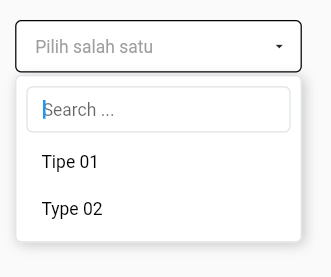
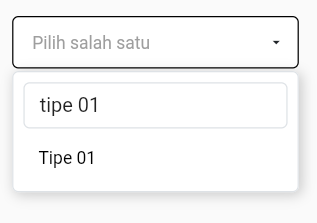
To create a select box with server side data, use serverSide property
  BsSelectBox(
    hintText: 'Pilih salah satu',
    searchable: true,
    selectBoxController: _select3,
    serverSide: selectApi,
  )
Note
- To enable searchable option, set
searchablepropertytrue serverSideproperty need returnedFuture<BsSelectBoxResponse>
selectApi function
// ...
  Future<BsSelectBoxResponse> selectApi(Map<String, String> params) async {
    Uri url = Uri.http('localhost', 'api-json.php', params);
    Response response = await http.get(url);
    if(response.statusCode == 200) {
      List json = convert.jsonDecode(response.body);
      return BsSelectBoxResponse.createFromJson(json);
    }

    return BsSelectBoxResponse(options: []);
  }
// ...
Json response data
[
  {
    "value":"1",
    "text":"Tipe 01",
    "typecd":"TP01"},
  {
    "value":"2",
    "text":"Type 02",
    "typecd":"TP02"
  }
]
Note
createFromJsonis automatically put response datavalue, but you cant change it with define manual- If you want to make
typecdasvalueof option, usevalueparameters ofcreateFromJson
/// ...
    if(response.statusCode == 200) {
      List json = convert.jsonDecode(response.body);
      return BsSelectBoxResponse.createFromJson(json,
        value: (data) => data['typecd'],
      );
    }
/// ...
- If you want to make
typecdastextof option, userenderTextparameters ofcreateFromJson renderTextfunction need returnedWidget
/// ...
    if(response.statusCode == 200) {
      List json = convert.jsonDecode(response.body);
      return BsSelectBoxResponse.createFromJson(json,
        value: (data) => data['typecd'],
        renderText: (data) => Text(data['typecd'])
      );
    }
/// ...
ServerSide Datatables (with datatables response)
Example: main.dart

To create a select box you need to import:
import 'package:bs_flutter_datatable/bs_flutter_datatable.dart';
Create source datatable:
class ExampleSource extends BsDatatableSource {

  static List<BsDataColumn> get columns => <BsDataColumn>[
    BsDataColumn(label: Text('No'), orderable: false, searchable: false, width: 100.0),
    BsDataColumn(label: Text('Code'), columnName: 'typecd', width: 200.0),
    BsDataColumn(label: Text('Name'), columnName: 'typenm'),
  ];

  @override
  BsDataRow getRow(int index) {
    return BsDataRow(index: index, cells: <BsDataCell>[
      BsDataCell(Text('${controller.start + index + 1}')),
      BsDataCell(Text('${response.data[index]['typecd']}')),
      BsDataCell(Text('${response.data[index]['typenm']}')),
    ]);
  }
}
To create row event listener you musth defined listener on data source
class ExampleSource extends BsDatatableSource {

// ...

  ValueChanged<dynamic> onEditListener = (value) {};
  ValueChanged<dynamic> onDeleteListener = (value) {};

// ...

}
And then use variable on pressed action
// ...
@override
  BsDataRow getRow(int index) {
    return BsDataRow(index: index, cells: <BsDataCell>[
      // ...
      BsDataCell(Row(
        children: [
          TextButton(
            onPressed: () => onEditListener(response.data[index]['typeid']),
            child: Container(child: Text('Edit'))
          ),
          TextButton(
            onPressed: () => onDeleteListener(response.data[index]['typeid']),
            child: Container(child: Text('Edit'))
          )
        ],
      ))
      // ...
    ]);
  }
// ...
To handle that listener, you can set after request data success
  Future loadApi(Map<String, dynamic> params) {
    return http.post(
      // ..
    ).then((value) {
      // ...
      setState(() {
        // ...
        _source.onEditListener = (typeid) {
          /// Do edit
        };
        _source.onDeleteListener = (typeid) {
          /// Do delete
        };
      });
    });
  }
declare source and controller datatable:
// ...
class _MyAppState extends State<MyApp> {

  ExampleSource _source = ExampleSource();

  @override
  void initState() {
    _source.controller = BsDatatableController();
    super.initState();
  }

// ...

}
create table view:
// ...
    BsDatatable(
      source: _source,
      title: Text('Datatables Data'),
      columns: ExampleSource.columns,
      serverSide: loadApi,
    )
// ...
Serverside function to get datatable response
// ...
  Future loadApi(Map<String, dynamic> params) {
    return http.post(
      Uri.parse('http://localhost/flutter_crud/api/public/types/datatables'),
      body: params,
    ).then((value) {
      Map<String, dynamic> json = jsonDecode(value.body);
      setState(() {
        _source.response = BsDatatableResponse.createFromJson(json['data']);
        _source.onEditListener = (typeid) {
          /// Do edit
        };
        _source.onDeleteListener = (typeid) {
          /// Do delete
        };
      });
    });
  }
// ...
Note
- After request data from server has been successfully you need to update
responsedata souece
// ...
  Future loadApi(Map<String, dynamic> params) {
    return http.post(
      // ...
    ).then((value) {
      // ...
      setState(() {
        /// Update response source data
        _source.response = BsDatatableResponse.createFromJson(json['data']);
        // ...
      });
    });
  }
// ..
To reload data you can use reload function
_source.controller.reload();
If you want to show data from List variable, you can add data to constructor source
class ExampleSource extends BsDatatableSource {

  ExampleSource({
    List? data,
  }) : super(data: data);

// ....
}
And now you cant set List variable in your widget
class Datatables extends StatefulWidget {
  @override
  _DatatablesState createState() => _DatatablesState();
}

class _DatatablesState extends State<Datatables> {

  ExampleSource _source1 = ExampleSource(
    data: [
      {'typecd': 'TP1', 'typenm': 'Type 1'},
      {'typecd': 'TP2', 'typenm': 'Type 2'},
      {'typecd': 'TP3', 'typenm': 'Type 3'},
      {'typecd': 'TP4', 'typenm': 'Type 4'},
      {'typecd': 'TP5', 'typenm': 'Type 5'},
    ]
  );

// ....

}
If you want to add data dynamicaly from button or anything, you can call method add or addAll. And if you want to update you call method put for remove call method remove or removeAt
// ...
    TextButton(
      onPressed: () {
        _source1.add({'typecd': 'TP1', 'typenm': 'Type ${_source1.datas.length}'});
      },
      child: Text('Add Row'),
    )
// ...