Enable Google Analytics for all Flutter platforms: Android, iOS, macOS, Web, Windows, and Linux.
The official Flutter plugin for Firebase Analytics (which uses Google Analytics behind the scenes) works with 4 platforms (Android, iOS, macOS, and Web). For Windows and Linux, there's no out-of-the-box support.
Ambilytics Flutter plugin solves this issue by enabling Google Analytics 4 (GA4) Measurement Protocol for unsupported platforms (Windows and Linux) and creating a unified interface that abstracts away interaction with 2 different analytics backends:
- Google/Firebase Analytics
- You enable and configure it for any of the required platforms (Android, iOS, macOS, Web)
- Note: as of July 2023 macOS is in Beta and may be displayed as iOS platform in Firebase/Google Analytics consoles, choose proper Data Stream name for it in GA console
- GA4 Measurement Protocol
- You create a separate Web stream to track events sent from Windows/Linux
By creating Firebase project, configuring Google Analytics account, importing the package (and optionally setting navigation observer) you get the capability to send standard and custom events to Google Analytics and see data in Reports.
Product analytics made easy (and ambient).
Features
- Unified analytics interface for all Flutter platforms
- Seamless interaction with Firebase Analytics and GA4 Measurement Protocol
- Automatic app start and screen view event tracking
app_startcustom event is sent during initialization,platformparameter contains name of the platform- When
AmbilyticsObserveris configuredscreen_viewis sent on Firebase platforms along withscreen_view_custvia Measurement Protocol (either for all platforms or only Windows/Linux, configurable)
- Custom event tracking
- Configurable navigation observer for easy integration
- It can register
showDialog()actions as navigation events
- It can register
- Disable analytics in one place, e.g. according to user changing preferences (a checkbox to share analytics)
Check /example folder for usage detail.
Challenges
Measurement Protocol can't be a complete replacement for the default Google Analytics backend:
- Limited standard reports in GA4 for unsupported platforms
- You might need to create custom dimensions and customize standard reports
- Measurement protocol doesn't support sending standard events, e.g. instead if
screen_viewevents sent via Firebase, a custom eventscreen_view_custis sent (with screen name param).- This make standard Events report not useful for all 6 platforms. Yet the package allowed sending both events, which make it possible to create a custom report that can track screen views across all platforms.
- No automatic geo, demographic, and language data collection for Measurement Protocol
Hence the philosophy of this package: complete analytics for the platforms supported by Firebase and essential events from unsupported platforms (Windows and Linux).
Configuring Ambilytics
Historically Firebase Analytics was used for app analytics on iOS/Android and Google Analytics for web. Now they are integrated. In order to proceed you'll need a Google Account. Using this account you will set-up a project in Firebase Console which will be linked to an account/property in Google Analytics. All reports will be available in Google Analytics Console.
The workflow has 2 steps:
- Configuring Firebase Analytics for complete reporting on any of the 4 platforms (Android, iOS, macOS, Web)
- Configuring Measurement Protocol for essential analytics on Windows and Linux
Configuring Firebase
Bellow you can find instructions for 2 scenarios:
- Adding analytics from scratch
- Adding it to existing Flutter app using Firebase Analytics
a) Setup from scratch
The below instructions are based on this manual: https://firebase.google.com/docs/flutter/setup?platform=ios
Prepare command-line tools
- Install the Firebase CLI (https://firebase.google.com/docs/cli#setup_update_cli)
- Log into Firebase using your Google account by running the following command:
firebase login
- you can logout via
logoutcommand and than repeat thelogincommand to change the account
- Install the FlutterFire CLI by running the following command from any directory:
dart pub global activate flutterfire_cli
- you might need to add the cli to path, e.g.
export PATH="$PATH":"$HOME/.pub-cache/bin"for macOS
Configure Firebase/Google Analytics for each target platform
- In terminal change directory to your Flutter project
- Run Firebase core initialization script
flutterfire configure
- Fix macOS networking. Edit
macos\Runner\DebugProfile.entitlementsandmacos\Runner\Release.entitlementsand addcom.apple.security.network.client, e.g.:
	...
  <key>com.apple.security.network.client</key>
	<true/>
</dict>
</plist>
- Modify and use the generated
firebase_options.dartto initializeAmbilytics(see here)
- You need to remove unnecessary platforms from the generated file to avoid error:
  static FirebaseOptions get currentPlatform {
  if (kIsWeb) {
    return web;
  }
  switch (defaultTargetPlatform) {
    case TargetPlatform.android:
      return android;
    case TargetPlatform.iOS:
      return ios;
    case TargetPlatform.macOS:
      return macos;
    default:
      return macos;
  }
}
- Open Firebase Console (https://console.firebase.google.com/) and choose used above project. Click
Analytics->Dashboardtab to the left, clickEnable Google Analyticsbutton. You will be presented with a wizard that will link Google Analytics account to Firebase project. At the last stepAdd the Google Analytics SDKjust clickFinishbutton asflutterfire configurecommand above has already taken care of that.
At this point you have Firebase/Google Analytics setup for up-to 4 platforms (Android, iOS, macOS and web). Next you need to Configure Measurement Protocol to cover Windows and Linux and Start using Ambilytics in your app and start sending events.
Notes:
- Running the command will show the list of existing Firebase projects to choose one OR will suggest to create a new project.
- Firebase Analytics requires native projects to be configured. I.e. various plists for macOS/iOS, google-services.json for Android etc. The above command takes care of that
- You can have each platform configured individually/manually without any CLI (e.g. follow the instructions from Firebase console/Google Analytics console on configuring each native part individually) - though CLI seems easier and less error-prone
- Each time a new platform is added to Flutter app you need to rerun the above command
- App ID, API keys etc. will be saved to a newly created
firebase_options.dartfile - This step only covers Android, iOS, macOS and Web platforms
- You can skip Firebase set-up and have all 6 platforms using Measurement Protocol (assuming the challenges mentioned above)
Here's an example for `flutterfire configure` output:
user@users-MacBook-Pro example % flutterfire configure
i Found 4 Firebase projects.
✔ Select a Firebase project to configure your Flutter application with · <create a new project>
✔ Enter a project id for your new Firebase project (e.g. my-cool-project) · ambilytics-example
i New Firebase project ambilytics-example created successfully.
✔ Which platforms should your configuration support (use arrow keys & space to select)? · ios, macos, web, android
i Firebase android app com.example.example is not registered on Firebase project ambilytics-example.
i Registered a new Firebase android app on Firebase project ambilytics-example.
i Firebase ios app com.example.example is not registered on Firebase project ambilytics-example.
i Registered a new Firebase ios app on Firebase project ambilytics-example.
i Firebase macos app com.example.example.RunnerTests is not registered on Firebase project ambilytics-example.
i Registered a new Firebase macos app on Firebase project ambilytics-example.
i Firebase web app ambilytics_example (web) is not registered on Firebase project ambilytics-example.
i Registered a new Firebase web app on Firebase project ambilytics-example.
? The files android/build.gradle & android/app/build.gradle will be updated to apply Firebase configuration and gradle build plugins. Do you want to cont
✔ The files android/build.gradle & android/app/build.gradle will be updated to apply Firebase configuration and gradle build plugins. Do you want to continue? · yes

Firebase configuration file lib/firebase_options.dart generated successfully with the following Firebase apps:

Platform  Firebase App Id
web       1:777853418226:web:69da4a4f2a495cbc99cdeb
android   1:777853418226:android:d5ffad29eb40783199cdeb
ios       1:777853418226:ios:5e6533e94fef227899cdeb
macos     1:777853418226:ios:e32e65cdbc373d6599cdeb

Learn more about using this file and next steps from the documentation:
 > https://firebase.google.com/docs/flutter/setup
b) Adding to Flutter app already using Firebase Analytics
Given you have been using Firebase Analytics plugin, native platforms are already set (the above a) step is not necessary), you are using FirebaseAnalytics.logEvent() to send events and FirebaseAnalyticsObserver to plug-in to navigation events. In this case in order to switch to Ambilytics you have to:
- Enable Measurement Protocol as described below
- Replace all occurrences of
FirebaseAnalytics.logEvent()withsendEvent()from this package and replaceFirebaseAnalyticsObserverwithAmbilyticsObserver. See using Ambilytics in your app
Measurement Protocol
To enable essential data sent from Windows and Linux you will have to create a new Web stream in Google Analytics to accept events sent via Measurement Protocol.
- Go to Google Analytics Console (https://analytics.google.com/analytics/web/)
- At the top left corner check that you're using the right property
- Given that you have already setup Firebase platforms (as described above) make sure to choose the configure property in order to have data in one place for all platforms
- Click Admin (gear icon at the bottom left) -> Data Stream ->
Add streambutton ->Web
- Enter any URL and choose stream name (e.g. 'Windows-Linux')
- Skip installation instructions
- Copy
Measurement ID - Click
Measurement Protocol API secretsin the same view below. Create a new API secret and copy it. - Both values must be provided to
init()method to get Measurement Protocol working (see next section)
Using Ambilytics in your app
- Add
firebase_coreandambilyticspackages todependenciessection ofpubspec.yaml:
dependencies:
dependencies:
  flutter:
    sdk: flutter
  cupertino_icons: ^1.0.2
  firebase_core:
  ambilytics:
- Import Ambilytics:
import 'package:ambilytics/ambilytics.dart' as ambilytics;
- In the
mainfunction add initialization call:
void main() async {
  // This one
  await ambilytics.initAnalytics(
      measurementId: 'G-6R363DDKTZ',
      apiSecret: 'uzUv6h_iRS6hEt_sIVtTTA',
      firebaseOptions: DefaultFirebaseOptions.currentPlatform);
  runApp(const MyApp());
}
- it's assumed that you have
firebase_options.dartgenerated byflutterfire(see above) withDefaultFirebaseOptionsclass defined there - you've setup Measurement Protocol as described above provided correct
measurementIdandapiSecret
- If you want to track navigation events, add navigator observer to
MaterialApp, e.g.:
class MyApp extends StatelessWidget {
  const MyApp({super.key});

  @override
  Widget build(BuildContext context) {
    return MaterialApp(
      title: 'Flutter Demo',
      theme: ThemeData(
        primarySwatch: Colors.blue,
      ),
      // Here
      navigatorObservers: ambilytics.isAmbilyticsInitialized
          ? [
              ambilytics.AmbilyticsObserver(
                  routeFilter: ambilytics.anyRouteFilter,
                  alwaySendScreenViewCust: true)
            ]
          : [],
      routes: {
        '/': (context) => HomeScreen(
              title: 'Home',
              analyticsError: ambilytics.initError,
            ),
        '/color/red': (context) => const ColorScreen(),
        '/color/yellow': (context) => const ColorScreen()
      },
    );
  }
}
- You can send custom events via Ambilytics
sendEventfunction:
  void _incrementCounter() {
    setState(() {
      _counter++;
      // Here
      ambilytics.sendEvent(counterClicked, null);
    });
  }
Using Reports
The reports can be seen in both Google Analytics Console (https://analytics.google.com/analytics/web/) and Firebase Console (https://console.firebase.google.com/).
Ambilytics custom events
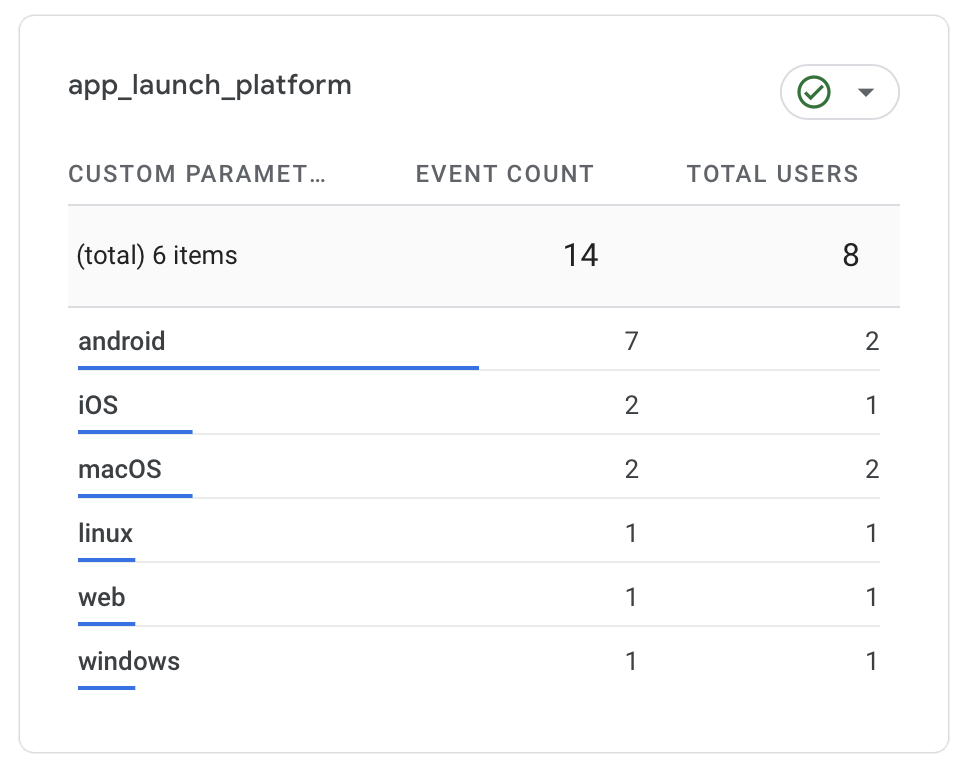
The package automatically sends 2 custom events:
app_launch- sent upon initialization of Ambilytics. Containsplatformparameters with the name of the platform where the app is built.screen_view_cust- sent via navigation observer upon navigation events (such as pushing a new route via Navigator API). Since Google Analytics doesn't allow sending predefined events (such asscreen_view) via its'logEvent()this event is used for Windows and Linux as substitute for standard event. The events hasscreen_namewhich is set to route name (Route.settings.name)- You can use
AmbilyticsObserver.alwaySendScreenViewCustparameter to have this custom event sent along with standardscreen_viewwith any of the Firebase platforms
- You can use
Seeing custom events' params
Parameters of custom events (the above 2 and all sent via sendEvent()) by default can only be seen in Realtime view. For other reports a custom dimension must be created:
- Admin (gear icon at the bottom left) -> Custom definitions -> Create custom dimensions -> type in dimension name and param -> go to reports and pick custom dimension.
- Note that you don't have to type in event name, just a description name of dimension AND exact name of parameter
- Make sure you add dimensions for params of
app_launchandscreen_view_cust- E.g. create
app_launch_platformdimension withplatformparam andscreen_view_cust_screenwithscreen_nameparameter
- E.g. create
Quote from Google docs: To see the event parameter values, you must create a custom dimension or metric for each event parameter. Once Analytics processes the custom dimension or metric, you can add it to your custom reports, audiences, explorations, and segments, and as secondary dimensions in standard reports."
Note that up to 1 day might be required to get updated data in reports outside Realtime view.
After that you should be able to see custom events and their params in reports, e.g. pick Engagement -> Events and click + sign in the Event name column and choose Custom -> [Dimension you created]
Known issues/Troubleshooting
1. Can't build macOS/iOS project with 'Error run pod install' or alike
In terminal go to macOS or iOS folder, remove Podfile.lock and run pod repo update
2. Android build fails (:app:mapReleaseSourceSetPaths)
If you get error
Execution failed for task ':app:mapReleaseSourceSetPaths'.
> Error while evaluating property 'extraGeneratedResDir' of task ':app:mapReleaseSourceSetPaths'
Go to android/build.gradle and update com.google.gms:google-services version, e.g.:
    dependencies {
        classpath 'com.android.tools.build:gradle:7.3.0'
        // START: FlutterFire Configuration
        classpath 'com.google.gms:google-services:4.3.15'
        // END: FlutterFire Configuration
        classpath "org.jetbrains.kotlin:kotlin-gradle-plugin:$kotlin_version"
    }
3. Android build fails (minSdkVersion mismatch)
Go to android/app/build.gradle and change minSdkVersion version from flutter.minSdkVersion to 19.
4. No data in Google Analytics reports
All reports outside Realtime can take up to a day to be in sync
5. No data in Realtime reports (on Android, iOS)
For mobile platforms (Android, iOS) Firebase Analytics uploads/processes data in batches, i.e. it takes some time to collect and than send and display it (presumably for battery saving). As a result you get jagged events (i.e. some come right away, some take time).
5. No data in reports from macOS clients
Check the above manual for Fix macOS and update DebugProfile.entitlements and Release.entitlements
6. A Firebase App named "[DEFAULT]" already exists error
Likely reason for that is that you already used FirebaseAnalytics with configured native projects and started using FirebaseOptions.
You can try deleting android/app/src/google-services.json, ios/Runner/GoogleService-Info.plist and macos/Runner/GoogleService-Info.plist files and rerun flutterfire configure
7. Error initialising Firebase on a Linux or Windows environment
You may see this error: Unhandled Exception: Unsupported operation: DefaultFirebaseOptions are not supported for this platform.
This occurs when you build with the firebaseOptions in the config when building to Linux or Windows. You could conditionally add this config option if you do need to build to different environments if required.
However, Firebase config is not necessary, so perhaps if you want to use the Measurement Protocol exclusively or you are only building to a Linux and Windows environment, you can leave out the firebaseOptions config entirely...
ambilytics.initAnalytics(
    measurementId: 'G-6R363DDKTZ',
    apiSecret: 'uzUv6h_iRS6hEt_sIVtTTA',
);