OkHi Flutter
The official OkHi Flutter library will enable you to start collecting and verifying your user's addresses.
Prerequisites
OkHi Client Key and Branch Id
First you need to obtain your OkHi client key and branch ID. You can get these by signing up here. Use your sandbox keys while you test and develop, and your production mode keys before you publish your app.
Android
Change your minSdkVersion target
This library targets android devices >= SDK 20. Make sure you're targeting at-least the same by modifying your android/build.gradle file
minSdkVersion = 20
Add necessary permissions to your AndroidManifest.xml
<manifest ...>
<uses-permission android:name="android.permission.ACCESS_FINE_LOCATION" />
<uses-permission android:name="android.permission.ACCESS_COARSE_LOCATION" />
<uses-permission android:name="android.permission.ACCESS_BACKGROUND_LOCATION" />
<uses-permission android:name="android.permission.ACCESS_NETWORK_STATE" />
<uses-permission android:name="android.permission.INTERNET" />
...
<application>
...
</application>
</manifest>
If you're targeting Android versions >= 8 and you're using the OkVerify library you need to make sure your users select on "Allow always" when granting permissions otherwise the verification process won't work.
iOS
Enable background mode in your application
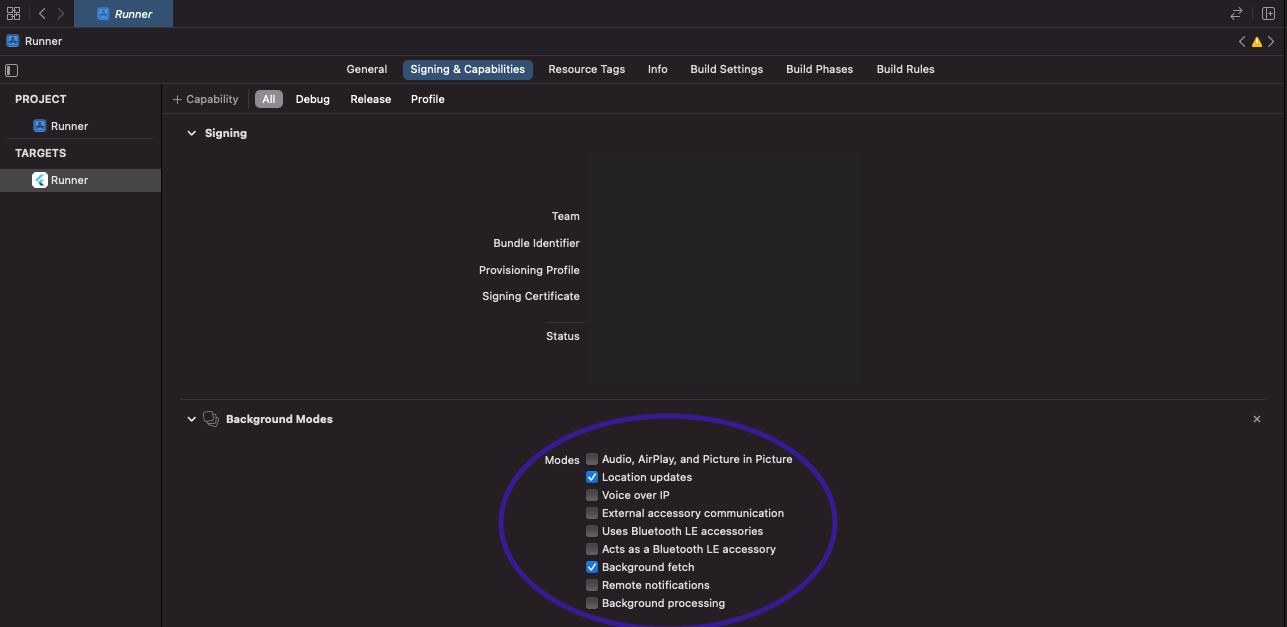
OkHi obtains verification signals in the background, to enable this make sure to add "Location updates" and "Background fetch" to your Background Modes under Signing & Capabilities of your target.
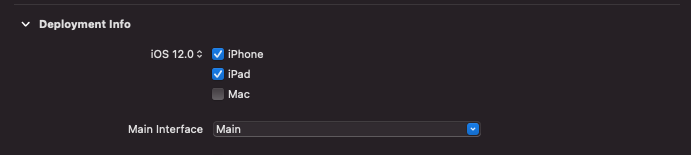
Change your deployment target
All OkHi Flutter libraries target ios devices >= 12. Make sure you're targeting at-least the same by modifying your both your Podfile and deployment target in xcode.
Podile located under: ios/Podfile
platform :ios, '12.0'
Add necessary permissions to your Info.plist
<key>NSLocationWhenInUseUsageDescription</key>
<string>String that explains why you need when in use location permission</string>
<key>NSLocationAlwaysAndWhenInUseUsageDescription</key>
<string>String that explains why you need always location permission</string>
Installation
Run the bellow command in the root directory of your flutter project.
flutter pub add okhi_flutter
Usage
Initialization
class MyApp extends StatefulWidget {
  const MyApp({Key? key}) : super(key: key);

  @override
  State<MyApp> createState() => _MyAppState();
}
class _MyAppState extends State<MyApp> {
  @override
  void initState() {
    super.initState();
    final config = OkHiAppConfiguration(
      branchId: "<my_branch_id>",
      clientKey: "<my_client_key>",
      env: OkHiEnv.sandbox,
      notification: OkHiAndroidNotification(
        title: "Verification in progress",
        text: "Verifying your address",
        channelId: "okhi",
        channelName: "OkHi",
        channelDescription: "Verification alerts",
      ),
    );
    OkHi.initialize(config).then(result {
      print(result); // returns true if initialization is successfull
    });
  }

  @override
  Widget build(BuildContext context) {
    return const MaterialApp(
      home: Home(),
    );
  }
}
Address Creation and Verification
class CreateAddress extends StatelessWidget {
  const CreateAddress({Key? key}) : super(key: key);

  @override
  Widget build(BuildContext context) {
    return Scaffold(
      appBar: AppBar(
        title: const Text("Create an address"),
      ),
      body: OkHiLocationManager(
        user: OkHiUser(phone: "+254712345678"),
        onSucess: (response) async {
          print(response.user) // user information
          print(response.location) // address information
          await response.startVerification(null) // start verification with response
        },
        onError (error) {
          print(error.code)
          print(error.message)
        }
      ),
    );
  }
}
Documentation
Libraries
- models/okhi_app_configuration
- models/okhi_constant
- models/okhi_env
- models/okhi_exception
- okhi_flutter
- models/okhi_location
- okcollect/okhi_location_manager
- models/okhi_location_manager_configuration
- models/okhi_location_manager_response
- models/okhi_native_methods
- models/okhi_notification
- models/okhi_user
- models/okhi_verification_configuration