ml_translator 0.0.2  ml_translator: ^0.0.2 copied to clipboard
Easy code generation for app translations using google_mlkit_translation.
Welcome to a very early version of MlTranslator. Translation generator and live translator for over 70 languages.
Motivation #
As developers, we want to make our applications available to the largest possible audience and ensure comfortable use by supporting many languages, but manual translation takes a lot of time. Especially during application development, when we need to add new phrases to files appropriate for each language. And even then, we are limited to the languages offered by the API we use.
Under the hood, MlTranslator uses the google_mlkit_translation package and its language models for machine translation. google_mlkit_translation.
Of course, these translations are not perfect, and therefore it is possible to provide your own translations for phrases that cause problems for the translator.
Benefits #
- automatic translations into over 70 languages
- text translations on the fly - e.g. from API or messages, etc.
- automatic device language detection
- out of the box saving the selected language
- ability to reach a wider audience
- time saving
How does it work #
.gif)
Device language detection #
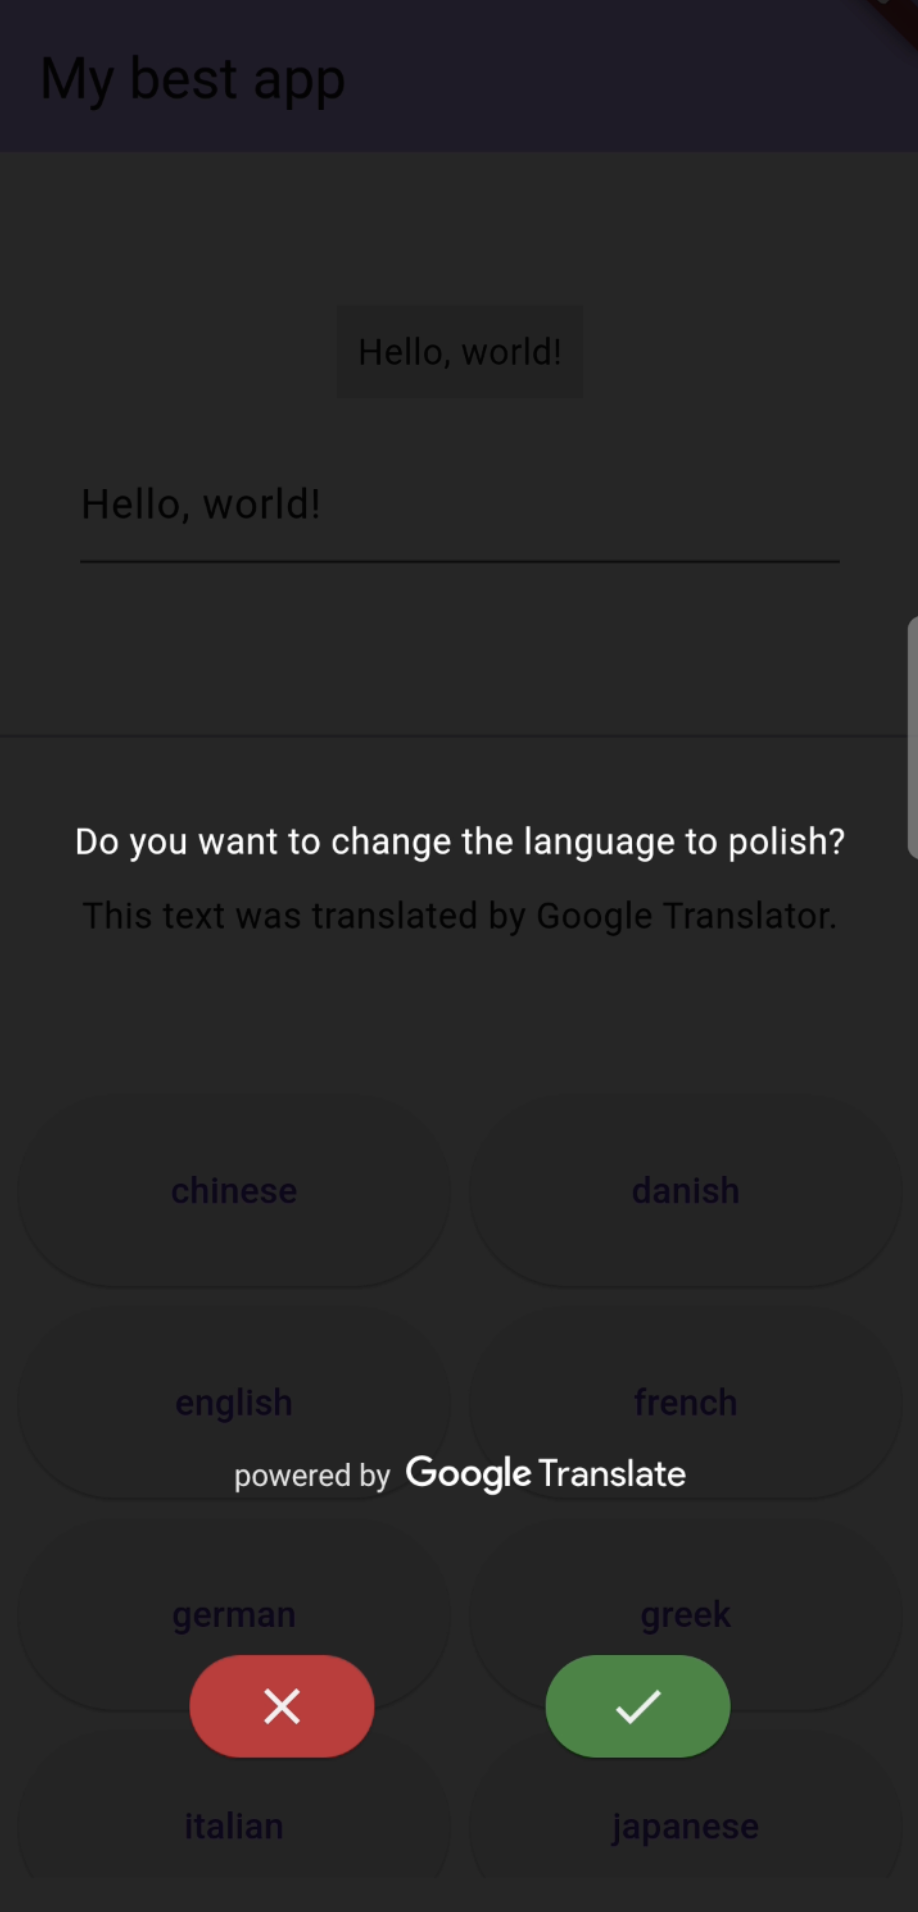
By default, MlTranslator will try to detect the device language and if it is on the supported list, it will show a dialog asking whether to translate with the application.
App translation #
If the user decides to translate, information about downloading the language model and translation will be displayed. MlTranslator will save the selected language, so you don't need your own implementation of this setting.
To translate the application into another language - chinese in this case, simply call:
Translator.of(context).translateTo(TranslationLanguage.chinese);
Translations on the fly #
Use the Translatedtext widget and pass the text you want to translate to it.
Attribution #
Since MlTranslator uses Google Translate under the hood, attribution is required according to the rules available here. For this reason, the device language detection dialog, the model download dialog, and the TranslatedText widget are not customizable.
Supported languages #
MLTranslator can translate between the following languages.
Getting started #
flutter pub add ml_translator
flutter pub add dev:build_runner
flutter pub add dev:ml_translator_generator
This installs three packages:
- build_runner - to run code-generator
- ml_translator_generator - the code generator
- ml_translator - a package containing annotations and utils for generated code.
Requirements and platforms setup #
MlTranslator has the same requirements and platform setup as google_mlkit_translation.
iOS #
- Minimum iOS Deployment Target: 12.0
- Xcode 13.2.1 or newer
- Swift 5
- ML Kit does not support 32-bit architectures (i386 and armv7). ML Kit does support 64-bit architectures (x86_64 and arm64). Check this list to see if your device has the required device capabilities. More info here.
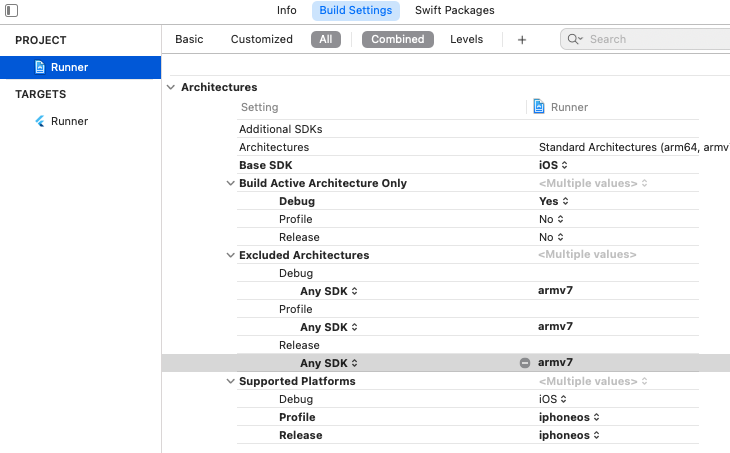
Since ML Kit does not support 32-bit architectures (i386 and armv7), you need to exclude armv7 architectures in Xcode in order to run flutter build ios or flutter build ipa. More info here.
Go to Project > Runner > Building Settings > Excluded Architectures > Any SDK > armv7
Your Podfile should look like this:
platform :ios, '12.0'  # or newer version

...

# add this line:
$iOSVersion = '12.0'  # or newer version

post_install do |installer|
  # add these lines:
  installer.pods_project.build_configurations.each do |config|
    config.build_settings["EXCLUDED_ARCHS[sdk=*]"] = "armv7"
    config.build_settings['IPHONEOS_DEPLOYMENT_TARGET'] = $iOSVersion
  end

  installer.pods_project.targets.each do |target|
    flutter_additional_ios_build_settings(target)

    # add these lines:
    target.build_configurations.each do |config|
      if Gem::Version.new($iOSVersion) > Gem::Version.new(config.build_settings['IPHONEOS_DEPLOYMENT_TARGET'])
        config.build_settings['IPHONEOS_DEPLOYMENT_TARGET'] = $iOSVersion
      end
    end

  end
end
Notice that the minimum IPHONEOS_DEPLOYMENT_TARGET is 12.0, you can set it to something newer but not older.
Android #
- minSdkVersion: 21
- targetSdkVersion: 33
- compileSdkVersion: 33
Usage #
Create translation model #
Consider creating a model in English. This will give you the best translation results into other languages. Also, if you use TranslatedText widget to translate, e.g. data from the REST API, it will make things easier because it is easiest to find materials in English.
// import this package
import 'package:ml_translator/ml_translator.dart';

// declare the part '*.translator.dart'; - this is where the generated classes and widgets will be saved
part 'my_class.translator.dart';

// annotate your class and declare language
@MlTranslator(sourceLanguage: 'en')
class MyClass with _$MyClass {
  const factory MyClass({
    // use @Val('Original text') to annotate every single constructor field
    @Val(
      'My best app',
      // description field is optional and will be shown in the tooltip in your IDE
      description: 'My awesome title',
      // fields marked with a language code, e.g. pl, da, etc., are used to define your own translations
      // and if they are not null, their value will be used as the translation
      pl: 'Mój customowy tytuł',
    )
    String title,
    @Val('This text was translated by Google Translator.') String bodyText,
    @Val('italian') String italian,
    @Val('japanese') String japanese,
    @Val('korean') String korean,
    @Val('polish', pl: 'polski') String polish,
    @Val('spanish', pl: 'hiszp') String spanish,
  }) = _MyClass;
}
Run the generator #
To run the generator once, execute this command in your project folder
dart run build_runner build --delete-conflicting-outputs
To let the build_runner observe your project and generate new code whenever you save changes to annotated classes, run:
dart run build_runner watch --delete-conflicting-outputs
Remember that if you update the translation model, you must run code generation again.
Initialize the translator #
To use the Translator, import the translation model
import 'package:my_package/my_class.dart';

void main() async {
  WidgetsFlutterBinding.ensureInitialized();

  await Translator.init();

  runApp(const MyApp());
}
Use generated Translator widget #
Wrap MaterialApp with generated Translator. Use Translator widget only once in your app!
class MyApp extends StatelessWidget {
  const MyApp({super.key});

  @override
  Widget build(BuildContext context) {
    return Translator(
      builder: (context, state) {
        return MaterialApp(
          // state gives access to translations
          title: state.title,
          theme: ThemeData(
            colorScheme: ColorScheme.fromSeed(
              seedColor: Colors.deepPurple,
            ),
          ),
          // provide the MaterialApp parameters necessary for the translator
          locale: state.locale,
          supportedLocales: state.supportedLocales,
          localizationsDelegates: state.localizationsDelegates,
          //
          home: const MyHomePage(),
        );
      },
    );
  }
}
Use translations #
You can access the translations via Translator.of(context):
child: Text(
  Translator.of(context).bodyText,
),
To inject value into string declare constructor field:
@Val('You have %s items in the cart') String itemsInCart,
So it can be reached as following:
child: Text(
  Translator.of(context).itemsInCart('5'),
),
Changing the language #
To translate the app into another language - german in this case, simply call:
Translator.of(context).translateTo(TranslationLanguage.german);
This will download the language model and translate the application. The translations and the selected language will be saved and used during subsequent launches of the application - the translation dialogue will not appear.
If you update the translation model, e.g. in a new version or during development, the first time you run it after the update, a dialog will appear informing about the application's translation, with the difference that this time no data download will be required. The previously saved language model will be used.
Automatic device language detection #
By default, MlTranslator will try to detect the language of the device and if it is one of the supported languages, it will propose a translation by showing a dialogue.
If you want to disable this behavior, set detectDeviceLanguage: false in the Translator widget config as shown below:
 @override
  Widget build(BuildContext context) {
    return Translator(
      detectDeviceLanguage: false,
      builder: (context, state) {
        return MaterialApp(
          //...
        );
      },
    );
  }
On the fly translation #
Easily translate text entered by the user or downloaded from the API.
TranslatedText(
  text: _controller.text,
  style: const TextStyle(fontSize: 16),
  // attribution image type [color, greyscale, white]
  imageType: ImageType.greyscale,
  // translation indicator params
  shimmerPeriod: const Duration(milliseconds: 1500),
  shimmerBaseColor: Colors.yellow,
  shimmerHighlightColor: Colors.blue,
)
Further plans #
- adding the ability to customize dialogues
- adding an element from which to select the language - perhaps ModalBottomSheet
- unit tests of the generator
Metadata
Publisher
Metadata
Easy code generation for app translations using google_mlkit_translation.
Homepage
Repository (GitHub)
View/report issues
Documentation
License
![]() MIT (LICENSE)
MIT (LICENSE)
Dependencies
flutter, flutter_localizations, google_mlkit_translation, hive, hive_flutter, shimmer